
Ever caught a strange, unpleasant whiff coming from a sink and wondered where on earth it was coming from?The culprit is often a problem with a simple but brilliant piece of plumbing called a P-trap. It’s that U-shaped pipe tucked away under every sink, shower, and floor drain in your home.
The Unsung Hero of Your Home’s Plumbing
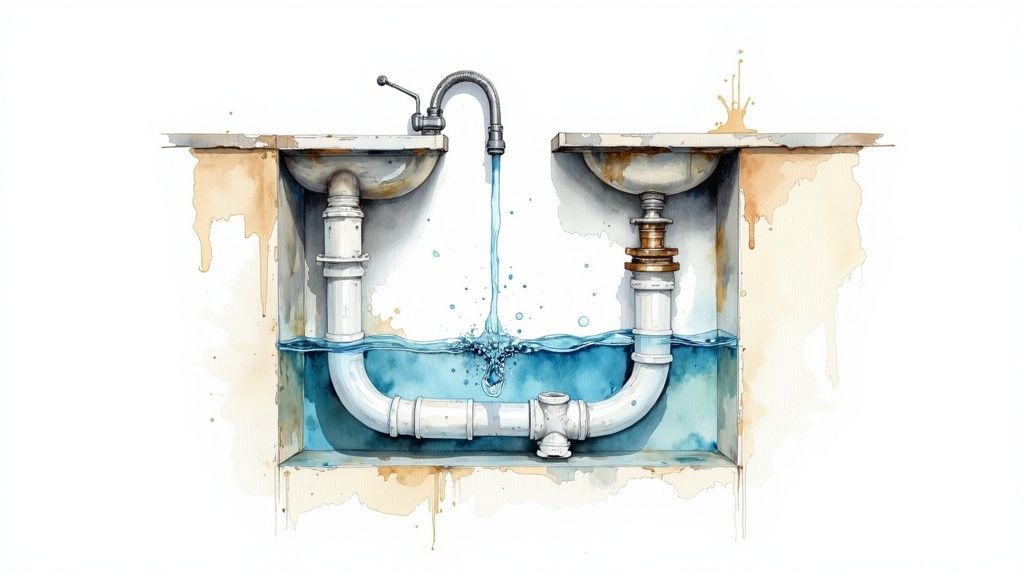
At its core, the P-trap is the silent guardian of your home’s air quality. Its main job is to hold a small amount of water in its bend after you run the faucet or flush the toilet. This little plug of water is more important than you might think.
This water seal creates a physical barrier, effectively blocking foul—and potentially hazardous—sewer gases from creeping up your pipes and into your kitchen or bathroom. It’s a beautifully simple solution to a major sanitation problem.
Without this water barrier, there’d be an open invitation for all the nasty smells from the main sewer line to enter your home. That alone makes the P-trap an absolutely essential part of any modern plumbing system.
More Than Just Blocking Odors
The P-trap does more than just control odors. That signature dip in the pipe also serves as a handy catch-all for small, heavy objects that accidentally go down the drain. Think wedding rings, earrings, or small toy parts.
Instead of being lost forever to the sewer system, these items settle at the bottom of the trap. With a bucket placed underneath, you can often just unscrew the connections and retrieve your lost valuable. It’s a small feature that can be a real lifesaver.
This image breaks down the three core functions of a P-trap.
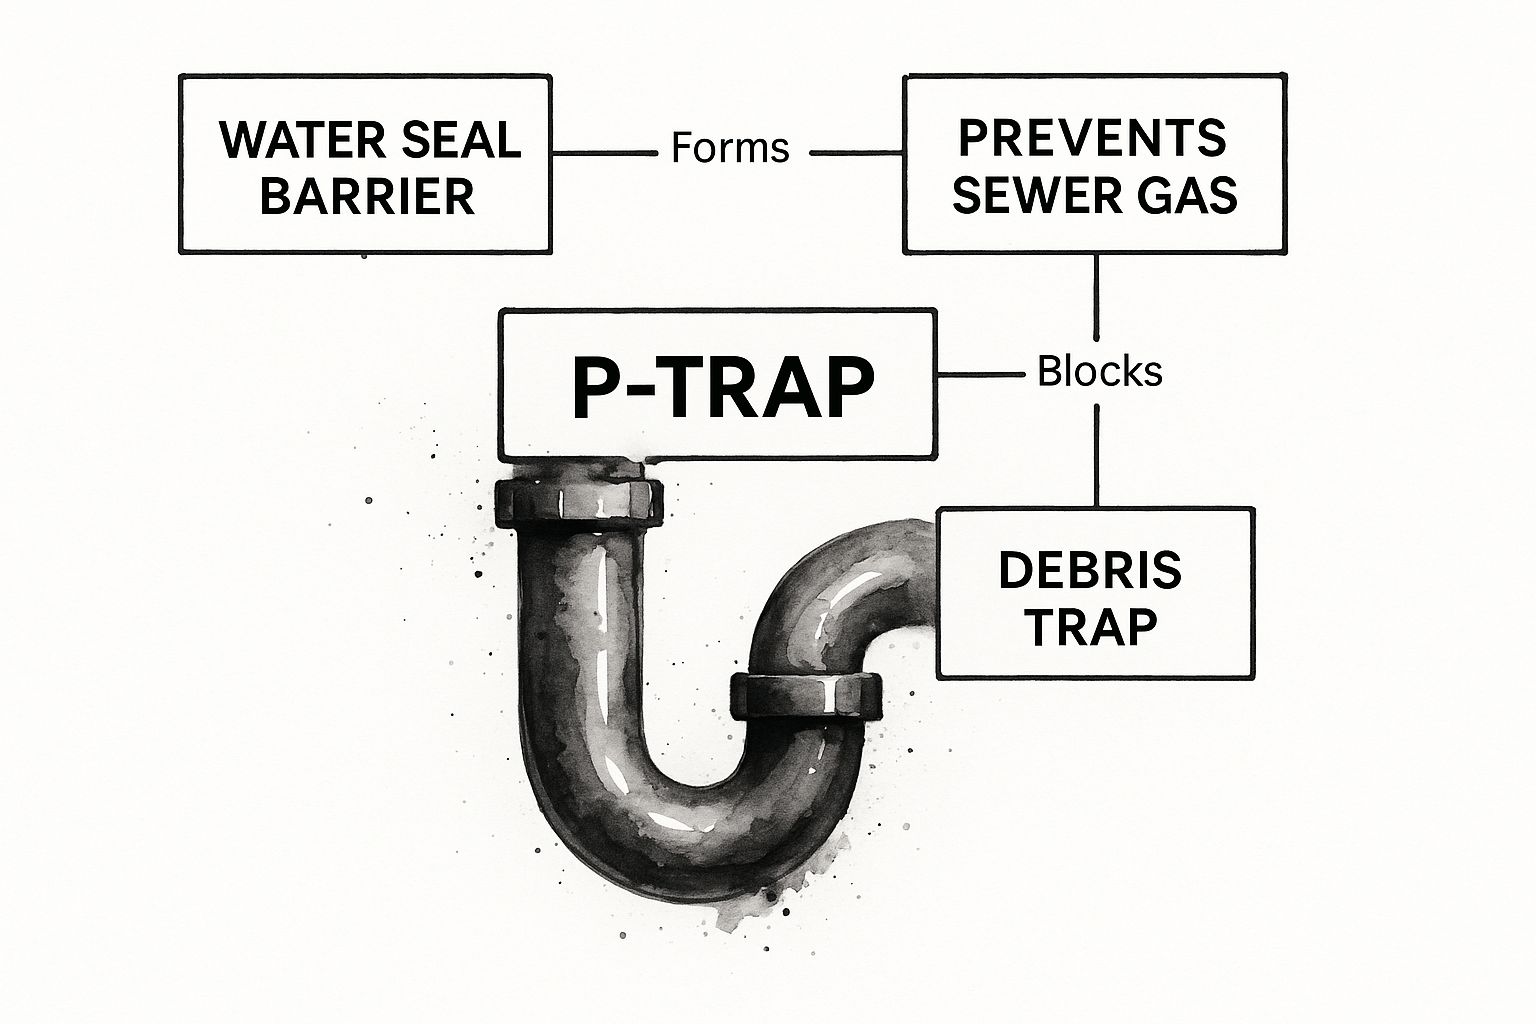
As you can see, the design is key. It allows the trap to hold water, block gases, and catch debris all at once.
To quickly summarize its role, here’s a look at the P-trap’s key functions and features.
P-Trap at a Glance Key Functions and Features
| Feature | Primary Function |
|---|---|
| Water Seal | Holds water to create an airtight barrier against sewer gases. |
| U-Shaped Bend | The physical design that allows water and small objects to be trapped. |
| Debris Trap | Catches small, heavy items dropped down the drain, allowing for retrieval. |
| Vent Connection | Connects to the plumbing vent system to maintain pressure and prevent siphoning. |
This simple device truly packs a punch, performing several vital jobs simultaneously to keep your plumbing working smoothly and your home safe.
A Quick Look at P-Trap History
The P-trap we use today is a refined version of earlier designs. It was a significant improvement on the S-trap, which was patented way back in 1775 by Alexander Cummings. The problem with the S-trap was that it could easily siphon itself dry, rendering the water seal useless.
Fast forward to 1880, when Thomas Crapper developed the more reliable U-bend. In the U.S., this design came to be known as the P-trap because when you look at the entire assembly from the side—including the vertical pipe coming from the sink and the horizontal pipe going into the wall—it looks like the letter “P.” If you’re interested, you can dig deeper into this fascinating journey through plumbing history.
Why Every Drain Needs This Essential Safeguard
That simple U-shaped pipe under your sink? It’s called a P-trap, and it’s one of the most brilliant—and non-negotiable—pieces of plumbing in your entire home. It’s not just a random curve in the drain line; it’s a vital barrier that protects your family’s health and safety every single day.
Its main job is to stop harmful sewer gases from creeping up your drains and into your living spaces. These aren’t just stinky fumes; they’re a nasty cocktail of gases like flammable methane and toxic hydrogen sulfide (the source of that tell-tale “rotten egg” smell). Exposure can cause everything from headaches and dizziness to more serious health problems, making the humble P-trap an essential guardian of your home’s air quality.
Think about that rarely-used floor drain in the basement or laundry room. Over time, the water held in the P-trap’s curve can evaporate. Once that water seal is gone, there’s nothing stopping noxious, dangerous gases from seeping directly into your home.
A Cornerstone of Public Health
The P-trap we rely on today is a direct result of major public health breakthroughs. Modern plumbing itself was born from the health crises of rapidly growing cities. Back in the mid-19th century, London was hit with devastating cholera outbreaks, largely because of awful sanitation. The situation got so bad that the infamous “Great Stink” of 1858 finally forced the city to build a modern sewer system.
A key part of that overhaul was incorporating traps to block sewer gas from flowing back into buildings. These simple innovations were game-changers for public health and hygiene. This direct link to safety is why plumbing codes, like the Uniform Plumbing Code (UPC), strictly require a P-trap on every single fixture drain. No exceptions.
A P-trap isn’t just a good idea for stopping bad smells; it’s a legally required safety device designed to protect everyone inside a building. Its installation is one of the most fundamental rules in plumbing.
Keeping Your Drains Healthy
While P-traps are amazing at blocking gases, their shape also helps them catch stray debris, which can prevent deeper clogs. But they can’t do all the work on their own. As a homeowner, understanding how to prevent clogged drains is a smart, proactive step toward keeping your entire plumbing system flowing smoothly.
Proper installation and a little maintenance are all it takes to keep your P-trap working as it should. For a deeper dive, check out our complete guide.
Read also: https://professional-plumbers-denver.com/blogs/what-is-p-trap/
Ultimately, that small, unassuming pipe is one of the most important safety features you have.
Choosing the Right P-Trap Material and Type
Walk into the plumbing aisle of any hardware store, and you’ll see that “a P-trap” isn’t just one thing. There’s a whole wall of them. Picking the right one for your job is key to a solid, leak-free connection that will last for years. The decision really boils down to two things: the material it’s made of and its specific type.
For the vast majority of projects around the house, plastic P-traps are the undisputed king. Why? They’re affordable, surprisingly tough, and so easy to work with that you can often get a perfect seal just by hand-tightening the connections. You’ll generally find two kinds of plastic:
- PVC (Polyvinyl Chloride): This is the classic, rigid white pipe you see everywhere in modern plumbing. It’s a workhorse material—strong, long-lasting, and stands up to just about any household chemical you can pour down the drain.
- ABS (Acrylonitrile Butadiene Styrene): You’ll recognize ABS by its black color. It’s another tough plastic, very similar to PVC. The main practical difference for a DIYer is how you join it to other pipes; ABS uses a one-step cement, whereas PVC requires a two-step process with a separate primer and cement.
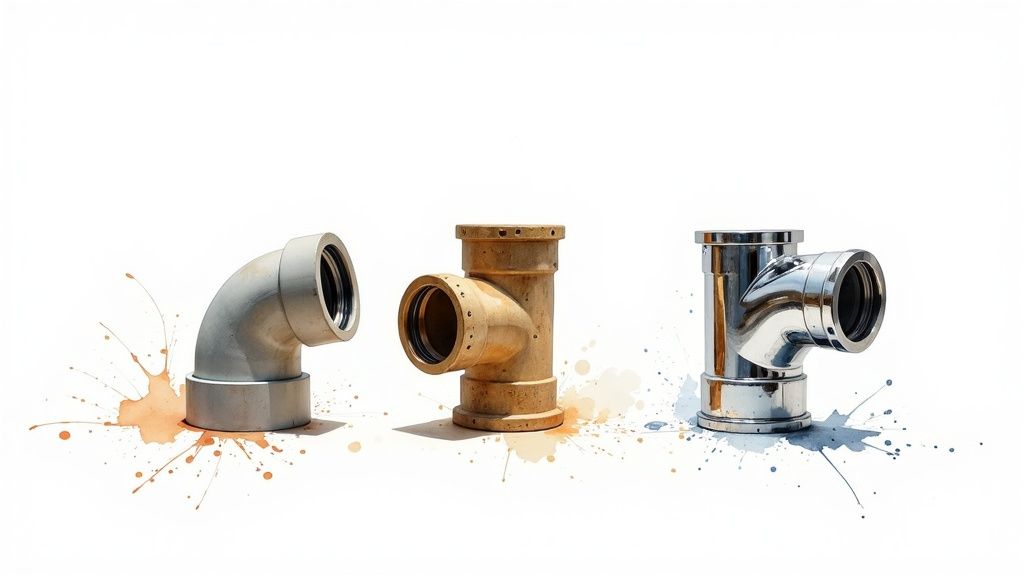
But what if your pipes are going to be out in the open? For something like a sleek pedestal sink or a floating vanity where the plumbing is part of the decor, a metal P-trap is the way to go. Chrome-plated brass is the most popular choice here. It gives you that polished, professional shine that perfectly matches your faucet and other fixtures. Yes, it costs more, and you have to be careful not to scratch the finish during installation, but for exposed plumbing, its durability and good looks are worth it.
Understanding Key P-Trap Materials
So, how do you choose? It’s a balancing act between your budget, where the trap is located, and the look you’re going for. If the pipes are tucked away inside a kitchen cabinet or bathroom vanity, the practicality and low cost of PVC make it a no-brainer. But when that plumbing is on display, chrome delivers a finish that plastic just can’t match.
Key Takeaway: The material you choose has a direct impact on how your plumbing looks and how long it lasts. Inexpensive plastic is perfect for hidden drains, while metal offers a premium finish for visible ones.
To make the decision a bit easier, here’s a quick breakdown of the common materials.
Comparison of P-Trap Materials
| Material | Pros | Cons | Best For |
|---|---|---|---|
| PVC (Plastic) | Inexpensive, durable, corrosion-resistant, easy for DIY installation. | Plain appearance, can become brittle over many years. | Kitchen sinks, bathroom vanities, laundry tubs—anywhere the trap is hidden. |
| ABS (Plastic) | Strong, simple one-step solvent welding process. | Less common in some areas, not as chemically resistant as PVC. | General drainage where local code permits its use. |
| Chrome-Plated Brass | Highly durable, polished and attractive appearance. | More expensive, can be scratched during installation, requires tools to tighten. | Exposed drains under pedestal sinks or wall-mounted vanities. |
This table should help you zero in on the best material for your specific project, whether it’s a quick fix under the sink or part of a major bathroom remodel.
The Critical Difference: P-Traps vs. S-Traps
Finally, there’s a crucial distinction you need to be aware of: the difference between a modern P-trap and its outdated cousin, the S-trap. An S-trap, true to its name, forms a complete “S” curve that drops straight down into the floor. The problem with this design is that a strong rush of water can easily siphon the entire water barrier right out of the trap. This leaves an open invitation for nasty—and dangerous—sewer gas to come right up into your home.
Because of this serious design flaw, S-traps are no longer allowed by modern plumbing codes. A properly installed P-trap connects horizontally into a vent pipe inside the wall. That vent is the secret sauce; it breaks the siphon and ensures the water seal always stays put, protecting your home.
If you have an older house and spot an S-trap under a sink, it’s something you should plan on replacing. Swapping it out for a code-compliant P-trap is a critical upgrade for a safe and properly functioning plumbing system.
Tackling Common P-Trap Problems Head-On
Even the most dependable parts of your plumbing system can act up, and the humble P-trap is no different. The good news is that most of its classic issues—annoying clogs, mystery leaks, and that unmistakable sewer gas smell—are things you can often diagnose and fix yourself. With a little confidence and the right approach, you can solve these problems without having to call in a pro right away.
The number one complaint we hear is a slow-draining or completely stopped-up sink. This is almost always caused by a gradual buildup of hair, grease, soap scum, and little bits of food that get caught in the U-shaped bend of the trap. Over time, this gunk chokes off the water flow. Before you even think about pouring harsh chemical drain cleaners down there (which can seriously damage your pipes), let’s try the hands-on approach first.
How to Clear a Stubborn Clog
Manually cleaning out the P-trap is, without a doubt, the safest and most effective way to get things flowing again. It might sound like a messy, intimidating job, but it’s surprisingly straightforward.
- Prep Your Workspace: First things first, get a bucket or a small pan and place it directly underneath the P-trap. Trust me, it’s going to catch some nasty water and gunk. Having a few old towels on hand is also a smart move.
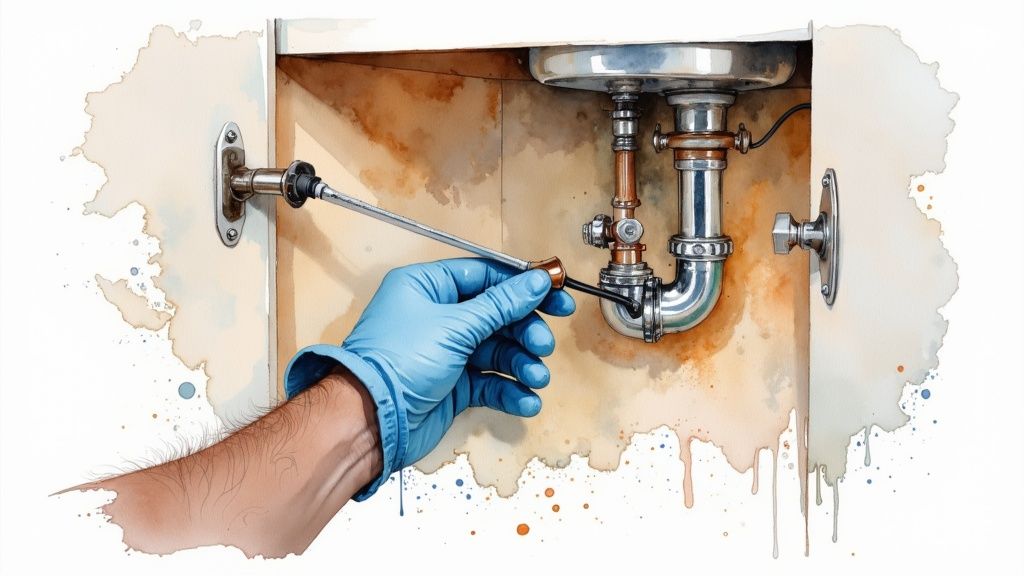
- Loosen the Nuts: Look for the two large slip nuts holding the P-trap in place—one connects to the pipe coming down from the sink (the tailpiece), and the other connects to the pipe going into the wall. If they’re plastic, you can usually get them started by hand. If they’re metal or just really stuck, a pair of channel-lock pliers will do the trick. Just be gentle so you don’t crack the plastic components.
- Remove and Clean: With the nuts loose, the P-trap should pull straight down. Tip the contents into your bucket, and then take the trap to another sink. A good scrub with a brush and some hot, soapy water will get it clean.
- Put It All Back Together: Reinstall the clean P-trap, making sure the little rubber washers are seated properly. Tighten the nuts by hand first. If you need to, give them one last gentle quarter-turn with the pliers, but don’t go crazy. Run hot water for a minute to flush everything out and, most importantly, to check for any leaks.
Fixing That Annoying Drip
A puddle of water under the sink is a dead giveaway for a P-trap leak. It’s almost always one of two culprits: the connections are loose, or a washer has failed.
Your first step is to simply check the slip nuts. Sometimes they work themselves loose over time and just need a little tightening to stop the drip. If that doesn’t do it, the rubber or plastic washers inside have likely become old, cracked, or were put in crooked. You’ll have to take the trap apart (just like for a clog) to get a look at them. If a washer looks worn out, replace it. A new set costs next to nothing and is key to creating a perfect, watertight seal.
Pro Tip: When you’re reassembling a P-trap, resist the urge to crank down on the nuts with all your might. For plastic traps especially, hand-tight is often plenty. Over-tightening can crack the nuts or squeeze the washers out of shape, causing the very leak you were trying to fix.
What to Do About That Nasty Sewer Smell
If you suddenly notice a foul, sewer-like odor coming from a sink or floor drain, the problem is almost always a dry P-trap. The water barrier that’s supposed to be there has evaporated, giving sewer gas a direct pipeline into your home. This is really common in guest bathrooms, laundry room floor drains, or any fixture that doesn’t get used very often.
Thankfully, the fix is usually incredibly simple: run the water for about a minute. This will refill the trap and bring back that protective water seal.
If the smell comes back quickly or never really goes away, you might be looking at a bigger issue, like a blocked plumbing vent. A blocked vent can create a siphon effect, pulling the water right out of the trap every time you run it. To get the full picture of why this water barrier is so important, our detailed guide explains the core purpose of a P-trap. If refilling the trap isn’t solving the problem, it’s a good time to call a professional plumber in Denver to check for a potential venting issue.
A Homeowner’s Guide to P-Trap Replacement
Replacing a P-trap is one of those plumbing jobs that’s perfect for a handy homeowner. Whether the old trap under your sink is cracked, constantly leaking, or just hopelessly clogged, swapping it out is a quick fix that delivers immediate results. Honestly, with the right parts and a bit of patience, you can get your drain back in top shape in less than an hour.
Before you even think about unscrewing anything, let’s get you prepared. A little prep work up front saves you from those annoying mid-project runs to the hardware store.
Tools and Materials Checklist
- A new P-trap kit: Your best bet is to snap a quick photo of your old setup or even bring the old parts with you. This ensures you grab the right diameter—it’s usually 1.5 inches for kitchen sinks and 1.25 inches for bathrooms.
- Bucket or small pan: This is non-negotiable. It’s going to catch the water and all the gunk that will spill out.
- Channel-lock pliers: A must-have for loosening any stubborn, old connections.
- Old towels or rags: Because drips and spills are just part of the job.
- A small brush: An old toothbrush works great for cleaning grime off the pipe connection points.
Once you have your gear laid out and ready, it’s time to dive in.
Step-by-Step Installation Process
Just take your time and follow these steps. Don’t rush it, and double-check that every connection is secure before you call it a day.
- Position Your Bucket: Slide your bucket right under the old P-trap. You’ll be glad you did.
- Remove the Old Trap: Use your hands or the channel-lock pliers to loosen the two big slip nuts on either side of the U-shaped bend. Once they’re loose, the old trap should pop right off.
- Clean the Connection Points: Take your brush and a rag and really clean the threads on the sink’s tailpiece and the drain pipe coming from the wall. A clean surface is the secret to a perfect, leak-free seal.
- Install the New Trap: Put the new P-trap together. Pay close attention to the plastic washers (gaskets)—the tapered side should always point toward the flared end of the connecting pipe.
- Tighten and Test: Hand-tighten the slip nuts until they feel snug. Now for the moment of truth: run hot water for at least a minute to check for any leaks and make sure everything is draining smoothly.
Pro Tip: When you’re working with plastic P-traps, hand-tightening is almost always enough. If you feel you need pliers, just give the nut a gentle quarter-turn past snug. It’s really easy to over-tighten and crack the plastic or warp the washer, which ironically creates the very leak you’re trying to fix.
This focus on proper trap installation isn’t new. It’s a practice built on decades of learning. Back in 1928, the first major U.S. plumbing code, often called the ‘Hoover Code,’ established official rules for trap design. Engineers like Dr. Roy B. Hunter built on that foundation in the following years, refining trap dimensions and venting to make our home plumbing systems dramatically safer. You can explore more of these foundational historical events in plumbing systems to see how far we’ve come.
Frequently Asked Questions About P-Traps
Even after you get the hang of what a P-trap does, it’s natural to have a few more questions pop up. Let’s walk through some of the most common things homeowners ask us, giving you straight-to-the-point answers that will clear things up.
Why Do I Smell Sewer Gas If I Have a P-Trap?
This is easily the most common call we get about P-traps, and it almost always points to one culprit: the water seal in the trap has dried up. If you have a sink, shower, or floor drain that doesn’t see much action, that water barrier can simply evaporate over time, leaving a wide-open path for sewer gas to sneak into your home.
The fix is usually incredibly simple. Just run the water for a minute or so to completely refill the trap. Honestly, this one small step solves the problem more than 90% of the time.
But what if the smell comes back quickly? That’s when things get a bit more complicated. A blocked plumbing vent pipe can create a powerful vacuum, siphoning the water right out of the trap every time the drain is used. Since diagnosing and clearing vent issues can be tricky and often requires getting on the roof, a persistent smell is your cue to call in a professional.
Are Chemical Drain Cleaners Safe for My P-Trap?
As a rule of thumb, we tell homeowners to steer clear of them. It’s incredibly tempting to reach for a bottle of potent chemicals when you have a slow drain, but they carry some serious risks.
Harsh liquid drain cleaners are corrosive. They can eat away at older metal pipes and even damage some plastic fittings. Worse yet, they often don’t even dissolve the real problem—like a solid clump of hair or food—leaving you with a sink full of caustic chemicals that make it dangerous for anyone to attempt a manual repair.
A much safer (and often more effective) first move is to use a simple plunger or to manually remove and clean out the trap. If you find yourself dealing with clogs all the time, check out our guide on common plumbing problems and how to fix them for more helpful tips.
What Is the Difference Between a P-Trap and an S-Trap?
The real difference comes down to their shape, which directly affects how well—and how safely—they work.
- S-Trap: You’ll only find this older design in very old homes. It forms a complete “S” shape and drains straight down into the floor. The problem is that its design is extremely prone to self-siphoning, where a strong rush of water can suck the entire water seal right out behind it.
- P-Trap: This is the modern standard. It has the same U-bend, but its exit pipe runs horizontally into the wall, where it connects to a vented drain line. That vent is the game-changer; it breaks the siphon and ensures the water seal stays put.
Because they are so unreliable and unsafe, S-traps are no longer permitted by any modern plumbing codes. The P-trap is the only approved standard for safe, effective plumbing in today’s homes.
How Often Should I Clean My P-Trap?
There’s no hard-and-fast rule, but giving your P-traps a preventative cleaning about once a year is fantastic home maintenance. This is especially true for the drains that get the most use, like your kitchen sink and main bathroom, where grease, hair, and soap scum build up the fastest.
The most obvious sign that it’s time for a cleaning is when a drain starts running noticeably slower than it used to. By taking care of this simple task proactively, you can head off major clogs before they ever form and keep your whole plumbing system running smoothly.
At Professional Plumbers Denver, we have the expertise to handle any P-trap issue, from simple clogs and leaks to complex venting problems. If you need reliable plumbing services in the Denver area, don’t hesitate to reach out. Visit us at https://professional-plumbers-denver.com to schedule a service or learn more.
