
Adding a bathroom to your basement isn’t a weekend project; it’s a major renovation that breaks down into a few distinct phases: smart planning, getting the right permits, tackling the unique plumbing challenges, and finally, all the finishing work. It all starts with a rock-solid plan that takes your home’s existing systems—and your wallet—into account from day one.
Planning Your Denver Basement Bathroom
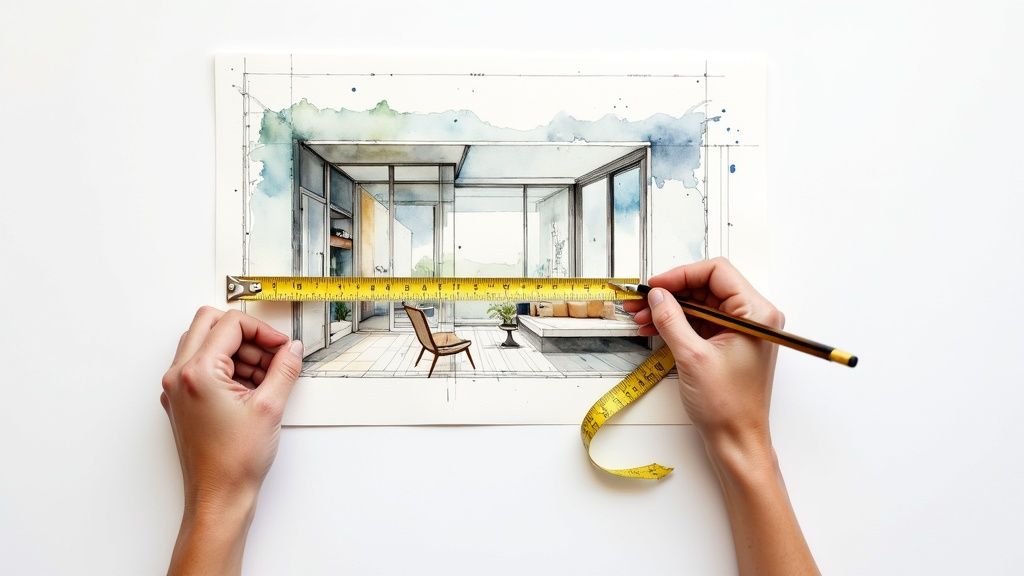
Before you even start looking at tile samples or vanities, the first real step is creating a detailed, practical plan. A great basement bathroom isn’t just about sticking a toilet in the corner. It’s about designing a functional, comfortable space that feels like it was always meant to be there. This is where you lay the groundwork for everything, from keeping the budget in check to loving the final look.
The single most important decision you’ll make is the location. The golden rule? Get as close to your existing plumbing and electrical lines as possible. Tucking the new bathroom directly under an upstairs bathroom or near the main sewer line can save you a fortune. It drastically cuts down on the need for extensive—and expensive—trenching through your concrete floor to run new pipes.
Once you’ve scouted a few potential spots, grab a notepad and sketch out some layouts. Think about how the space will be used. Is this a simple half-bath for your new movie room, or a full bathroom to create a true guest suite? Knowing the primary function helps you nail down the right footprint and choose the right fixtures from the get-go.
Creating a Realistic Budget
Budgeting for a basement bathroom is a different beast. You’re dealing with concrete, potential moisture issues, and often, complex plumbing. While it’s a project that adds serious livable space and value, it requires a significant investment. Nationwide, a basement remodel that includes a bathroom typically runs between $12,500 and $37,500, with labor eating up a huge chunk of that.
For a clearer picture, it’s helpful to see where the money goes. Here’s a sample breakdown for a mid-range project.
Basement Bathroom Budget Breakdown
| Expense Category | Estimated Cost Range | Percentage of Total Budget |
|---|---|---|
| Plumbing (Rough-in & Fixtures) | $4,500 – $10,000 | 30% – 40% |
| Framing & Drywall | $2,000 – $4,500 | 15% – 20% |
| Electrical (Wiring, Fixtures, Vent) | $1,500 – $3,500 | 10% – 15% |
| Flooring (Waterproof) | $1,000 – $3,000 | 5% – 10% |
| Fixtures & Finishes (Vanity, Toilet, etc.) | $2,500 – $6,000 | 15% – 20% |
| Permits & Inspections | $500 – $1,500 | 2% – 5% |
| Contingency Fund | 15-20% of Subtotal | 15% – 20% |
This table illustrates that plumbing and labor are the heavy hitters. And that contingency fund isn’t just a suggestion—it’s your safety net for the inevitable surprises, like finding a heating duct exactly where you planned to run a drain line.
Before you commit, it’s smart to understand the potential return on investment for a bathroom remodel. Knowing the value it adds can make the upfront cost a lot easier to swallow.
Choosing Basement-Proof Materials
Basements are naturally prone to moisture, so your material choices are critical for making sure your new bathroom lasts. This isn’t the place to cut corners.
Pro Tip: Whatever you do, don’t use standard paper-faced drywall. Spend a little extra on moisture-resistant “green board” for the main walls. For the shower or tub area, you absolutely need to use a cement board backer. It’s one of the best and simplest ways to prevent water damage down the line.
When it comes to flooring, your only option should be something that is 100% waterproof.
- Luxury Vinyl Tile (LVT): This is my go-to for basements. It’s tough, warmer on the feet than tile, and looks fantastic.
- Porcelain Tile: A classic for a reason. It’s completely impervious to water and will last forever.
Stay far away from laminate, wood, or carpet. Even a small leak or a bit of humidity can destroy them. To dig deeper into how these choices affect your bottom line, you can read our detailed guide on what influences your https://professional-plumbers-denver.com/blogs/basement-bathroom-installation-cost/.
By taking the time to plan your location, build a detailed budget, and pick the right materials from the start, you’re setting yourself up for success. This initial legwork saves you from expensive mistakes and ensures your new bathroom is an asset you can enjoy for years.
Navigating Denver Building Permits and Codes
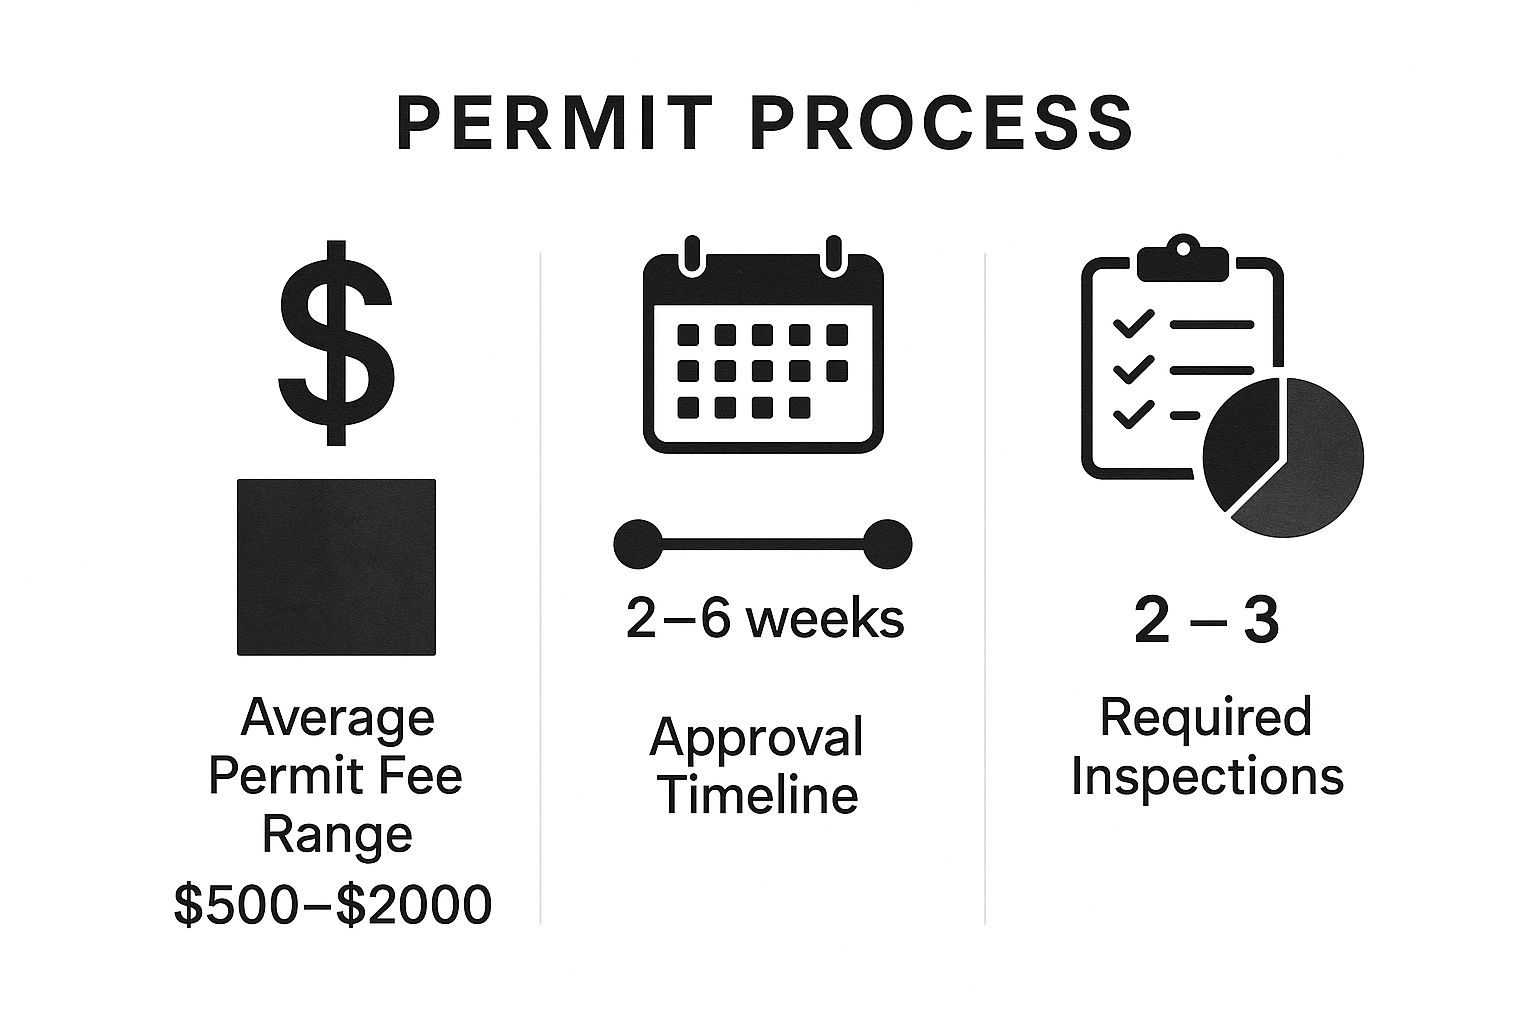
Let’s talk about the one part of the project that everyone dreads: permits. When you decide to add a bathroom to your basement, dealing with the City of Denver isn’t optional—it’s an essential part of getting the job done right. I know it can feel like a mountain of paperwork, but securing the right permits is your best insurance policy. It guarantees the work is safe, up to code, and officially adds real, recognized value to your home.
Trying to fly under the radar without a permit is a recipe for disaster. I’ve seen it happen. Down the road, when you go to sell your house, that unpermitted bathroom can completely derail the sale or, even worse, force you to tear it all out. More than anything, it’s about safety. Those codes are there for a reason—to prevent plumbing nightmares, electrical fires, and structural problems.
Key Denver Building Codes to Know
For a basement project, Denver’s building codes get pretty specific. When an inspector walks through, they have a checklist of things they’re looking for to make sure your new bathroom is compliant. Knowing what’s on their list from the get-go helps you and your contractor plan everything correctly from day one.
Here are a few of the big ones you absolutely can’t ignore:
- Minimum Ceiling Height: That new bathroom has to have a ceiling height of at least 7 feet. This can be a real challenge in older homes with low-hanging ductwork, so you have to be clever with your layout.
- Proper Ventilation: This is non-negotiable. To keep moisture and mold at bay, you need an exhaust fan that vents directly to the outside—not just into the space between your ceiling joists. It typically needs to be rated for at least 50 CFM (Cubic Feet per Minute), depending on the size of the room.
- GFCI Outlets: Safety first. Any electrical outlet within 6 feet of a water source, like your sink or shower, must have Ground Fault Circuit Interrupter (GFCI) protection. This is what prevents electric shock.
Thinking about these codes isn’t just about passing an inspection. It’s about building a safe, durable, and healthy space. A bathroom that’s vented correctly is a bathroom that won’t give you mold problems later.
Your Permit Application Checklist
To kick things off, you’ll need to put together a detailed application for the Denver Community Planning and Development department. A little prep work here makes the whole process go a lot smoother.
You’ll almost always need to have these three things ready:
- Detailed Architectural Plans: Think of this as the blueprint. It needs to show the bathroom’s location, exact dimensions, and layout within the basement.
- Plumbing Schematics: This is a map of all the new pipes—the drain, waste, and vent (DWV) system, plus the hot and cold water lines. Crucially, it must show how everything will tie into your home’s existing plumbing.
- Electrical Plan: A simple drawing showing where every new outlet, switch, light fixture, and the exhaust fan will be installed.
Sometimes, digging into the concrete floor uncovers older, bigger problems. If your contractor has any reason to suspect an issue with your main sewer line, it’s smart to get it checked out before finalizing your plans. You can get a better sense of what might be involved by reading up on some common sewer line issues and repairs in Denver.
The Inspection Timeline Unpacked
Once your permit is approved and work is underway, a city inspector will need to visit your home at a couple of key moments to sign off on the work.
First up is the rough-in inspection. This happens after all the framing, plumbing lines, and electrical wiring are installed, but before any drywall goes up. The inspector needs to see everything that will be hidden behind the walls to make sure it’s all up to snuff.
After you get the green light on the rough-in, you can move on to drywall, tile, and paint. The final inspection happens right at the very end, once every fixture is installed and everything is working. The inspector will check the toilet, sink, outlets, and fan one last time. Once that’s passed, your new basement bathroom is officially complete and legal.
Solving Basement Plumbing and Drainage Puzzles
When you decide to add a bathroom to your basement, you’re doing more than just putting up walls and picking out tile. You’re tackling your home’s most complex system head-on. In a normal bathroom, gravity is your best friend, pulling waste down and away without a second thought. But below ground, gravity suddenly becomes your biggest opponent, making a simple flush a real engineering challenge. This is where the true work—and cost—of a basement bathroom project really comes into play.
The toilet, naturally, is at the heart of this plumbing puzzle. Since it will sit below your home’s main sewer line, a standard toilet just won’t cut it. You need a system that can actively move waste up and out. This leads you to the first major decision you’ll need to make with your plumber.
Basement Toilet System Comparison
Choosing the right toilet system is the most critical plumbing decision for your basement bathroom. Your two main options are an up-flushing (macerating) toilet and a more traditional sewage ejector pump. While they both get the job done, they work very differently and have huge implications for your budget, construction process, and long-term reliability.
| System Type | How It Works | Pros | Cons |
|---|---|---|---|
| Up-Flushing (Macerating) Toilet | Waste goes into a sealed unit behind the toilet containing a grinder. The grinder liquefies waste, which is then pumped up and out through a small pipe. | Less invasive installation (no need to break concrete). Generally lower upfront cost. | Prone to clogs, especially if anything other than waste and toilet paper is flushed. Noisy operation. Not ideal for showers. |
| Sewage Ejector Pump | A sealed basin is installed below the floor. Waste from the toilet, sink, and shower drains into it. A pump activates to eject waste up to the main sewer line. | Extremely reliable and powerful. Can handle a full bathroom with a shower. Quieter and more durable long-term. | Requires breaking concrete to install the basin. Higher upfront installation cost. More complex to install. |
Ultimately, a sewage ejector pump is almost always the best bet for a full bathroom with a shower. It’s a robust system built to handle a higher volume of water and solids, making it far more reliable than a macerating unit. An up-flushing toilet can be a decent fix for a simple, low-use half-bath where breaking into the concrete just isn’t an option.
Breaking Concrete For New Drain Lines
If you go with the recommended ejector pump or need to run new drain lines for a sink and shower, there’s simply no way around it: you’re going to have to open up your concrete slab. This is a loud, dusty, and incredibly precise job that should only be handled by a professional. The contractor will use a concrete saw to cut trenches for the new drainpipes.
These trenches aren’t just ditches; they must be sloped perfectly—the standard is a quarter-inch of drop per foot—to ensure waste flows downhill to the ejector pit. Getting this slope wrong is a recipe for constant clogs and drainage nightmares down the road. This kind of precision work is exactly why you need to work with skilled plumbing professionals who have done this before.
As you can see, the official oversight for your project involves significant time and cost before a single pipe is even laid. This just reinforces how important it is to get all the technical details right the first time.
The Critical Role of Proper Venting
Finally, let’s talk about something you can’t see but is absolutely vital for a functioning bathroom: the vent pipe. Every single fixture—toilet, sink, shower—needs to be connected to a vent system that runs up through your roof. This system does two incredibly important things.
First, it allows air to enter the drainpipes behind the flowing water. This prevents a vacuum from forming and ensures your fixtures drain quickly and smoothly. Without it, you’ll get gurgling sinks and showers that seem to take forever to drain.
Even more importantly, the vent system carries harmful sewer gases safely up and out of your home. An improperly vented bathroom can let these gases seep into your living space, creating an unhealthy and foul-smelling environment. Tying into your home’s existing vent stack is a complex job that must meet strict plumbing codes, making it another area where professional expertise isn’t just a suggestion—it’s a requirement for a safe project.
Framing the Walls and Running Utilities

Now for the part where your new bathroom really starts taking shape. With the concrete work behind you, it’s time to frame the walls. This is where you build the room’s skeleton and run all the critical utilities that will eventually be hidden from view. Getting this stage right is non-negotiable—it’s the foundation for everything else.
Framing in a basement comes with one specific rule you absolutely cannot break: moisture protection. Your walls are sitting on a concrete slab that can pull moisture from the ground, so the bottom plate—the piece of wood that anchors the wall to the floor—must be pressure-treated lumber. This stuff is designed to resist rot and decay, safeguarding the entire structure.
After that pressure-treated bottom plate is secured, the rest of the wall framing goes up using standard lumber. This is also your chance to frame out any custom features you’ve planned, like a recessed medicine cabinet or a built-in shower niche.
Roughing In Electrical and Water Lines
Once the studs are up, the space becomes an open canvas for your electrician and plumber. This is the “rough-in” phase, a carefully choreographed process of running wires and pipes before the drywall goes on. Trust me, you want to get this perfect, because mistakes discovered after the walls are closed are a nightmare to fix.
Your electrical layout needs to be practical. Seriously think about where you’ll need power and light.
- GFCI Outlets: Code demands GFCI-protected outlets near the vanity. I always recommend installing two instead of just the required one. It saves you the hassle of unplugging an electric toothbrush just to use a hairdryer.
- Vanity Lighting: Now is when the wiring for your mirror lights goes in. Placement is everything here if you want to avoid casting weird shadows on your face.
- Switches: Think about where you want your switches. Most people opt for a dual-switch right inside the door—one for the main light, one for the fan.
- Exhaust Fan: The fan unit gets mounted between the ceiling joists, and this is when the wiring and the all-important exterior ductwork are run.
At the same time, your plumber will be running the hot and cold water supply lines through the new walls. Whether it’s flexible PEX or rigid copper, these pipes will feed the sink and shower. A well-placed sink is central to the room’s flow, and you can see the kind of precision required by learning more about how to install an undermount sink.
A pro tip from years in the field: the best rough-ins happen when the plumber and electrician communicate. It prevents those classic “oops” moments where an electrical wire is run exactly where a water line was supposed to go.
Insulation and Vapor Barriers
The last job before closing up the walls is to install insulation and a vapor barrier. When you add a bathroom to a basement, this step is especially crucial because below-grade walls are notoriously cold and can attract condensation.
Good insulation keeps the bathroom comfortable and helps with energy bills. After the insulation batts are snug between the studs, a plastic vapor barrier is stapled over the entire frame. This thin sheet is your front line of defense, stopping moisture from the foundation walls from getting into your wall cavity and creating a mold problem down the road.
Bringing Your New Bathroom to Life: Finishes and Waterproofing
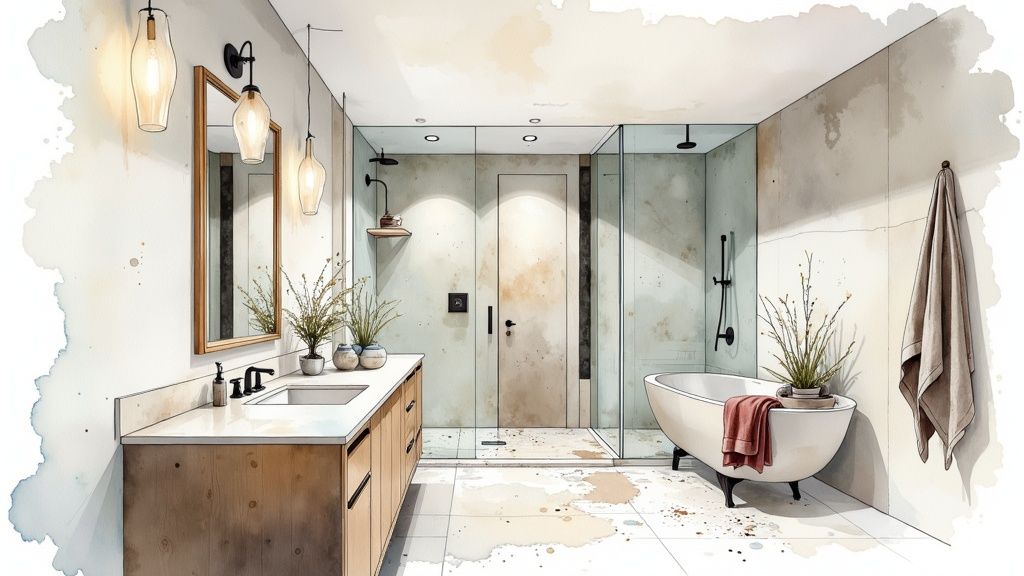
This is the moment all that planning and messy work starts to pay off. The finishing stage is where a bare-bones frame of studs and pipes transforms into the beautiful, functional bathroom you envisioned. But let’s be clear: in a basement, “finishing” is about more than just picking pretty tile. It’s about building a fortress against moisture from the inside out.
Your shower is ground zero for potential water issues. Before a single tile gets set, that entire enclosure needs to be completely watertight. This isn’t a step you can cut corners on; a robust waterproofing system is non-negotiable.
Most pros I work with swear by one of two methods. The first is a liquid-applied membrane, which is literally painted or rolled onto the cement board walls, curing into a seamless, rubber-like barrier. The other go-to is a sheet membrane, like the well-known Schluter-Kerdi system. This involves installing large, overlapping sheets to create a continuous waterproof surface. Both are fantastic, but flawless installation is everything, especially around tricky spots like corners and the shower valve.
Choosing the Right Walls and Flooring
Once the shower is buttoned up, you still have to think about humidity everywhere else. This is where your material choices really count.
- Drywall: For the main bathroom walls, you should only be using moisture-resistant drywall, often called “green board.” It’s treated specifically to handle damp environments. Inside the shower itself, cement board is the only way to go. It’s the essential tile backer because it’s completely impervious to water and won’t fall apart if it gets wet.
- Flooring: Stick with materials that are 100% waterproof. Luxury vinyl tile (LVT) is a phenomenal choice for basements. It’s tough, feels warmer on your feet than ceramic, and the style options are endless. Of course, porcelain or ceramic tile remains a bulletproof option, offering that classic look with unbeatable water resistance.
Think of it as creating layers of defense. A good exhaust fan, waterproof flooring, and moisture-resistant walls all work together. It’s this combination that will keep your new bathroom dry and free of mold for years to come.
These specialized materials do add to the bottom line. When you add a bathroom to a basement in Denver, it’s a serious investment. For 2025, the average cost to finish a basement runs anywhere from $65 to $105 per square foot. High-end projects can easily top $100,000 for a 1,000-square-foot space.
Installing Fixtures and Adding the Final Touches
With the walls, floors, and paint done, it’s time to install the fixtures that make it a real bathroom. Setting the toilet is a make-or-break moment. A new wax ring (or a modern wax-free seal) has to be placed perfectly to prevent nasty leaks and sewer gas from creeping into the room.
Next up, the vanity and sink are maneuvered into place, with the faucet and drain lines hooked up. It can be a surprisingly finicky job to get everything aligned just right to avoid those slow, cabinet-ruining drips.
Finally, the electrician comes in to wire up the vanity light, ceiling fixtures, and the all-important GFCI outlets. The last piece of that puzzle is the exhaust fan—and it might just be the most critical component for the long-term health of your basement. Proper ventilation is the only way to get humid air out and stop mold before it starts. For a great breakdown, check out this guide on the best bathroom ceiling fans, including installation guidance. This final step ensures your beautiful new space isn’t just stylish, but also built to last in its below-grade environment.
Common Basement Bathroom Questions
When you start thinking about adding a bathroom to a basement, the questions come fast and furious. It’s a big project, and you absolutely should get solid answers before breaking ground. I’ve been through this process with countless Denver homeowners, and a few key questions always come up.
Let’s walk through them, one by one, to clear things up and help you plan with confidence.
How Much Value Does a Basement Bathroom Add to a Denver Home?
This is usually the first thing people ask, and for good reason. In a hot market like Denver, a basement bathroom is a fantastic investment. On paper, you can generally expect to recoup 50% to 70% of the project’s cost when you eventually sell.
But the real value goes beyond that number. A basement with its own bathroom suddenly becomes so much more functional. It’s no longer just a basement; it’s a proper guest suite, a functional entertainment space, or the key to creating a legal bedroom. That kind of finished, livable square footage is a huge draw for buyers and makes your home far more appealing.
What Is the Best Flooring for a Basement Bathroom?
Down in a basement, your flooring has one non-negotiable job: it must be 100% waterproof. Basements are naturally prone to higher humidity and potential moisture issues, so choosing the wrong material here can lead to a real headache down the road.
From my experience, two options consistently stand out:
- Luxury Vinyl Tile (LVT): This is my go-to recommendation for most projects. It’s tough as nails, completely waterproof, and feels a lot warmer underfoot than tile. Plus, the design options are incredible—you can get a look that convincingly mimics everything from slate to rustic hardwood.
- Porcelain or Ceramic Tile: You can’t go wrong with a classic. Tile is basically bulletproof against water. As long as it’s installed properly with a high-quality, sealed grout, it will last forever and look great doing it.
Stay away from materials like laminate, engineered hardwood, and especially carpet. Even a little bit of moisture can cause them to warp, peel, or—worst of all—grow mold. It’s just not worth the risk in a below-grade space.
Do I Need a Special Toilet for a Basement Bathroom?
Yes, almost without exception. Standard toilets use gravity to pull waste down into your main sewer line. Since your basement floor is below that line, you need a system that can move waste up and out.
Your plumber is going to talk to you about two main solutions. The gold standard, especially if you’re including a shower, is a sewage ejector pump. This system uses a sealed basin set into the concrete floor to collect waste from the toilet, sink, and shower. When it fills, a powerful pump kicks on and sends everything up to the main sewer line. It’s the most robust and reliable way to do it.
The other route is an up-flushing (macerating) toilet. This is a self-contained unit with a grinder that liquefies waste before pumping it out through a much smaller pipe. It’s less invasive to install, but it’s really better suited for a half-bath that won’t see heavy, everyday use.
Can I DIY a Basement Bathroom or Should I Hire a Pro?
Look, I get the appeal of DIY. A skilled homeowner can definitely handle framing, hanging drywall, painting, and maybe even setting tile. But when you add a bathroom to a basement, the plumbing and electrical work are on a different level. This isn’t the place to learn as you go.
One mistake with the plumbing can lead to a sewage backup that ruins your new basement. An error in the wiring is a serious fire hazard. It’s that simple.
For your own safety and the protection of your home, hiring licensed and insured plumbers and electricians is the only way to go. Their work is guaranteed to meet Denver’s strict building codes, which means you’ll pass your inspections and end up with a safe, valuable, and correctly built bathroom.
Ready to turn that underused basement into a fantastic new living space? The team at Professional Plumbers Denver has the expertise to guide you through every step, from smart plumbing layouts to installing the final fixtures. Contact us today for a consultation and we’ll help you get it done right.
