
When you turn on the tap expecting a hot shower and get a blast of cold water instead, it’s frustrating. But with a tankless water heater, the fix is often simpler than you think. More often than not, the problem isn’t a catastrophic failure but a simple interruption, like a tripped circuit breaker, a system overload from running too many appliances, or even just an obstructed air vent.
These common hiccups are usually easy to spot and fix, getting your hot water back on in no time.
Diagnosing the Root Cause of Your Cold Water Problem

Unlike a big, bulky tank that keeps a reservoir of hot water ready, your tankless unit heats water the moment you need it. So when it fails, the problem is happening right now in that heating process. Before you start thinking about expensive repairs, let’s walk through the most common reasons these systems stop working.
It’s no wonder these units are everywhere now. The global market for tankless water heaters is expected to jump from USD 3.49 billion in 2022 to a staggering USD 6.80 billion by 2030. Homeowners love them because they’re incredibly efficient—sometimes up to 34% more energy-efficient than old-school tanks. That can easily save you over $100 a year on your utility bills.
To help you get started, this quick table maps out the most common symptoms and where you should look first.
Quick Diagnosis for Cold Water Issues
| Symptom | Potential Cause | First Action to Take |
|---|---|---|
| No hot water anywhere in the house | Complete power or fuel loss | Check your home’s main circuit breaker or the gas valve at the heater. |
| Water is lukewarm, not hot | System overload or sediment buildup | Reduce the number of hot water taps running at once. Plan to flush the unit. |
| Unit displays an error code | Specific internal fault | Look up the error code in your owner’s manual for targeted instructions. |
| Heater makes clicking sounds but doesn’t fire up | Ignition failure (gas models) | Check that the gas supply is on and listen for the igniter’s spark. |
This table should help you narrow down the possibilities quickly. Now, let’s dig a little deeper into the most frequent failure points.
Common Failure Points to Investigate
The first thing to do is run through a mental checklist, starting with the simplest and most obvious things before assuming the worst.
Here are the prime suspects when the hot water disappears:
- Power Supply Interruption: Your electric tankless heater is useless without electricity. A tripped breaker is the number one cause I see in the field. It’s a five-second fix that solves the problem more often than you’d think.
- Fuel Supply Issues (Gas Models): If you have a gas unit, no fuel means no flame. Check that the gas valve on the supply line going into the heater is fully open. Sometimes they get bumped or accidentally turned.
- System Overload: This is a big one. Tankless heaters are rated for a specific gallons-per-minute (GPM) flow rate. If you try to run a hot shower, the dishwasher, and the washing machine all at once, the unit just can’t keep up. The result? Lukewarm water for everyone.
The most important takeaway here is that most “no hot water” situations don’t mean your heater is broken. It usually means one of its essential inputs—power, fuel, or water flow—has been cut off.
And for those with gas models, sometimes you need to look beyond your own property lines. If your heater relies on natural gas, the problem might not be with your unit at all, but with the main supply to your neighborhood. There are several reasons for natural gas supply delays that can temporarily affect your service.
First Things First: The Simple Checks
When your tankless water heater suddenly stops making hot water, it’s easy to jump to the worst conclusion. But before you start pricing out a replacement, take a deep breath. More often than not, the culprit is something surprisingly simple.
Think of this as triage. We’re going to knock out the most common and easiest-to-fix issues first, ruling out the obvious stuff before we get our hands dirty. You’d be surprised how many service calls end with flipping a single switch.
Is It Getting Power?
Even gas-powered tankless heaters rely on electricity to run their control panels, igniters, and sensors. Without it, you’ve got nothing. I can’t tell you how many times I’ve seen a panicked homeowner, only to find the problem was a tripped breaker.
Before you do anything else, run through these quick power checks:
- Check the Breaker Box: Head to your electrical panel and find the circuit breaker for your water heater. If it’s in the middle or “OFF” position, flip it all the way off and then firmly back on to reset it.
- Look for a Disconnect Switch: Many installations have a separate power switch on the wall near the unit, sometimes in a small grey box. Make sure it hasn’t been accidentally turned off.
- Test the GFCI Outlet: If your heater plugs into an outlet (common for smaller electric models), check the GFCI. These outlets have “TEST” and “RESET” buttons. Push the “RESET” button—if it clicks back into place, you may have just solved your problem.
Got Gas? (For Gas and Propane Heaters)
If you have a gas model and the power looks good, the next logical step is to make sure it’s actually getting fuel. No gas means no flame, and no flame means no hot water. Simple as that.
Find the gas line running to your heater. It’s usually a flexible, often yellow or black, pipe. Along this line, you’ll see a shut-off valve with a handle. That handle should be parallel to the pipe, which means gas is flowing. If it’s turned perpendicular, the gas is off. Turn it back to the parallel position, and you might be back in business.
This process of elimination—checking power, then fuel, then the unit itself—is the core of any good troubleshooting.
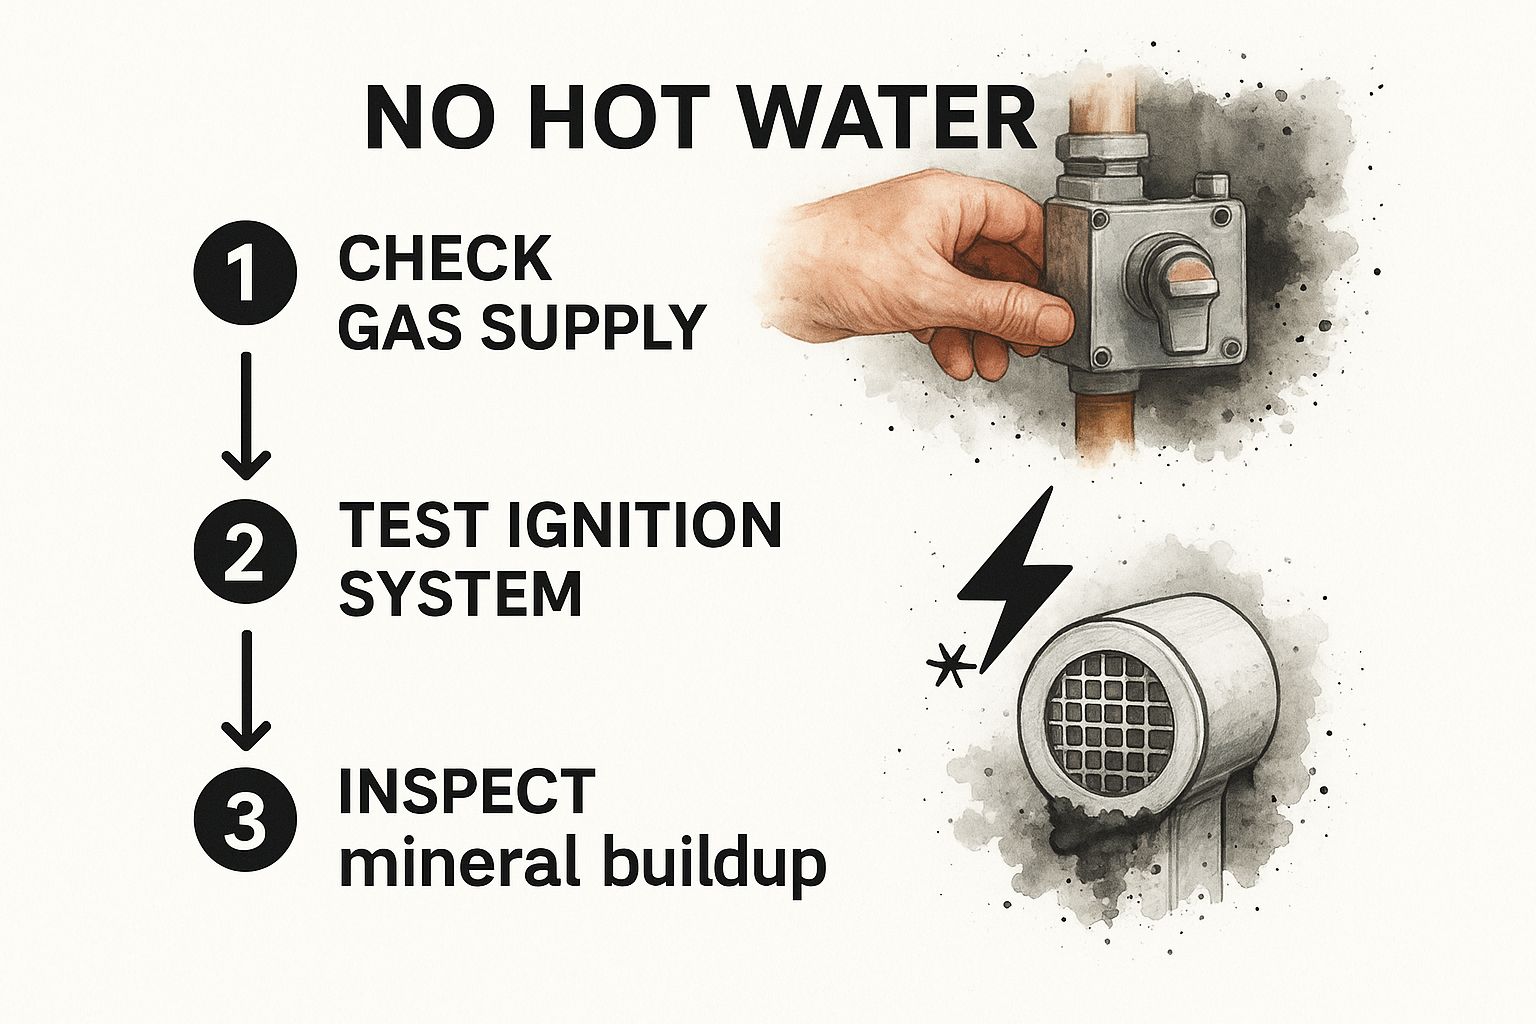
The image above gives a great visual overview of this diagnostic flow, from the external supply lines right down to potential buildup inside the unit.
Let the Heater Tell You What’s Wrong
One of the best things about modern tankless units is that they often diagnose themselves. Take a close look at the digital display on the front of the heater. Is there an error code flashing?
An error code is your best friend in this situation. It’s the heater’s way of saying, “Hey, the problem is right here!” This code points you directly to the issue—be it an ignition failure, a blocked vent, or a faulty sensor—and saves you a ton of guesswork.
Don’t ignore it. Grab your owner’s manual (or find it online with your model number) and look up what that specific code means. It will tell you whether you’re dealing with a quick fix or if it’s time to bring in a pro.
Dealing With Flow Rate and System Overloads

Sometimes, the reason you have no hot water isn’t a broken part but a simple case of asking too much from your tankless heater. Unlike a traditional tank that stores hot water, a tankless unit heats it on the fly. That means it has a hard limit on how much water it can heat at any given moment.
Ever tried to run the dishwasher while someone else is in the shower, only to have the water turn lukewarm? You’ve just hit that limit. When you demand more hot water than the unit was designed to produce, it gets overloaded. This is one of the most common issues we see, and it all comes down to the heater’s Gallons Per Minute (GPM) rating.
Are You Exceeding Your Heater’s GPM Capacity?
Every tankless water heater is rated for a specific GPM, which is the maximum flow rate it can heat to your desired temperature. A unit rated for 5 GPM, for instance, can heat five gallons of water per minute. Push past that, and the system just can’t keep up, leaving you with cold water.
You can usually find this GPM rating on a sticker right on the side or front of your heater, or tucked away in the owner’s manual. Knowing this number is the key to diagnosing an overload problem.
Here’s a quick test you can run. Shut off every hot water appliance in your house—the washing machine, dishwasher, all the faucets. Now, turn on just one shower. If the hot water flows perfectly, you’ve likely found your culprit: your household’s demand is simply outstripping the heater’s capacity.
A key takeaway here is that both electric and gas tankless heaters can only provide continuous hot water up to their specific flow rate. When you request more hot water simultaneously than the heater’s capacity, the temperature can drop, or the unit may fail to supply hot water altogether. You can explore more about these capacity limits in this helpful Energy Star report.
The Hidden Culprit: A Clogged Inlet Filter
So, what if you’re sure you aren’t overloading the system but still have no hot water? The next thing to check is the water inlet filter. This little screen sits right where the cold water enters the unit, and its job is to catch any sediment or debris before it gets inside.
Over time, especially in areas with hard water, this filter can get clogged with mineral deposits. A blocked filter chokes the water flow, and if the flow rate drops below the heater’s minimum activation threshold (typically around 0.5 GPM), the unit won’t even turn on. It’s a frustrating situation that acts just like a major failure but is actually a quick fix.
Cleaning this filter is a straightforward but essential piece of maintenance. Here’s how you do it:
- First, kill the power to the heater and shut off the cold water supply valve.
- Stick a bucket under the inlet connection to catch any water that spills out.
- Carefully unscrew the inlet pipe or the filter cap.
- Inside, you’ll find a small, thimble-shaped screen filter. Gently pull it out.
- Rinse the screen under a faucet, using an old toothbrush to scrub away any gunk.
- Once it’s clean, pop the filter back in and securely reconnect the pipe.
Just by cleaning this tiny part, you can restore proper flow, which often solves the “no hot water” problem instantly and can even improve your overall water pressure. For a deeper look at other common problems, check out our guide on frequently encountered tankless water heater issues.
Checking for Blocked Air Intake and Exhaust Vents
A gas-powered tankless heater is a lot like a high-performance engine; it needs to breathe freely to work correctly. A clear, unobstructed path for fresh air intake and exhaust is non-negotiable for both performance and, more importantly, your safety. These units are built with sophisticated sensors that will shut everything down the second they detect a blockage.
This isn’t just a minor feature—it’s a critical safety system. If a vent gets blocked, it can lead to a dangerous buildup of carbon monoxide in your home. So, if your heater keeps cutting out unexpectedly, a compromised vent is one of the first things you should suspect.
What’s Clogging Up Your Vents?
It’s amazing what can find its way into a vent pipe. I once got a call from a homeowner whose brand-new heater kept failing. We went through all the usual suspects, and everything looked fine. Finally, we checked the vents and found a massive hornet’s nest built right inside the exhaust pipe. It was just enough to restrict the airflow and trigger the safety sensor.
That little story shows how even something seemingly small can bring your hot water supply to a complete standstill.
Here are some of the most common culprits I see in the field:
- Yard Debris: Leaves, pine needles, and small twigs can easily get sucked into the intake or fall into the exhaust pipe.
- Critter Nests: Birds and wasps absolutely love the shelter of a vent pipe. It’s the perfect spot for them to build a home.
- Snow and Ice: In colder climates, heavy snowfall can completely bury exterior vents, effectively suffocating the unit until it’s cleared.
- Overgrown Landscaping: It’s easy to forget about the bushes or vines growing near your house, but they can quickly cover up vent terminals.
Think of the venting system as your heater’s lungs. Any restriction, whether on the intake or the exhaust side, will cause the unit to shut down to prevent a potentially hazardous situation. It’s a failsafe you want working correctly.
How to Safely Inspect Your Venting
First things first: kill the power. Head to your circuit breaker and flip the switch for your tankless water heater. This is crucial to prevent the unit from trying to fire up while you’re poking around.
Start with a simple visual check on the outside of your house. Find where the intake and exhaust pipes exit through the wall or roof. Look for anything obvious right at the vent cap or screen—you might spot a bird’s nest, a clump of wet leaves, or even a plastic bag that got pinned against the house.
If the outside looks clear, the next step is to check the pipe runs. If you have a short, straight vent, you can often shine a bright flashlight in from both ends to see if there’s anything inside. Look carefully for anything that could be impeding airflow. For minor blockages near the opening, like a few leaves, you can usually clear them out by hand or with a shop vacuum.
But a word of caution: if you find something more serious, like what looks to be an animal nest deep inside the pipe, it’s time to call a pro. Trying to dislodge a stubborn blockage yourself can end up damaging the vent or just pushing the problem further down the line.
How to Deal with Mineral Buildup
So, the power is on, the vents are clear, but your water is still just… meh. Lukewarm at best. If this sounds familiar, the culprit is likely hiding inside your heater.
Most of us have hard water to some degree, and for a tankless water heater, that can be a real killer over time. The minerals in the water—mostly calcium and magnesium—slowly build up on the delicate internal components.
This buildup is called scale, and it essentially coats the heat exchanger in a layer of rock. It’s like trying to boil a pot of water while it’s wearing a winter jacket. The unit has to work way harder to get heat through that mineral armor, making it less efficient. Eventually, the scale can get so thick it literally chokes off the water flow, leaving you with no hot water at all.
Signs Your Heater Needs Descaling
Thankfully, your tankless unit will usually give you a heads-up before it completely gives up the ghost. Learning to spot these warning signs can save you from a surprise cold shower.
Here’s what I tell homeowners to watch out for:
- Water temperature on a rollercoaster: Does your shower water swing from hot to lukewarm even when you haven’t touched the faucet? That’s a classic sign of scale interfering with the heat exchanger.
- Wimpy water pressure: If you’ve noticed a significant drop in hot water pressure everywhere in the house, it’s a good bet that scale is physically constricting the pipes inside the unit.
- Overheating error codes: When scale forces the heater to overcompensate, it can overheat and trigger a safety shutdown. You’ll often see a specific error code pop up on the display.
- Rumbling or popping noises: Hearing strange sounds from your heater when it kicks on? That could be water getting trapped under the scale and boiling, which creates a distinct popping or kettling sound.
The Descaling Process: A DIY Guide
Flushing your tankless water heater, also known as descaling, might sound complicated, but it’s a very doable DIY job that can save you a service call fee. The goal is to circulate a cleaning solution through the unit to dissolve all those built-up mineral deposits.
Most descaling kits come with everything you need, but you can easily build your own setup with a small submersible pump, a couple of hoses, and a five-gallon bucket.
Here’s how you get it done:
- Safety first, always. Kill the power to your water heater at the circuit breaker. No shortcuts here.
- Isolate the heater. Shut off the main cold water inlet and hot water outlet valves. Your unit should have dedicated service valves (often with little T-handles) that make this easy. They’re designed specifically for this job.
- Hook up your hoses. Connect one hose to the cold water service port and run the other end into your bucket. Attach the second hose to the hot water service port, and connect its other end to the submersible pump, which you’ll also place in the bucket.
- Mix your cleaning solution. You don’t need anything fancy. Just pour about 2-3 gallons of plain old undiluted white vinegar into the bucket. It’s a mild acid that does a fantastic job of eating away at calcium and magnesium.
- Let it circulate. Open both service port valves. Now, plug in the pump and let that vinegar solution run through the heater for at least 45 to 60 minutes. Don’t be surprised if you see nasty-looking flakes or discolored water in the bucket—that’s the scale breaking down, which is exactly what you want to see.
Once the time is up, unplug the pump, close the service valves, and be sure to flush the system with fresh water to get all the vinegar out.
This is one of the most important pieces of preventative maintenance you can do. It’s a cornerstone of our comprehensive guide to tankless water heater upkeep. Think of it this way: just like with your furnace, effective cleaning for maintaining peak system performance in heating components is non-negotiable for long-term health and efficiency.
Knowing When to Call a Professional
Look, I’m all for rolling up your sleeves and tackling home repairs. Many of the reasons a tankless heater stops producing hot water are genuinely simple fixes. But it’s just as important to know when to put the tools down and call in a pro.
Trying to muscle through a complex repair without the right training isn’t just a risk to your warranty—it can be flat-out dangerous. Your safety and the long-term integrity of your water heater hinge on knowing where to draw that line.
Red Flags That Demand a Pro
Some problems are more than just a headache; they’re immediate stop signs. If you run into any of these issues, it’s time to step back and get a licensed plumber on the phone.
- You Smell Gas: This is the big one. If you catch that distinct “rotten egg” smell near a gas unit, don’t hesitate. Shut off the gas supply to the heater immediately, get everyone out, and call for help from a safe location. This is a true emergency.
- Stubborn Error Codes: You’ve powered the unit off and on, but that same frustrating error code just pops right back up. This is a classic sign of a deeper problem, like a failing sensor or a fried control board that needs an expert’s diagnostic equipment.
- Water Leaks from the Unit: We’re not talking about a drip from a pipe fitting you can tighten. If you see water coming from the casing of the heater itself, that signals a potential internal failure.
Don’t be a hero. Messing with a faulty ignition system, complex wiring, or a gas line is a recipe for disaster. A professional plumber has the experience to pinpoint the real issue and fix it safely, all while keeping things up to code.
In the end, it’s all about respecting your own limits. While you can certainly troubleshoot many of the 5 most common tankless water heater problems yourself, bringing in an expert for the tough stuff is what keeps your home safe and ensures you’ll have reliable hot water for years to come.
Got More Questions? We’ve Got Answers.
Even after running through all the troubleshooting steps, you might still be scratching your head about a few things. It happens. Here are some of the most common questions we get from homeowners when their tankless heater acts up.
My Heater Has Power, So Why Isn’t the Water Hot?
This is a classic. The display is lit up, everything looks fine, but the water is still ice-cold. Nine times out of ten, this points to a water flow issue.
Your tankless heater is smart, but it needs a clear signal to get to work. That signal is a minimum flow of water, usually around 0.5 gallons per minute (GPM). If anything restricts that flow—like a clogged inlet filter or a water valve that isn’t fully open—the heater simply won’t fire up. It’s a safety feature.
Another culprit could be a faulty flow sensor. This little part is the unit’s trigger. If it’s broken, it can’t tell the main brain that water is moving, so the heating elements never get the command to turn on.
Could a Single Faucet Be the Problem?
You bet. It’s amazing how often the problem isn’t the heater at all, but a single fixture.
If you’re only getting cold water at one specific sink, the first thing to check is the faucet’s aerator. That little screen at the tip can get clogged with mineral buildup and sediment. When it does, it can choke the water flow enough to dip below that minimum activation rate. Just unscrew it, clean it out, and you might have your hot water back.
It’s a great reminder that the problem isn’t always at the source. Any blockage in the hot water line can trick the heater into staying off.
What’s the Lifespan of a Tankless Water Heater?
This is where tankless heaters really shine. With consistent annual maintenance (especially descaling to fight mineral buildup), a good tankless unit can easily last 15 to 20 years. Some even go longer.
That’s a huge leap compared to old-school tank heaters. Those typically tap out after about 10-12 years because the tank itself eventually falls victim to rust and sediment.
If you’ve gone through this guide and your water is still cold, it’s probably time to bring in a professional. For those in the Denver area, the team at Professional Plumbers Denver has the tools and expertise to pinpoint the problem quickly.
Schedule your service with us today! and get your hot water running again.
