
That jolt of icy water when you’re expecting a hot shower is never a welcome surprise. But when it’s your tankless water heater acting up, the fix is often simpler than you think. Most of the time, the problem isn’t a major breakdown but a simple issue with power, fuel, or a clogged filter. Before you pick up the phone to call a plumber, a few quick checks can often get your hot water flowing again in minutes.
Your First Checks When the Water Runs Cold
So, the water’s running cold. Don’t panic. More often than not, the culprit is something you can spot and fix yourself without any special tools. We’ll start with the most common and easiest things to rule out first. This approach can save you the time, hassle, and cost of a professional service call.
First things first: does the unit have power? Take a look at the display panel—is it lit up? If it’s an electric model, head to your home’s circuit breaker panel. A tripped breaker is one of the most common reasons for a sudden no hot water in tankless water heater situation. For gas heaters, find the gas valve that supplies the unit and make sure it’s fully open. It’s surprisingly easy for these to get bumped into the closed position.
To streamline your initial troubleshooting, this quick checklist covers the essentials. Run through these before moving on to more complex diagnostics.
Initial Diagnostic Checklist
| Check | What to Look For | Action |
|---|---|---|
| Power Supply | Is the display lit? Is the unit plugged in? | For electric units, check the circuit breaker. For all units, ensure the power switch is on. |
| Fuel Source (Gas) | Is the gas valve to the unit in the “On” position? | Verify other gas appliances are working. If not, you may have a gas supply issue. |
| Error Codes | Are there any codes on the digital display? | Look up the specific code in your owner’s manual for a direct diagnosis. |
| Water Flow | Is the water pressure normal at the tap? | Check for clogged faucet aerators or showerheads. Ensure all water valves are fully open. |
| Inlet Filter | Is the small screen on the cold water inlet clean? | Shut off the water supply, remove the filter, and clean any sediment or debris. |
This checklist helps you quickly eliminate the most frequent culprits behind a cold water surprise.
Simple Steps for Initial Diagnosis
If the power and gas seem fine, let the heater itself tell you what’s wrong. Most modern units have a digital display that will show error codes. Think of these codes as a direct message from your heater, pointing you straight to the problem. A quick look in your owner’s manual will tell you what that code means—it could be anything from a blocked exhaust vent to a faulty sensor.
Another common problem, especially with gas models, is ignition failure. The heater tries to light, fails, and then shuts down for safety. This can be caused by something as simple as a blocked vent preventing proper airflow. If your other gas appliances are working just fine, the issue is isolated to the water heater. It might be a dirty flame sensor that can’t “see” the flame and shuts the system down as a precaution. Many of these common issues have typical repair costs ranging from $50 to $150.
This visual guide breaks down the first three things you should always check.
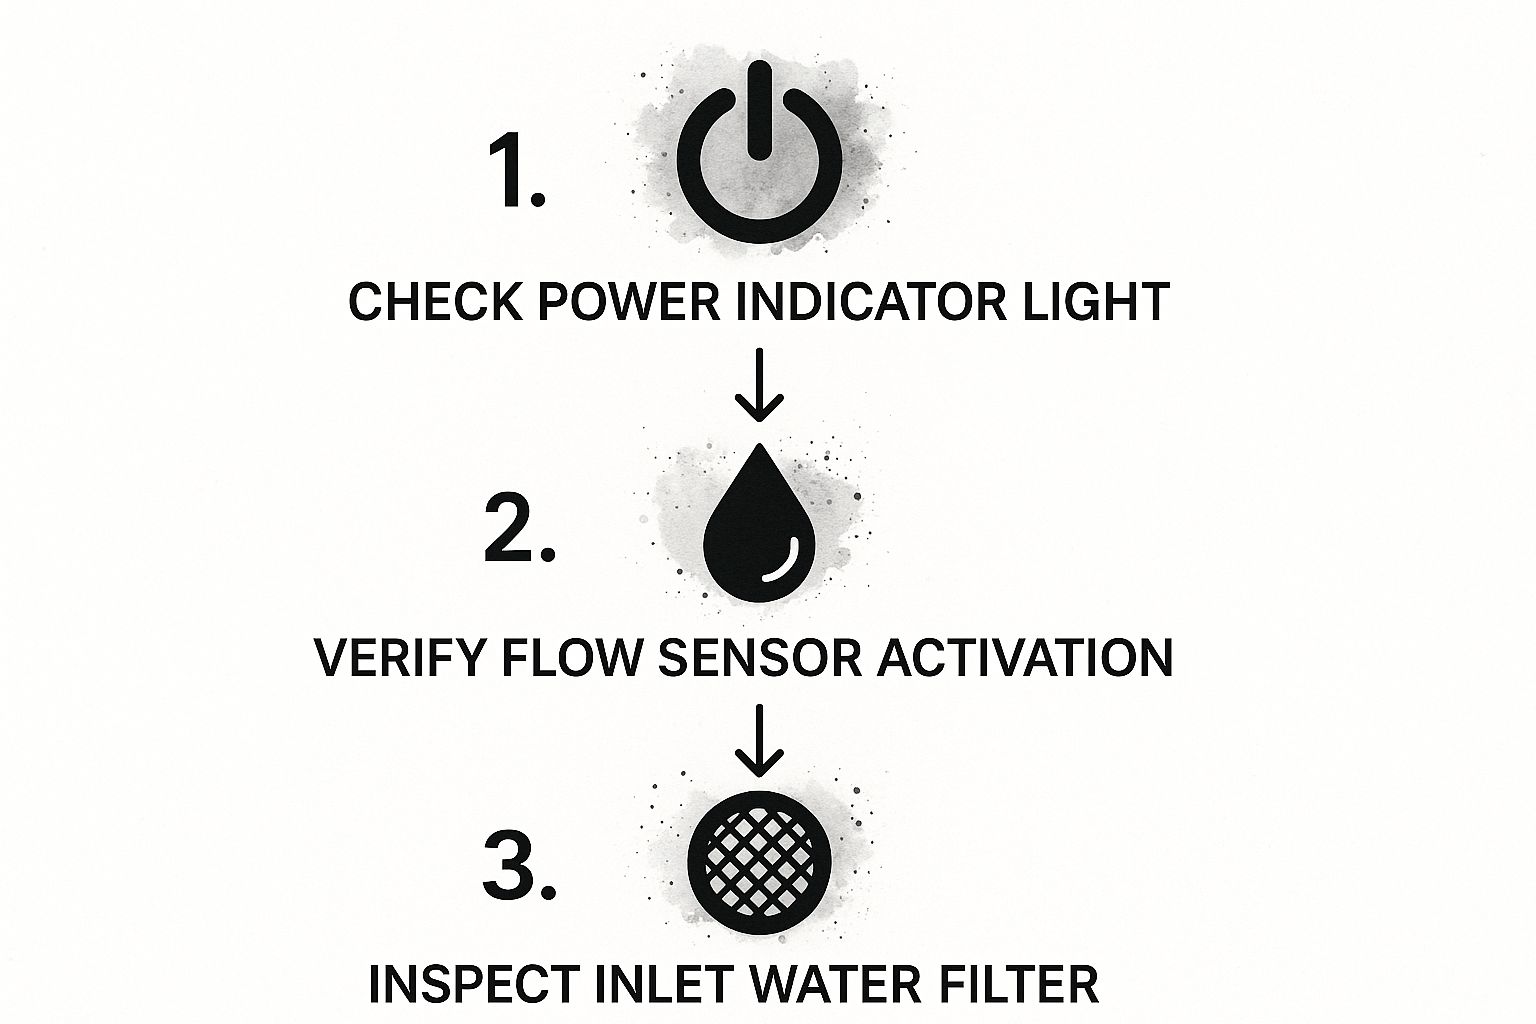
As the graphic shows, confirming power, proper water flow, and a clean filter are the foundational first steps in any diagnosis.
Before assuming the worst, always check the three fundamentals: power, fuel, and water flow. The solution is often found right there.
Lastly, don’t forget the water inlet filter. It’s a small screen, usually on the cold water intake pipe, that catches sediment and debris. If it gets too clogged, water flow can drop so low that it fails to trigger the heater’s activation sensor. Cleaning this filter is a simple but critical piece of maintenance. If you need to turn off the water to get to it, our guide on how to find your water main shut off valve can walk you through it. These initial checks will solve the vast majority of sudden hot water failures.
Is Your Hot Water Demand Just Too High?
Sometimes the culprit behind no hot water in a tankless water heater isn’t a mechanical failure at all. It might just be that you’re asking it to do too much at once.
Unlike old-school tank heaters that keep a reservoir of hot water ready, a tankless unit heats water on the fly. This means it has a finite capacity, a maximum output measured in gallons per minute (GPM).
Think of it this way: your tankless heater is a fantastic sprinter, but it’s not a marathon runner. It can heat water for a long shower perfectly. But if you start a load of laundry on the hot cycle while someone is showering, you might be pushing it past its limit. The combined demand for hot water can easily overwhelm the unit’s GPM rating, leaving everyone with lukewarm or even cold water.
Tallying Up Your Home’s Water Demand
So, how do you know if you’re maxing out your heater? It’s time for some simple detective work. First, find your heater’s GPM rating—it should be on a sticker on the side of the unit or listed clearly in the owner’s manual.
Next, add up the GPM of the appliances you’re running simultaneously. Here are some typical flow rates to get you started:
- Modern Showerhead: 1.5 to 2.5 GPM
- Washing Machine: 1.5 to 3.0 GPM
- Dishwasher: 1.0 to 2.5 GPM
- Bathroom Faucet: 0.5 to 1.5 GPM
Let’s say your unit is rated for 4.0 GPM. If you’re running a 2.5 GPM shower and start a 2.0 GPM washer, you’re now demanding 4.5 GPM. That’s more than the heater can handle. It simply can’t heat that much water that fast, and the temperature will plummet.
The Dreaded “Cold Water Sandwich”
Ever been in the shower and gotten a sudden, shocking blast of cold water? That’s likely what plumbers call a “cold water sandwich.”
This happens when you briefly turn off the hot water—maybe to lather up—and then turn it back on. The tankless heater stops firing, leaving a pocket of cold water sitting in the pipes. When you demand hot water again, you get that slug of cold water first, followed by the newly heated water. It’s a classic tankless quirk.
Overloading your tankless unit is one of the most common non-mechanical reasons for getting cold water. The easiest fix? Stagger your use of major hot water appliances.
The solution here is all about timing and forming new habits. Try running the dishwasher or washing machine late at night or during times when you know no one will need to shower. By simply spacing out your hot water usage, you allow the heater to focus its power on one task at a time, giving you that consistent hot water you paid for. It’s a simple change that costs you nothing.
How Mineral Buildup Can Stop Hot Water Flow
If you’ve checked the power and you’re sure the unit isn’t just overloaded, it’s time to look at the most common, and often invisible, culprit: mineral buildup. This stuff, also called limescale, is the silent killer of tankless water heaters, especially if you live in an area with hard water.
Imagine the tiny pipes inside your heater’s heat exchanger. Over the years, dissolved minerals like calcium and magnesium start clinging to the inner walls, slowly but surely narrowing the path for water. This scale acts like a layer of insulation, forcing the heater to work way harder to get the water hot. Eventually, the blockage can get so bad that you get no hot water in your tankless water heater at all.
Spotting the Early Warning Signs of Scale
Long before the water goes completely cold, your heater will usually give you some hints that scale is becoming a problem. Catching these early can save you from a much bigger headache and a more expensive repair down the road.
You might first notice your water temperature isn’t as steady as it used to be. Maybe it fluctuates during a shower, or you find yourself cranking the faucet handle further to the hot side to get the same warmth. A drop in hot water pressure is another classic symptom.
Pay attention to these signs:
- Fluctuating Temperatures: The water gets hot, then lukewarm, then hot again for no reason.
- Reduced Water Pressure: You’ll only notice this on the hot water side.
- Strange Noises: A popping or rumbling sound coming from the unit is a dead giveaway it’s struggling to heat water through a layer of scale.
- Higher Energy Bills: The unit has to run longer and burn more fuel to reach the temperature you’ve set.
If any of this sounds familiar, the heat exchanger is likely being choked by mineral deposits. You need to get on top of this quickly.
The Critical Role of Descaling
I can’t stress this enough: hard water is the number one cause of tankless water heater failure. Mineral buildup can slash heating efficiency by up to 40%, leading to weird temperature swings or a total shutdown. From what we see in the field, units that aren’t regularly descaled need major repairs three times more often than well-maintained ones.
Flushing your system is the single most important maintenance task you can do. It involves circulating a special descaling solution through the unit for about an hour, which dissolves all that built-up gunk. It’s a pretty simple job that brings your heater back to peak efficiency and helps you avoid a catastrophic failure. Learning what preventive maintenance entails really drives home how this one action protects your investment.
Descaling isn’t just a “good idea”—it’s a must-do for keeping your unit alive. Forgetting this annual task is the fastest way to ruin a high-efficiency appliance.
If you’re not comfortable doing it yourself, have a pro walk you through it the first time. We’ve also put together a step-by-step guide you can follow. Check out our complete walkthrough on https://professional-plumbers-denver.com/blogs/tankless-water-heater-maintenance/ to learn the process. A little bit of effort once a year will keep your hot water flowing strong for years.
Clearing Blocked Air Vents and Exhaust
A gas tankless heater is a bit like an engine—it absolutely has to breathe. For the combustion process to work safely and efficiently, it needs a steady flow of fresh air coming in and a clear path to push exhaust fumes out.
This isn’t just about performance; it’s a critical safety feature. If either the intake or exhaust vent gets clogged, sensors inside the unit will immediately shut the whole system down. This is designed to prevent deadly exhaust gases like carbon monoxide from backing up into your home. This safety trip is one of the top reasons you’ll suddenly find yourself with no hot water in a tankless water heater.
The good news is that you can often spot the problem with a simple visual check. You don’t need any fancy tools, just your eyes.
What to Look for in Your Vents
Start your inspection outside, right where the vent pipes exit your home. This is where most blockages happen. It’s surprisingly easy for debris to build up and choke off the airflow your heater desperately needs.
Keep an eye out for these common culprits:
- Animal Nests: Birds, mice, and other critters love to build nests inside vent terminations. It’s a warm, sheltered spot for them, but it completely seals off the pipe.
- Insect Hives: Wasps are notorious for building nests just inside the vent opening, creating a blockage that’s as solid as cement.
- Yard Debris: After a windy day, it’s common to find leaves, twigs, and even grass clippings blown into the vent.
- Snow and Ice: If you live in a colder climate, a heavy snowfall or ice storm can easily bury your vents, especially if they’re installed low to the ground.
If you find anything, carefully clear it away. Often, this is all it takes to get your hot water running again.
A tankless heater is designed to fail safely. An airflow restriction is a serious condition, so the unit will shut down every single time until the airway is clear. This isn’t a glitch; it’s the system protecting you.
When the Problem Is Deeper: Installation and Condensation
Sometimes the issue isn’t a simple nest or a pile of leaves. The way the vents were installed in the first place can cause persistent problems.
Vent pipes must be installed with a very specific and continuous slope. Depending on your model (especially high-efficiency units), this slope allows the acidic condensation that naturally forms during operation to drain away properly.
If the pipes have a dip, a “belly,” or are sloped the wrong way, that moisture will pool up inside. This water can fool the unit’s pressure sensors into thinking there’s a blockage, triggering a safety shutdown. This is a much trickier problem to solve and usually points to an improper initial installation. If your vents look clear but you’re still getting shutdown errors, it’s time to have a pro come out and inspect the entire vent run.
Knowing When to Call a Professional Plumber
https://www.youtube.com/embed/b-kGs5olf8o
Look, I’m all for rolling up your sleeves and fixing things yourself. But when it comes to a no hot water in tankless water heater situation, you have to know where to draw the line. The difference between a simple DIY fix and a problem that needs a pro is huge. Crossing that line can turn a small headache into a massive expense—or worse, a serious safety risk for your family.
Some things are absolute deal-breakers. If you smell gas, even a little, don’t be a hero. Don’t touch a thing on the unit. Get everyone out, call your gas company’s emergency line from a safe distance, and then call a licensed plumber. That’s not a moment for guesswork; it’s an emergency.
Another clear sign is an error code that just won’t go away, even after you’ve tried resetting the power. Sure, some codes are simple—a dirty filter, maybe. But others point to serious internal problems with the control board or critical sensors. Trying to just reset your way out of the problem without fixing the root cause is a recipe for bigger, more expensive damage down the road.
Red Flags That Scream “Call a Pro”
Beyond an obvious gas leak, there are other symptoms that should have you reaching for the phone instead of the toolbox. Trying to tackle these without the right training and tools is just asking for trouble.
Keep an eye out for these warning signs:
- Visible Water Leaks: Any sign of water dripping from or pooling around the unit means there’s a breach somewhere. It could be a bad seal, a loose fitting, or a cracked heat exchanger. These aren’t patched with duct tape; they require professional diagnosis and repair.
- Internal Component Failures: If you’ve narrowed the problem down to the gas valve, thermocouple, or the electronic ignition system, your job is done. Stop right there. These are the heart and lungs of the heater, and messing with them is dangerous.
- Discolored or Smelly Water: Is your hot water coming out rusty, brown, or with a weird metallic smell? That’s a bad sign, often pointing to corrosion inside the heat exchanger. This is a major issue that usually means the unit needs to be replaced.
Attempting to repair internal gas or electrical components without a license isn’t just risky—it can void your manufacturer’s warranty and may even violate local building codes.
You’d be surprised how many problems trace back to a bad installation. I’ve seen it countless times. Industry experts estimate that up to 30% of tankless heater failures are due to mistakes made during the initial setup—things like improper venting or incorrect gas pressure settings. These aren’t just performance issues; they can lead to dangerous carbon monoxide leaks. Insurance companies are also quick to deny claims if they discover the damage was caused by a shoddy, non-compliant installation.
To make the decision a bit easier, here’s a quick breakdown of common scenarios and the best course of action.
DIY vs Professional Repair Scenarios
| Symptom | DIY Action | When to Call a Pro |
|---|---|---|
| No Power to Unit | Check the circuit breaker and reset if tripped. Ensure the unit is plugged in securely. | If the breaker keeps tripping or there’s no power after a reset. |
| Error Code Displayed | Look up the code in your user manual. Try a simple power reset first. | If the code indicates an internal failure or persists after a reset. |
| Low Water Flow | Clean the inlet water filter and check faucet aerators for blockages. | If flow is still weak after cleaning, suggesting a deeper system issue. |
| Gas Smell | Do nothing! Evacuate the area immediately. | Call your gas company first, then a licensed plumber. Do not attempt any repairs. |
| Visible Water Leak | Turn off the water supply to the unit. | Immediately. Water and electronics don’t mix, and it could be a sign of a major failure. |
| Loud Noises | This could be sediment buildup. You might attempt a descaling flush if you’re comfortable. | If noises are metallic (banging, grinding) or persist after a flush. |
Deciding between a DIY approach and calling for help really comes down to safety and experience. A simple filter cleaning is one thing; messing with gas lines is another entirely.
The Value of Professional Expertise
Hiring a licensed plumber isn’t just about getting the heat back on; it’s about peace of mind. A pro has the right diagnostic tools to find the real problem fast, saving you hours of frustration. They’ll also make sure every repair meets local safety codes, which protects your home and keeps your warranty valid.
Navigating that choice can feel tricky. If you’re on the fence, our guide on DIY plumbing versus calling a professional offers some great advice to help you decide with confidence.
And let’s be honest, these things never seem to break at a convenient time. Knowing you have access to an after-hours plumbing service can be a real lifesaver. In the end, it’s about making the smart, safe choice to protect your investment and, most importantly, your family.
Still Puzzled? Let’s Tackle Some Common Questions
Even after you’ve checked the basics, some issues can be head-scratchers. Don’t worry, you’re not alone. Over the years, I’ve heard just about every question there is about why a tankless water heater isn’t making hot water. Let’s go through some of the most common ones.
Why Is My Hot Water on and Off Again?
There’s nothing more maddening than hot water that comes and goes. One minute you’re enjoying a hot shower, and the next, it’s a blast of cold. This classic intermittent problem usually points to a couple of likely suspects: flow rate issues or the beginnings of mineral buildup.
First, tankless heaters need a certain amount of water flowing through them to kick on. Think of it as a minimum threshold. If you’re just trying to get a trickle of hot water from the sink, it might not be enough to tell the unit, “Hey, it’s time to work!” This is a frequent issue with modern, low-flow faucets.
The other common culprit is limescale in its early stages. Before it clogs things up completely, small flakes of mineral scale can break loose, mess with the sensors, or temporarily restrict flow. This confusion causes the heater to fire up and shut down when it shouldn’t.
What Should I Expect to Pay for a Tankless Heater Repair?
This is the big question, and the honest answer is: it depends. The cost can swing pretty dramatically based on what part failed and how much time it takes to fix it. But I can give you a realistic ballpark of what to expect.
Here’s a general breakdown of repair costs I see in the field:
- Minor Fixes: Things like replacing a flame sensor or an ignition probe are pretty straightforward. For these, you’re typically looking at $150 to $400. That usually covers the new part and about an hour of a technician’s time.
- Moderate Repairs: When you get into issues with the main control board, a busted fan, or a bad flow sensor, things get more involved. For these jobs, it’s fair to expect a bill in the $400 to $800 range.
- Major Overhauls: The most expensive repair by a long shot is a heat exchanger replacement. The part itself is costly, and the labor is intensive. This kind of job can easily run from $1,500 to over $2,500. Frankly, at that price point, you should seriously consider if replacing the whole unit makes more sense.
My advice? Always get a detailed quote before you agree to any work. A good plumber will break down the costs for both parts and labor, so you know exactly where your money is going.
How Do I Do a Proper Reset on My Tankless Water Heater?
Sometimes, all a finicky heater needs is a good old-fashioned reboot. A power flicker or a temporary system glitch can leave it confused, and a simple reset is often the first thing to try. But doing it the right way is important.
Here’s the step-by-step for a safe power cycle:
- Cut the Power: Find the power cord for your heater and pull it straight from the wall outlet. Don’t just flip a switch; you want to completely disconnect it from the power source.
- Give It a Minute: Just leave it unplugged for at least 60 seconds. This isn’t just for show—it gives the internal electronics enough time to fully discharge and wipe any temporary error codes from their memory.
- Plug It Back In: Once a full minute has passed, plug the cord securely back into the outlet.
- Run a Test: Head to a faucet, turn on the hot water, and see what happens. If the unit fires up and gives you steady hot water, you’re back in business.
A reset is your go-to move for clearing phantom error codes or fixing a hiccup from a power surge. If the error code pops right back up or the water is still cold, that’s your sign that there’s a real mechanical or electronic problem that a simple reboot won’t solve.
When DIY fixes just don’t cut it, you need someone who can figure out the problem quickly and safely. The team at Professional Plumber Denver has seen it all and has the experience to handle any tankless water heater issue, from a quick sensor swap to a tricky diagnostic. Don’t put up with cold showers for another day—visit us online or give us a call for fast, professional service in the Denver area.
