
When you’re working on a plumbing project, knowing how to measure a pipe’s diameter seems simple enough, but there’s a catch. Are you looking for the Outside Diameter (OD) to get the right fitting, or the Inside Diameter (ID) to figure out flow capacity? You can get a quick measurement with a flexible tape measure, but for a really accurate reading, digital calipers are the way to go.
Why Accurate Pipe Measurement Is So Critical
Before you even reach for your tools, it’s worth taking a moment to appreciate why this matters so much. A tiny mistake in measuring a pipe can snowball into big problems, from a nagging, slow leak in a home DIY project to a complete system failure in a commercial building.
Often, the only thing standing between a perfect, watertight seal and a slow drip that ruins a cabinet is a fraction of an inch. At home, that might mean dealing with water damage behind a wall. In an industrial setting, the stakes are much higher—you could be looking at expensive production downtime or even serious safety risks.
Simply put, precision is everything. This is especially true for more involved jobs like well water system repairs, where every single measurement has to be spot-on for the fix to hold.
Understanding Key Pipe Terminology
To measure like a pro, you need to talk the talk. Plumbing has its own language, and some of the terms aren’t as straightforward as they sound. Getting these definitions straight from the start will save you a world of headache.
- Outside Diameter (OD): This is the measurement from one outside edge of the pipe straight across to the opposite outside edge. It’s the number you’ll need most often, especially when you’re picking out fittings and clamps.
- Inside Diameter (ID): This is the space inside the pipe, measured from one inner wall to the other. If you’re concerned about flow rate or water pressure, the ID is what you need to know.
- Nominal Pipe Size (NPS): Here’s where it gets tricky. NPS is more of a “trade name” than an actual measurement. A pipe labeled as 1-inch NPS won’t actually measure exactly one inch on its OD or ID.
This whole “nominal” size thing isn’t new. It actually goes back to the mid-1800s when a guy named Robert Briggs created a standard for pipe sizes. His goal was to make sure parts from different factories would actually fit together, which was a huge deal for manufacturing at the time.
Because of this system, you can’t just slap a tape measure on a pipe and assume that’s its “size.” The real key is understanding how OD, ID, and NPS all relate to each other. Getting it right is crucial for avoiding pressure loss or, in a worst-case scenario, a burst pipe. If you’re curious about what causes that, we have a guide that explains what causes pipes to burst and how you can prevent it.
Choosing the Right Tools for the Job

When you need to measure a pipe’s diameter, having the proper tool is the difference between a wild guess and a perfect fit. The right choice really comes down to the pipe’s size and just how precise you need to be. After all, you wouldn’t measure a small engine part with a cloth sewing tape, and the same principle applies here.
For smaller pipes—anything under 6 inches or so—and jobs where accuracy is everything, a good set of digital calipers is your best friend. They give you incredibly precise Outside Diameter (OD) readings, often down to a thousandth of an inch. If you’re working on something critical like a hydraulic fitting or a gas line, there’s zero room for “close enough.” A caliper is the only way to go.
But what about bigger pipes, like a main drain line or a structural steel column? That’s where a simple, flexible tape measure becomes surprisingly effective. Wrapping it around the circumference is quick, practical, and usually more than accurate enough for that kind of work. A quick bit of math, and you’ve got your diameter.
Matching the Tool to the Task
Knowing the strengths of each tool is what separates the pros from the amateurs. Picking the right one saves you headaches, prevents costly mistakes, and ensures every connection you make is solid. Any serious DIYer or plumber knows the value of a well-rounded toolkit. If you’re building yours out, our guide on essential plumbing tools is a great place to start.
Here’s a quick rundown to help you grab the right tool for the job:
- Digital or Dial Calipers: These are your go-to for high-precision measurements of OD, ID, and even wall thickness on smaller pipes. Nothing beats them for making sure fittings will seal up tight.
- Flexible Tape Measure: The workhorse for measuring the circumference of large-diameter pipes where calipers just aren’t an option. Perfect for general plumbing and construction tasks.
- Pi Tape: This is a more specialized tool, but it’s brilliant at its one job: measuring diameter directly. It has two scales printed right on it, so you can skip the calculations entirely.
From my experience, the most common mistake isn’t using the wrong tool—it’s using the right tool the wrong way. For instance, if you don’t keep the caliper jaws perfectly square to the end of the pipe, you’ll get an angled, inaccurate reading every single time.
At the end of the day, the best tool is simply the one that gives you a confident, repeatable measurement that you can trust for your specific project.
Getting an Accurate Outside Diameter Reading
The Outside Diameter (OD) is the most critical measurement you’ll take when working with pipes. It dictates which fittings and clamps will work, and getting this number right from the start is the difference between a secure, leak-free connection and a frustrating trip back to the hardware store. Precision here is non-negotiable.
Your two best friends for this task are digital calipers and a flexible tape measure. Each one shines in different situations, and a real pro knows exactly when to reach for which tool.
Using Digital Calipers for Precision
When you’re working with smaller pipes where every fraction of an inch counts, nothing beats the pinpoint accuracy of digital calipers. They give you a direct, easy-to-read number without any guesswork.
To get a perfect measurement, gently close the large outer jaws onto the pipe. The most important thing here is to make sure they are perfectly square to the pipe’s end. An angled measurement is a useless measurement. If the jaws aren’t sitting flat and perpendicular, you’ll get an artificially large reading that will send you home with the wrong size fitting every time. I’ve seen it happen—a slightly skewed caliper can easily add an extra 1/16th of an inch, which is more than enough to cause a persistent leak.
This image shows exactly how to position the caliper for a perfect OD reading.
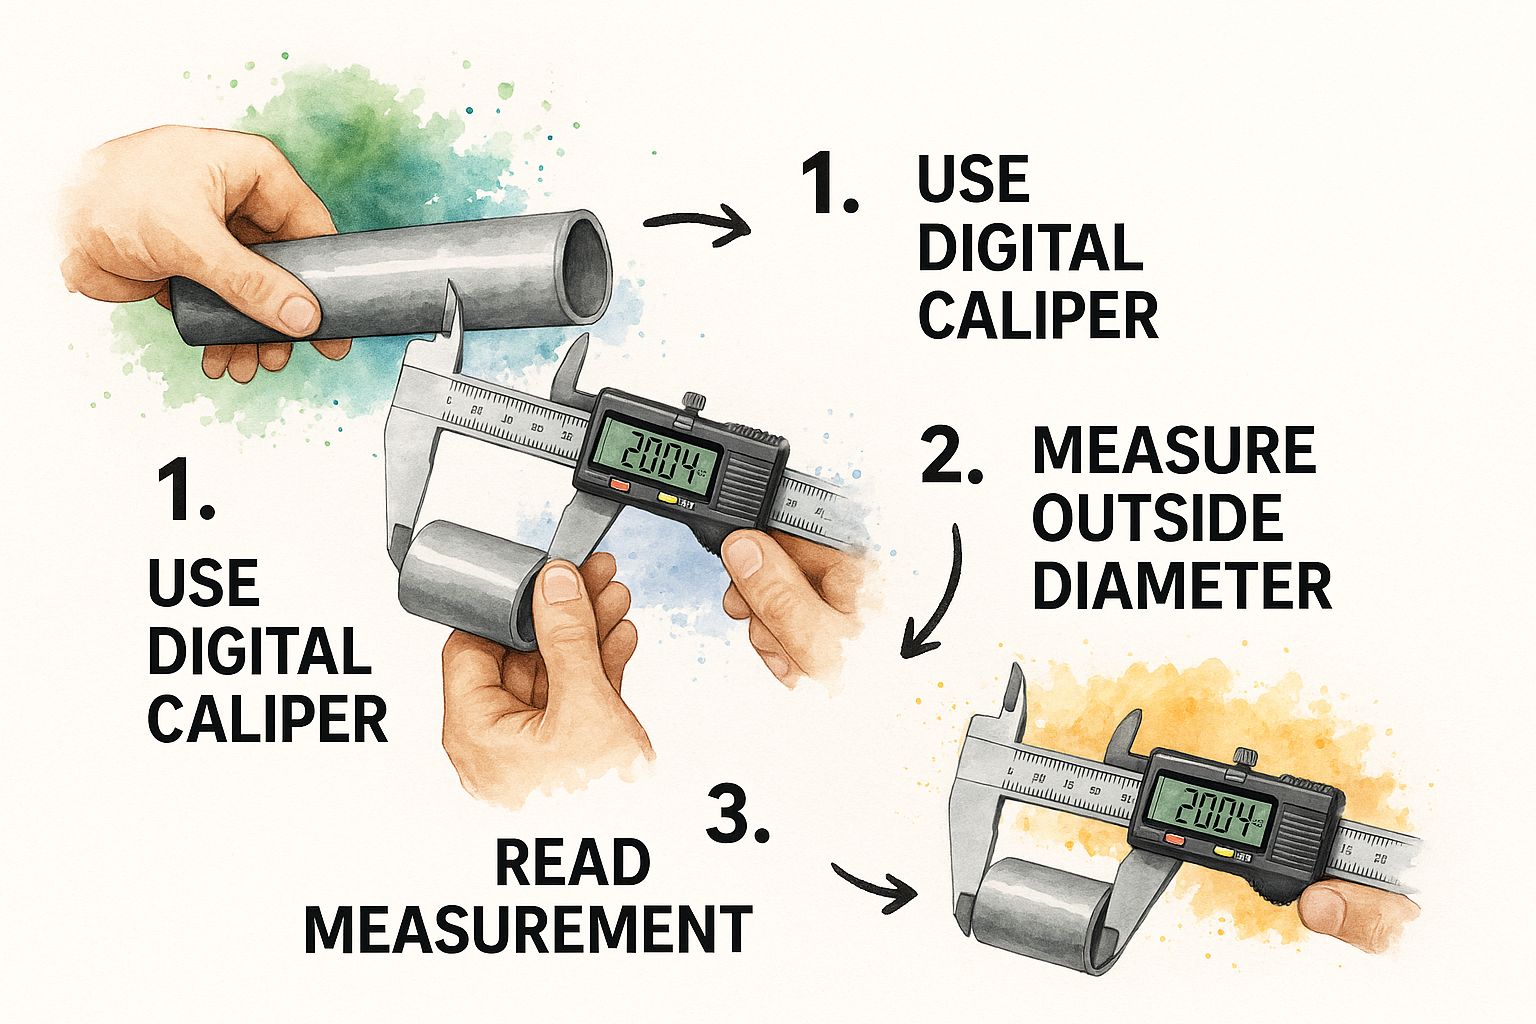
Notice how the tool’s jaws are parallel to each other and perpendicular to the length of the pipe. That’s the only way to get a true, reliable number.
The Flexible Tape Measure Method
What about when you’re faced with a pipe too big for your calipers to hug? That’s when a trusty flexible tape measure comes to the rescue. The process is straightforward, but it does involve a little bit of math.
- Wrap the Tape: Snugly wrap the tape measure around the pipe’s full circumference. Keep the tape level and flat—no twists.
- Get the Circumference: Take down the exact measurement where the tape meets its starting point.
- Do the Math: Now, just divide that circumference by Pi (3.14159). The number you get is your Outside Diameter.
Quick Tip: Don’t have a calculator handy on the job site? Just divide the circumference by 3.14. For most plumbing tasks, this will get you close enough to identify the correct nominal pipe size you’re working with.
A common headache in the field is dealing with pipes that aren’t perfectly round, often due to age, pressure, or damage. To get around this, take your OD measurement at three or four different points around the pipe and average the results. This simple extra step ensures you’re working with the most realistic dimension possible, preventing that awful scenario where a fitting is too tight on one side and too loose on the other.
Tool Selection Guide for Outside Diameter
Choosing the right tool is the first step to an accurate measurement. This quick guide breaks down which tool to grab based on the job at hand.
| Tool | Best For | Precision Level | Pro Tip |
|---|---|---|---|
| Digital Calipers | Small to medium pipes (under 6 inches) | High | Ideal for threaded fittings where tolerances are tight. Ensure jaws are zeroed out before measuring. |
| Flexible Tape Measure | Large pipes, ducts, or irregular shapes | Medium | Best for determining nominal size, not for high-precision machine work. Always use a metal tape for accuracy. |
| Pi Tape | Any size circular object | Very High | A specialized tape with both standard and diameter scales printed on it. Eliminates the need for calculation. |
Ultimately, having both a quality caliper and a good tape measure in your toolbox means you’re prepared for whatever the plumbing throws at you.
Getting a Handle on Inside Diameter and Wall Thickness
While the outside diameter (OD) is what you need for grabbing the right fittings, the inside diameter (ID) is where the real action happens. This is the measurement that tells you about the pipe’s performance—its flow rate and pressure. Get it wrong, and you could end up with a system that can’t keep up.
A pipe’s ID is tied directly to its wall thickness. You’ll often see this defined by a “Schedule” number, like Schedule 40 or Schedule 80. The bigger the schedule number, the thicker the wall. A thicker wall means a smaller inside diameter, even when two pipes have the exact same OD.
The Pro-Trusted Method for Finding the ID
Let’s be honest, trying to measure the inside diameter directly can be a real pain, especially on smaller pipes. It’s tough to get a tool in there and get a reading you can trust. That’s why the most accurate and reliable method is actually an indirect one, using two simple measurements you can take from the outside.
Here’s the formula we use in the field all the time:
Outside Diameter (OD) – (2 x Wall Thickness) = Inside Diameter (ID)
This little bit of math takes all the guesswork out of the equation. You get a precise OD, a solid wall thickness reading, and you’ll nail the ID every time.
To get that wall thickness measurement, grab your digital calipers. Hook one jaw over the outer edge of the pipe’s end and rest the other jaw on the inner edge. Just make sure you’re holding the caliper straight, not on a weird angle, to get a true reading.
A Real-World Look: Schedule 40 vs. Schedule 80
So, how does this play out on a real job site? Picture this: you’ve got two steel pipes, both labeled as 4-inch Nominal Pipe Size (NPS). For a 4 NPS steel pipe, the nominal OD is always going to be 4.5 inches. But one is Schedule 40 and the other is Schedule 80.
- A Schedule 40 Pipe has a wall thickness of 0.237 inches.
- A Schedule 80 Pipe has a much beefier wall at 0.337 inches.
Now, let’s plug those numbers into our formula:
- Sch 40 ID: 4.5″ – (2 x 0.237″) = 4.026 inches
- Sch 80 ID: 4.5″ – (2 x 0.337″) = 3.826 inches
See the difference? The Schedule 80 pipe, built for higher pressure, has a significantly smaller opening. This is absolutely critical in industrial applications where precise flow is non-negotiable. For a deeper dive, this pipe size and tolerance guide is a great resource.
These principles don’t just apply to steel, either. Understanding how materials are specified is key for modern plumbing, which is why we put together a guide on why PEX is a top choice for Denver plumbers.
Watching Out for Common Measurement Mistakes
Getting an accurate pipe measurement seems straightforward, but a few common slip-ups can send you right back to the hardware store. Trust me, I’ve seen it happen more times than I can count.
A classic error is measuring over gunk and grime. Things like rust, a thick layer of old paint, or mineral buildup can easily throw off your reading. It might only be by a fraction of an inch, but in plumbing, that’s often the difference between a perfect seal and a slow leak.
Before you put a tool on the pipe, give the measurement area a quick clean. A little sandpaper or a wire brush will do the trick. You need to make sure your calipers or tape are touching the bare pipe, not a layer of debris. It’s a tiny step that makes a huge difference.
The Pipe Isn’t Always Perfectly Round
Here’s another one I see all the time: assuming the pipe is a perfect circle. Pipes, especially older ones or those under stress, can become slightly oval-shaped. If you measure just one spot, you might be getting the widest or narrowest point, which isn’t the true diameter.
To get around this, always take at least three measurements at different spots around the pipe. Simply average those numbers together, and you’ll have a much more reliable figure to work with.
A word of caution from experience: when you’re working with more flexible pipes like PEX or some types of PVC, it’s easy to squeeze too hard with your calipers. This can slightly compress the pipe and give you a smaller, inaccurate reading. Be gentle—let the caliper jaws just kiss the surface.
Avoiding these simple mistakes is your best bet for getting the right fitting on the first try. It’s all about being precise and taking a moment to double-check your work.
Common Questions We Hear on the Job
Even after you’ve gotten the hang of measuring pipe diameter, some questions always seem to come up. Trust me, I’ve heard them all. Getting these sorted out will make you much more confident when you’re sizing up a job.
The biggest point of confusion? It’s almost always the difference between a pipe’s Nominal Pipe Size (NPS) and what your tape measure actually says. It’s best to think of NPS as a nickname or a trade size, not a literal measurement. For any pipe under 14 inches, the NPS is just a standard reference, not its true outside or inside diameter.
What’s a Pipe “Schedule”?
You’ll constantly hear plumbers and suppliers talk about pipe “Schedule,” like Schedule 40 or Schedule 80. This number is all about the pipe’s wall thickness. It’s simple: a higher schedule number means a thicker wall, which means the pipe can handle more pressure.
This system isn’t new. Back in 1927, the American Standards Association created the Nominal Pipe Size (NPS) to standardize things. As industrial jobs demanded pipes that could handle different pressures, the schedule system was developed to specify wall thickness separately from the pipe’s overall diameter. You can dig into the full history of standardized pipe dimensions on Wikipedia if you’re curious.
Here’s the most important thing to remember: Two pipes with the same NPS, say a 2-inch Schedule 40 and a 2-inch Schedule 80, will have the exact same outside diameter. The Schedule 80 pipe just has a smaller inside diameter because its walls are thicker.
If you’re dealing with plumbing issues that go beyond a simple measurement, the team at Professional Plumber Denver has your back. For any plumbing and drain cleaning projects in the Denver Metro area, check out our website or give us a call.
