
Soldering copper pipes is a classic plumbing skill that, once mastered, gives you the ability to create incredibly strong, watertight seals. The whole magic of it lies in a principle called capillary action. You heat the pipe and fitting just right, and when you touch the solder to the joint, it gets pulled into that tiny gap, creating a permanent bond.
Gathering Your Essential Soldering Toolkit
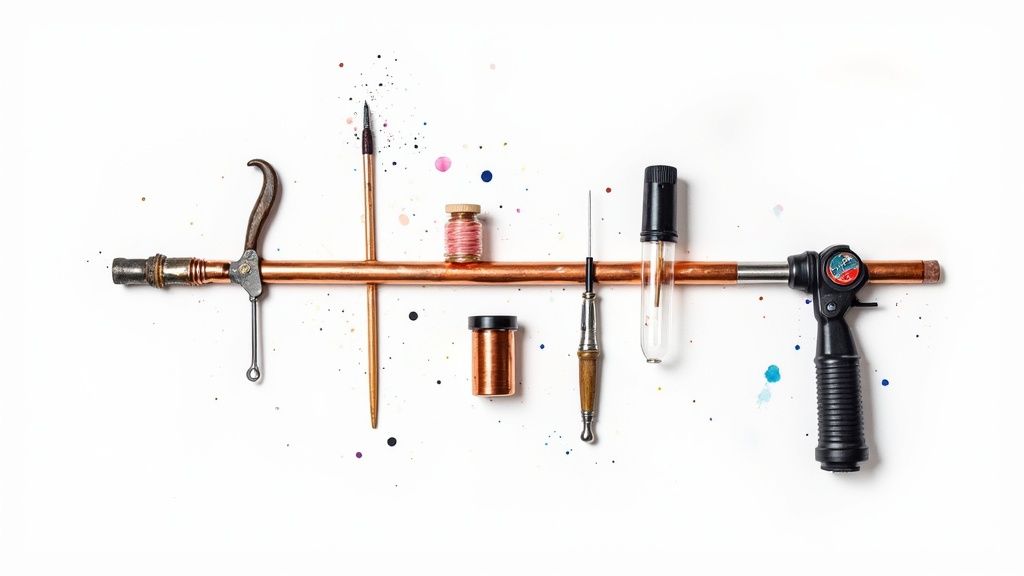
Long before you even think about striking that torch, your success is really decided by the tools you lay out. Showing up to a job unprepared is a surefire way to get frustrated and, even worse, create weak joints that will leak and cause a world of trouble down the line. It’s more than just having a torch and a roll of solder; it’s about having the right tools for every single step.
Think of it like a chef’s mise en place—everything in its place. Each tool, from the pipe cutter to the cleaning brushes, plays a critical part in the final result. Rushing your prep is a rookie mistake and the biggest difference between a quick fix and a professional joint that will hold strong for decades.
Here’s a look at the tools you absolutely need to get the job done right.
| Tool | Primary Function | Pro-Tip for Best Results |
|---|---|---|
| Propane or MAPP Gas Torch | Heats the pipe and fitting to the correct temperature for the solder to melt and flow. | MAPP gas burns hotter than propane, heating the joint faster. It’s my go-to for larger pipes (¾-inch and up) or when working in chilly conditions. |
| Lead-Free Solder | The metal alloy that melts and flows into the joint, creating the permanent seal. | For potable water lines, you must use lead-free solder. A 95/5 tin-antimony solder is a solid, reliable choice for strong joints. |
| Water-Soluble Flux | A paste applied to the cleaned copper that prevents oxidation and helps the solder flow evenly. | Water-soluble flux is a game-changer. It’s easy to work with and cleans up with a simple wet rag, which helps prevent corrosion inside the pipe later on. |
| Pipe and Fitting Brushes | Abrasive tools used to mechanically clean the inside of the fitting and the outside of the pipe. | Don’t stop cleaning until the copper has a bright, shiny, almost salmon-pink color. A dull surface is a sign of oxidation, and solder will not stick to it properly. |
| Pipe Cutter | Cuts copper pipe cleanly and squarely, which is essential for a proper fit. | A good tubing cutter is worth its weight in gold. It gives you a clean, burr-free cut that a hacksaw just can’t match. |
| Deburring Tool | Removes the small metal ridge (burr) left on the inside of the pipe after cutting. | Skipping this step can restrict water flow and create turbulence in the line. Most good pipe cutters have a deburring tool built right in. |
Having this lineup ready to go makes the entire process smoother and more professional. The global soldering market was valued at around USD 2 billion in 2025 and continues to grow, which just goes to show how fundamental this skill is across plumbing and construction.
Safety Gear Is Not Optional
Now let’s talk about the gear that protects you. Working with an open flame and molten metal is no joke and demands your full respect.
Never, ever start a soldering job without the right safety gear. An accident happens in a split second and can cause serious burns. Your well-being is always more important than getting the job done a few minutes faster.
Your non-negotiable safety kit should include:
- Heat-Resistant Gloves: Protect your hands from touching a pipe that’s still screaming hot.
- Safety Goggles: Shield your eyes from any unexpected spatter of hot flux or solder.
- Fire Extinguisher: Always have a certified fire extinguisher within arm’s reach. No excuses.
This isn’t just a friendly suggestion; it’s a professional standard. If you want to build out a more comprehensive plumbing toolkit, our guide on essential plumbing tools has you covered.
Getting Your Pipes Ready for a Flawless Solder Joint
Most people think the secret to a great solder joint is all in how you handle the torch. And while good heat control is definitely part of it, the real make-or-break moment happens long before you even strike a flame. The truth is, meticulous preparation is what separates a pro-level, leak-proof connection from a botched job that’ll cause you headaches down the line.
This isn’t just about giving the pipe a quick wipe. It’s a deliberate process to create a perfectly clean, smooth surface that the solder can grab onto. If you rush this part, I can almost guarantee you’ll end up with a weak joint.
Cutting and Fitting for a Perfect Union
It all starts with a perfectly square cut. For this, nothing beats a wheeled pipe cutter. It gives you a clean, straight edge every time, unlike a hacksaw which can leave things messy and uneven. A square cut is crucial because it ensures the pipe seats all the way into the fitting, giving you the maximum surface area for a strong bond.
Once you’ve made your cut, you’ll find a little ridge, or burr, left on the inside of the pipe. You have to get rid of it.
That tiny burr might not look like much, but it creates turbulence as water flows past. Over the years, that turbulence can literally wear away the copper from the inside, eventually causing nasty pinhole leaks.
Grab a deburring tool and ream out the inside of the pipe until it’s completely smooth. Now, test the fit by pushing the pipe and fitting together without any solder or flux. It should slide in smoothly and bottom out completely inside the fitting’s socket. If you need a hand with getting your measurements just right, our guide on how to measure pipe diameter has some great pointers.
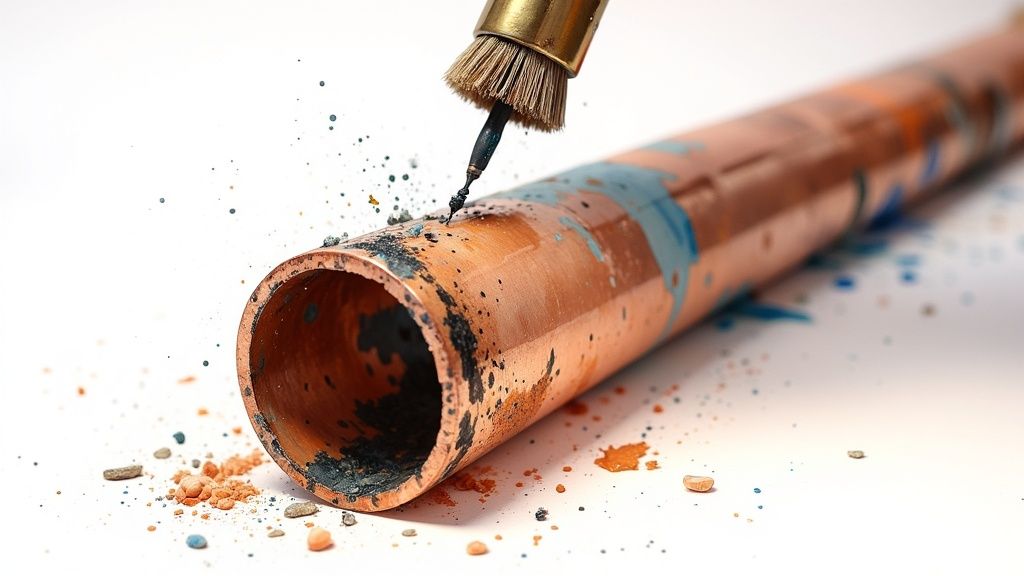
Clean It Until It Shines Like a New Penny
This is the most important step of all: cleaning. Copper naturally develops an oxide layer when it’s exposed to air, and solder just won’t stick to that stuff. The goal here is to scrub that layer away until the metal is bright and shiny.
- Cleaning the Pipe: Grab some sand cloth or an open-mesh abrasive cloth and get to work polishing the end of the pipe. You want to see that copper gleam like a freshly minted penny.
- Cleaning the Fitting: For the inside of the fitting, a dedicated fitting brush is your best friend. Make sure you’re using the right size for your pipe. A few quick twists is all it takes to get that same bright, shiny finish on the inside.
Once you’ve cleaned these surfaces, try not to touch them with your bare hands. The natural oils on your skin can mess with the soldering process and prevent the solder from flowing properly.
Applying Flux: A Little Goes a Long Way
With your copper surfaces perfectly clean, it’s time for the flux. Think of flux as a chemical cleaner that works under heat. It stops the copper from oxidizing again as you heat it and, more importantly, it helps pull the molten solder deep into the joint. This is called capillary action, and it’s what makes the joint strong.
Using a small acid brush, apply a thin, even coat of flux to the outside of the pipe end and the inside of the fitting.
And when I say thin, I mean it. Piling on too much flux is a classic rookie mistake, and it causes big problems. Excess flux gets squeezed inside the pipe, and the heat turns it corrosive. It will sit there and slowly eat away at your pipes, leading to serious damage over time. Just apply a light film and wipe away any extra before you put the joint together.
Mastering Heat Control and Solder Application
Alright, your joint is cleaned, fluxed, and fitted together. Now comes the fun part: fire. This is where skill and a steady hand come into play, turning two separate pieces of copper into one solid, leak-proof connection.
Getting the heat right is more about finesse than brute force. The biggest rookie mistake I see is pointing the torch flame right at the joint’s seam. Don’t do that. You want to heat the fitting, not the pipe or the seam. Copper conducts heat beautifully, so warming up the fitting ensures the entire joint heats up evenly. This is what sets the stage for capillary action to pull that solder right in.
The Art of Heating the Joint
The whole idea is to get the copper just hot enough to melt solder on contact. If you go too far, you’ll burn the flux. Burnt flux turns black, stops working, and will actively prevent solder from flowing where it needs to go.
Start by sweeping the blue tip of your torch’s flame back and forth across the body of the fitting. Keep it moving. If you hold it in one spot, you’ll create a hot spot, and the solder will only flow there, leaving you with a guaranteed leak.
This image perfectly illustrates the concept—heat the fitting, and the solder will follow.
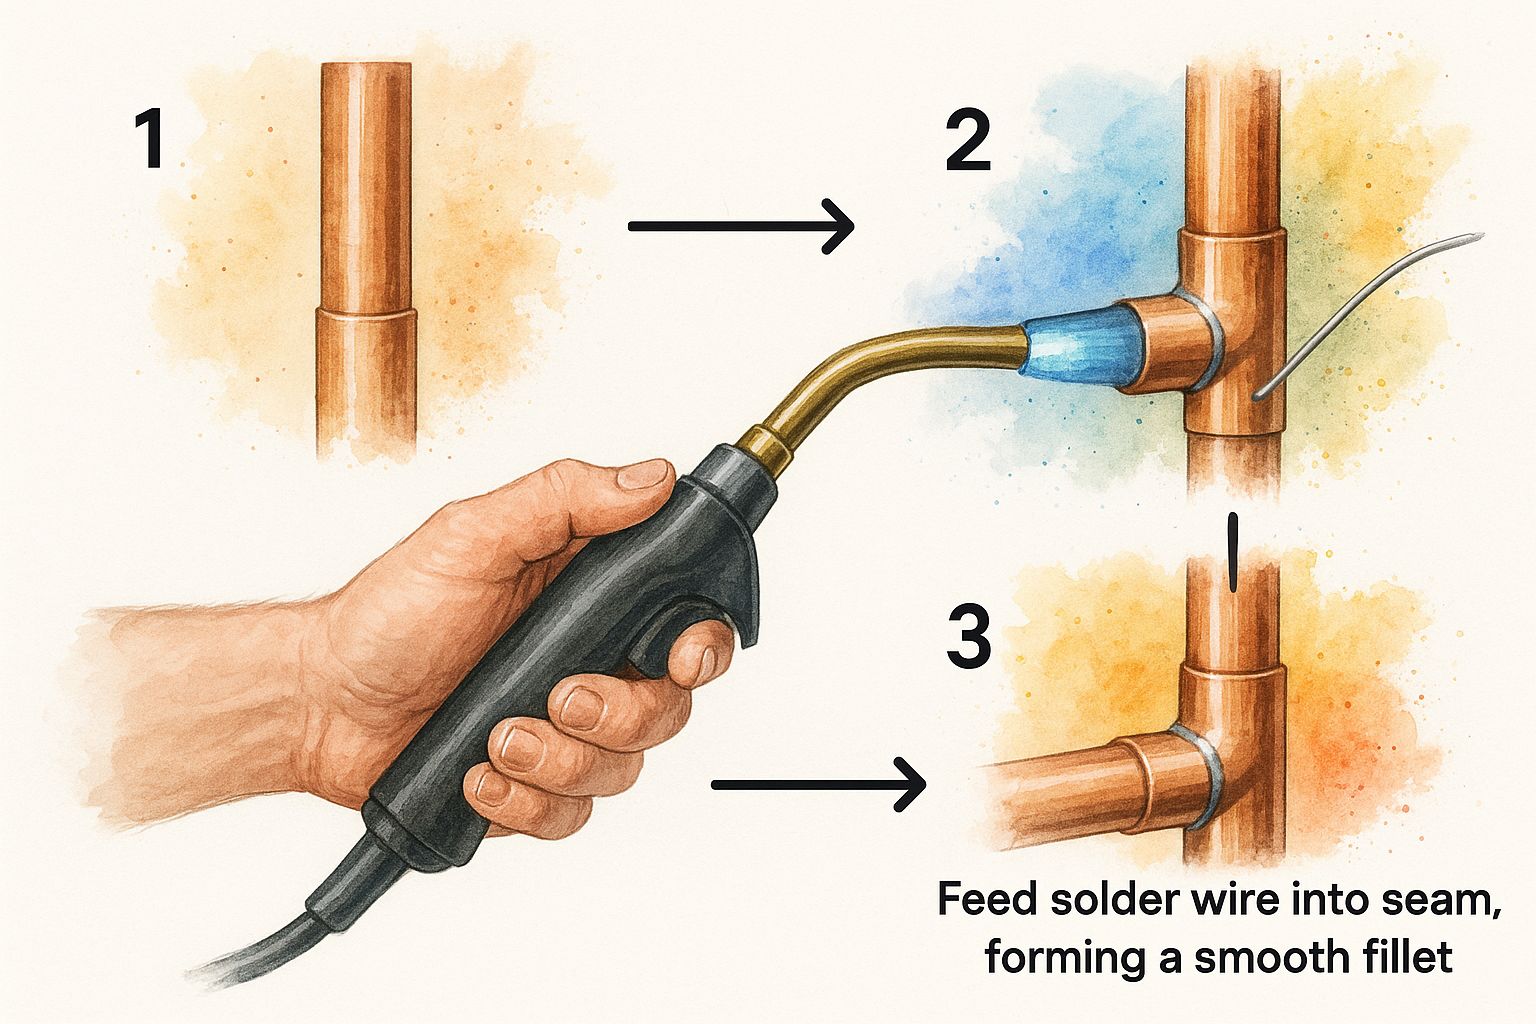
See how the heat is concentrated on the fitting? That’s what pulls the solder into the joint for a perfect seal.
Knowing When It’s Time to Solder
So, how do you know when it’s hot enough? Simple: watch the flux. As the temperature rises, the flux will start to bubble and then let off a little wisp of smoke. That’s your cue. The second you see that smoke, pull the flame away.
Now, immediately touch the tip of your lead-free solder to the joint on the opposite side from where you were just applying heat. If you’ve done it right, the hot copper will melt the solder instantly, and capillary action will suck it right into the gap.
Pro Tip: Solder always follows the heat. By heating one side and applying solder to the other, you force the molten metal to travel completely through the joint, ensuring a solid, 360-degree seal.
For a standard ½-inch or ¾-inch fitting, you’ll only need about a half-inch of solder—maybe a tiny bit more. Once a complete, shiny silver ring forms around the seam, pull the solder away. You’re done. Let the joint cool down on its own. It’s this kind of reliability that has made copper a plumbing staple; in fact, the global copper tubes market was valued at over USD 29 billion in 2025 and continues to grow. You can discover more insights about the copper tubes market and its projected expansion.
Common Heat Control Mistakes
Getting a feel for the heat takes practice. Here are the most common slip-ups to avoid:
- Underheating: You touch the solder to the joint, and it just sits there or forms a blob. The copper isn’t hot enough. Don’t ever “paint” the joint by melting the solder with the torch flame—that just creates a cold joint that will fail. Just put the flame back on the fitting for a few more seconds and try again.
- Overheating: If the flux turns black and crusty or the copper itself starts to glow red, you’ve gone way too far. The flux is ruined, and the solder will just bead up and drip off. You’ll have to take it apart, clean everything, and start over.
- Uneven Heating: If you only heat one side, the solder will only flow to that one spot. This leaves massive gaps and a pipe that will leak the second you turn the water on. Remember: always keep that flame moving.
Cleaning and Inspecting Your Final Work
You’ve applied the heat and the solder flowed just right—you’ve got a solid connection. But hold on, the job isn’t quite finished. This final step of cleaning and inspecting is what separates a decent joint from a professional one, and it’s absolutely crucial for the long-term integrity of your plumbing.
While the joint is still hot (but after the solder has hardened and lost that liquid sheen), take a damp rag and give it a good, firm wipe. This simple move cleans off any excess flux residue on the outside of the pipe.
You want to get that stuff off right away. Why? Because heated flux becomes corrosive. If left on, it will eventually cause a greenish-blue discoloration called verdigris, which will slowly eat away at the copper over time.
What a Perfect Solder Joint Looks Like
Once the pipe has completely cooled to room temperature, it’s time to put on your detective hat. A well-soldered joint has a very specific look, and learning to read the signs is a skill that tells you whether you’ve nailed the process.
Here’s exactly what you’re looking for:
- A Continuous Silver Ring: The solder should form a smooth, complete, and shiny silver fillet that wraps perfectly around the entire joint.
- No Voids or Gaps: Get in close and check for any tiny pinholes or spots where the solder didn’t quite fill the space between the pipe and the fitting.
- Minimal Drips: A small, uniform bead is perfectly fine, but big, lumpy drips are a dead giveaway that you used too much solder or held the heat on for too long.
- No Black Soot: The copper around the joint should still look like clean copper, not like it’s been blackened in a fire. Soot is a classic sign you overheated and burned the flux.
A perfect solder joint isn’t just about function; it’s a mark of true craftsmanship. It’s the visual proof that every single step, from cleaning to heating, was done right. That silver ring is your guarantee of a connection built to last a lifetime.
If you spot any of these problems, treat it as a red flag. A small drip can usually be filed off, no problem. But voids, or a dull, grainy-looking joint, often mean the solder didn’t bond correctly with the copper.
In those cases, the only reliable fix is to reheat the joint, pull it apart, clean everything meticulously, and start over. This final quality check is your best insurance against future leaks, ensuring your hard work results in a professional connection you can trust for years to come.
Troubleshooting Common Soldering Problems
Even when you do everything right, soldering can throw you a curveball. A joint that just won’t accept solder or a tiny leak that appears after you’ve put your tools away can be infuriating. But don’t sweat it—most of these issues are easy to fix and are valuable lessons in disguise. Learning to spot and solve these problems is what separates the novices from the pros.
Soldering is a core skill in plumbing for a reason. It’s the backbone of a huge industry, with the global market for copper pipes and tubes expected to hit nearly 6 million tons by 2030. This just goes to show how essential solid, leak-free joints are. If you’re curious, you can dig into more stats about the future of the copper pipe market to see the bigger picture.
When Solder Just Won’t Flow into the Joint
This is probably the most common headache you’ll run into. You heat up the fitting, touch the solder to the seam, and it just beads up and falls off, refusing to get pulled into the joint.
My Take: When solder doesn’t flow, it’s almost always a problem with heat or cleanliness. Solder is picky; it only goes where conditions are just right.
Let’s figure out what’s going wrong. Pinpointing the cause is the first step to fixing it.
- Is it hot enough? The copper fitting needs to melt the solder, not your torch. If you’re melting the solder wire with the flame directly, you’re creating a weak “cold joint” that’s doomed to fail. Give the fitting a few more seconds of heat and try again.
- Is it too hot? If you see black soot forming around the joint, you’ve gone too far and burned the flux. At this point, the joint is a lost cause. You have to let it cool completely, take it apart, and start the cleaning and fluxing process all over again.
- Is it truly clean? Even a small amount of oil from your fingers, dirt, or leftover oxidation will stop solder in its tracks. This is why that initial prep work is so crucial. The surfaces have to be shiny and immaculate.
Getting Rid of Ugly Drips and Blobs
A lumpy, messy joint covered in solder drips is a dead giveaway of an amateur job. While it might not leak right away, it looks unprofessional and often indicates a poor technique that could be hiding a bigger problem.
This almost always comes down to a couple of simple mistakes:
- Too much solder: For a standard ½-inch pipe, you only need about a half-inch of solder. If you keep feeding the wire in, the excess has nowhere to go but down.
- Too much heat: Overheating makes the solder super runny, causing it to shoot right past the joint before it has a chance to set.
Luckily, the fix is simple. Once you see that complete, clean silver ring form around the seam, pull the solder away immediately. It just takes a little practice to get a feel for how much is just enough.
Dealing with a Maddening Pinhole Leak
This is the worst. You turn the water on, feeling proud of your work, only to see a tiny, high-pressure stream of water spraying from the joint. That pinhole leak is a clear sign the solder didn’t make it all the way around.
Usually, this means you either missed a spot when cleaning or didn’t heat the fitting evenly, leaving a cool spot where the solder couldn’t flow. Don’t try to patch it by dabbing more solder on the outside—that never works for long. The only right way to fix it is to drain the line, heat the joint until the old solder melts, pull it apart, and do the whole process over from scratch. Clean, flux, and solder again. It’s the only way to guarantee a permanent fix.
Answering Your Copper Pipe Soldering Questions
Even with the best instructions, you’re bound to run into a few questions when you’re in the middle of a soldering job. Getting the right answers to these common hang-ups can make all the difference, turning a potential leak into a rock-solid joint that will last for decades.
Let’s dive into some of the most frequent questions I hear and get you the practical advice you need, whether you’re firing up a torch for the first time or just sharpening your skills.
What’s the Right Solder for Water Lines?
This is a big one, and it’s non-negotiable, especially when you’re working on plumbing for drinking water.
You must use lead-free solder for any pipes carrying potable water. This isn’t just a friendly suggestion—it’s a critical safety and legal requirement to keep lead out of the water supply. Always check the packaging for a “lead-free” label. These solders are typically a tin alloy, often mixed with a bit of copper, silver, or antimony. Whatever you do, don’t grab that old roll of leaded solder from your grandpa’s toolbox for a drinking water line.
Why Is My Solder Dripping Instead of Flowing into the Joint?
It’s a classic rookie mistake: you go to apply the solder, and it just beads up and drips onto the floor instead of wicking cleanly into the fitting. It’s frustrating, but the fix is usually simple. This problem almost always boils down to one of two things: too much heat or too much solder.
If you blast the fitting with the torch for too long, you’ll burn off the flux. Without that flux, the solder has nowhere to go. On the other hand, if you just keep feeding solder wire into the joint, the excess has to go somewhere—and that somewhere is usually down. The trick is to heat the fitting just enough so the solder melts the moment it touches the copper, letting capillary action pull it into the gap for a perfect seal.
Pro Tip: A tiny, persistent trickle of water can completely sabotage your work by sucking all the heat away. If you can’t get the pipe bone dry, try the old plumber’s trick: stuff a small ball of white bread up into the pipe. It acts as a temporary dam, buying you enough time to solder the joint, and it will simply dissolve once the water is turned back on.
Can I Solder a Pipe That Still Has Water in It?
The short answer? Absolutely not.
Even a few drops of water inside the pipe will kill your chances of getting a good joint. The heat from the torch will instantly turn that water into steam, and steam is incredibly efficient at absorbing heat. The copper will never get hot enough to melt the solder, no matter how long you hold the flame on it.
Make sure the line is fully drained and completely dry before you even think about lighting your torch. If you find yourself dealing with a section of pipe that seems to require more than just a simple fix, it might be a sign of a bigger issue. You can learn more about what copper repiping is and when it’s necessary from our guide on the topic.
When a small repair turns into a major plumbing headache, don’t hesitate to bring in a professional. For any plumbing and drain cleaning needs across the Denver Metro area, Professional Plumbers Denver delivers reliable, expert service. Reach out to us today for everything from simple leak repairs to full-scale installations at https://professional-plumbers-denver.com.
