
So, you’re ready to tackle that leaky or corroded kitchen sink strainer? It’s one of those projects that looks more intimidating than it actually is. The whole process really just boils down to shutting off the water, getting the old drain pipes out of the way, wrestling the old strainer free, and then putting the new one in its place with a good seal.
Honestly, for most people, this is a job you can knock out in well under an hour.
Gearing Up: Everything You Need to Replace a Kitchen Sink Strainer
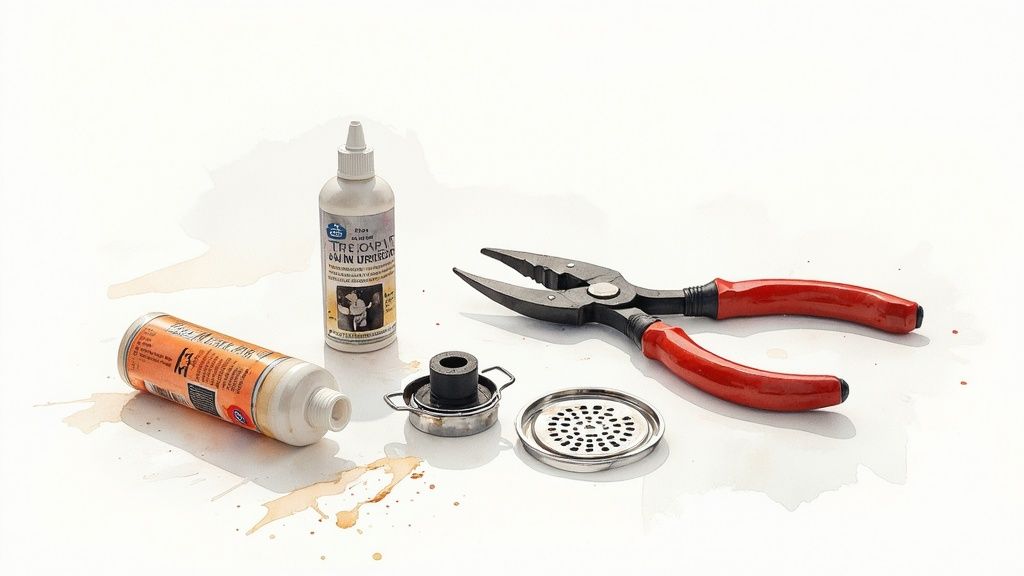
The absolute key to a frustration-free plumbing project is having everything you need within arm’s reach before you start. Trust me, nothing is worse than having your sink in pieces only to realize you’re missing a crucial tool. A little prep work turns this into a satisfying weekend win.
Before you even head to the store, it helps to know what you’re looking at. Your new sink strainer kit will typically include the main strainer body, a rubber gasket, a friction ring (usually cardboard or plastic), and the big locknut that holds it all together.
You’ll almost certainly be working with a “back nut” style strainer. They’re the most common type out there because they’re cheap and easy for pros and DIYers to install. In fact, market studies from back in 2018 showed this design dominated sales, largely because people were more focused on kitchen and bathroom hygiene. You can dig into the market trends for sink strainers on industrygrowthinsights.com if you’re curious.
Your Tools and Materials Checklist
Having your gear laid out and ready to go is half the battle. This simple setup prevents a messy, half-done job and that dreaded mid-project trip to the hardware store.
Here’s a quick rundown of what you should gather up.
Essential Tools and Materials for Sink Strainer Replacement
This checklist covers everything you’ll need to get the job done right, from taking the old one out to leak-testing the new one.
| Item | Purpose | Pro Tip |
|---|---|---|
| New Sink Strainer Kit | The main replacement part. | Double-check that it fits your sink’s drain opening. Most are a standard 3.5 inches, but it never hurts to measure. |
| Plumber’s Putty | Creates that essential waterproof seal. | A small tub is plenty. Whatever you do, don’t use silicone caulk for this—it makes future repairs a nightmare. |
| Channel-Lock Pliers | Your go-to for grabbing and turning slip nuts. | A pair with at least a 10-inch handle will give you the leverage you need without busting your knuckles. |
| Strainer Wrench | The specialty tool for the strainer’s locknut. | Also called a basket strainer wrench. It makes life so much easier, but you can often manage with large pliers in a pinch. |
| Bucket | To catch the nasty water from the P-trap. | Any small bucket or large bowl you don’t mind getting dirty will work just fine. |
| Plastic Putty Knife | For scraping away old, crusty putty. | Always go with plastic! A metal one can easily scratch and permanently damage your sink’s finish. |
| Rags or Paper Towels | For general cleanup and drying. | Have a good supply handy. Plumbing is rarely a clean job. |
| Penetrating Oil (Optional) | A secret weapon for a stubborn, rusted locknut. | If the old strainer has been there for decades, a quick spray of something like WD-40 can save you a ton of grief. |
With these items ready, you’re all set for a successful replacement.
This kind of project is a perfect gateway into DIY plumbing. Once you see how straightforward it is, you might feel ready for a bigger challenge. If you get the bug, you should check out our comprehensive guide on how to install a kitchen sink from scratch.
Removing the Old Sink Strainer Without a Fight
Let’s be honest, getting the old, corroded strainer out is usually the toughest part of this whole job. Years of gunk, soap scum, and who-knows-what-else can practically weld the parts together. But with the right approach, you can win this battle without wrecking your sink.
First things first, clear everything out from under the sink. You’re going to need all the room you can get, and the last thing you want is to soak your cleaning supplies in grimy drain water. Slide a small bucket directly under the pipes—because trust me, no matter how much you think you’ve drained it, the P-trap always has a little surprise waiting for you.
Disconnecting the Drain Plumbing
Your first move is to take off the P-trap, that U-shaped pipe that prevents sewer gas from coming up your drain. It’s held in place by two large rings, which we call slip nuts. One connects the trap to the tailpiece dropping down from the strainer, and the other hooks it up to the drainpipe heading into the wall.
Grab your channel-lock pliers and get a good grip on the slip nut closest to the sink. Turn it counter-clockwise to loosen it up. It might put up a fight, but a little muscle will break it free. Repeat for the second nut, and the whole P-trap assembly will come right off, dumping its contents into your bucket.
With the trap out of the way, you finally have a clear shot at the main event: the strainer’s locknut.
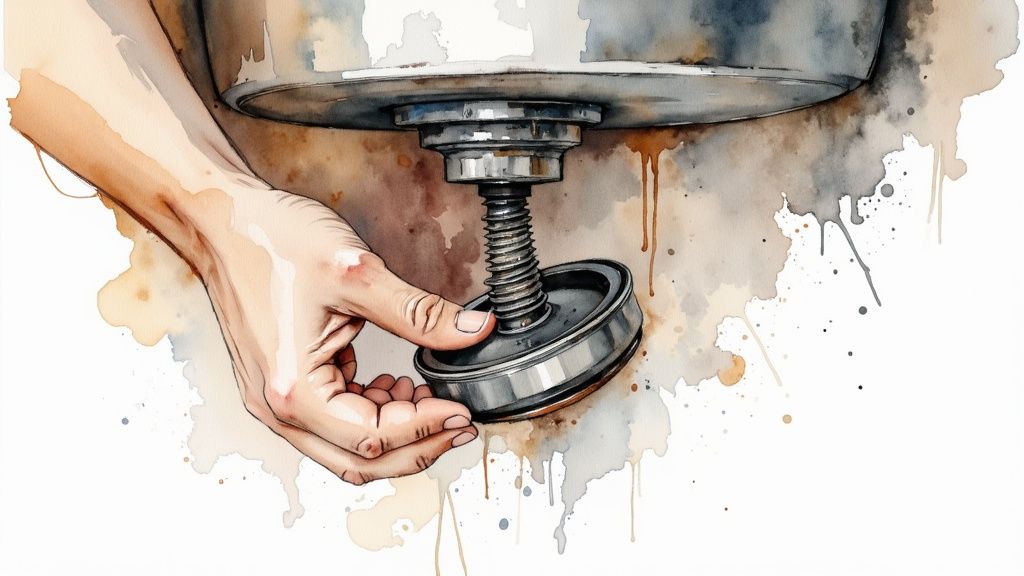
Tackling the Stubborn Locknut
This is the big nut that clamps the strainer body tight against the underside of the sink. Nine times out of ten, this is the part that will give you the most grief, especially if you’re dealing with an old, rusted metal one.
Here’s how I usually approach it, from the easiest method to the last-ditch effort:
- The Right Tool for the Job: A specialty strainer wrench (sometimes called a basket strainer wrench) is designed for this exact purpose. Its long arms give you fantastic leverage, letting you grip the locknut’s little tabs and turn it without a struggle. If you plan on doing more plumbing projects, it’s a tool worth having.
- The Common Workaround: No special wrench? A big pair of channel-lock pliers can often get it done. You’ll need to open the jaws wide to grab onto the tabs and apply slow, steady pressure. It’s an awkward angle, but it usually works.
But sometimes, just throwing more muscle at it isn’t the answer and can even risk cracking a porcelain sink. If that nut just won’t budge, it’s time to change tactics.
Pro Tip: Before you go full-on beast mode, grab some penetrating oil like WD-40 and give the locknut threads a good spray. Let it sit for at least 15-20 minutes to soak in and do its thing. This one simple step has saved me from a world of frustration on countless jobs.
When All Else Fails
So, you’ve tried the pliers, you’ve doused it in penetrating oil, and that locknut is just mocking you. This is what happens when corrosion has essentially fused the nut to the strainer body. It’s time for the last resort.
If you’re up against a truly frozen metal nut, you can use a mini hacksaw or a Dremel with a cutting wheel to carefully slice a groove into it. The goal isn’t to cut all the way through to the strainer threads—you just want to cut about 90% of the way through the nut itself. This is usually enough to relieve the tension holding it hostage.
Once you’ve made the cut, wedge a flathead screwdriver into the slot and give it a sharp twist. That should be enough to crack the nut the rest of the way, allowing you to finally spin it off by hand. With the locknut defeated, just push the old strainer up and out of the sink from below. You’ve won.
Getting the Sink Surface Ready for a Perfect Seal
With the old strainer finally out of the way, you’ve reached what I consider the most important step for preventing future leaks. A watertight finish all comes down to a perfectly clean surface, and I’ve seen countless homeowners create headaches for themselves by rushing this part. Trust me, don’t skip it.
Once the old assembly is gone, you’ll probably be looking at a nasty, grimy ring of old plumber’s putty and mineral deposits. This gunk is the number one enemy of a good seal. The mission here is to get that drain opening perfectly smooth, clean, and dry for the new strainer.
Clearing Out the Old Gunk
I usually grab a plastic putty knife or even an old credit card to start scraping away the bigger chunks of residue. Using plastic is the key—it protects your sink’s finish. This is especially true if you have a stainless steel, granite composite, or porcelain sink that can be easily scratched by metal tools.
If you hit some stubborn spots that just won’t give up, a non-abrasive scouring pad with a bit of isopropyl alcohol usually does the trick. It’s great at cutting through the grime without causing any damage.
Take a second to wipe the area dry and run your finger around the drain opening. Feel any bumps or grit? If so, get back in there and clean it again. This little bit of prep work only takes about five minutes but is the secret to a professional, watertight seal that will last.
This growing focus on better, more hygienic materials is a big reason the global sink strainers market is expanding. It was valued at around USD 1.2 billion in 2024 and is expected to climb to USD 2.1 billion by 2030, all thanks to people wanting more durable and customized kitchen gear. You can find more details on these trends over at deepmarketinsights.com.
The Final Touches for a Rock-Solid Seal
After all that cleaning, give the entire area one last wipe-down with a clean, dry cloth. Any lingering moisture or dust can ruin the seal from your plumber’s putty or silicone. For certain sinks, like granite or marble, you might want to use a high-quality bacteria-resistant sanitary silicone sealant instead of traditional putty for an even more hygienic and durable bond.
Since you’ve got everything taken apart, this is also the perfect time to think about the rest of your drain system. You’re already under the sink, so why not tackle any funky smells coming from the disposal? We’ve got some great, practical tips in our guide on https://professional-plumbers-denver.com/blogs/how-to-clean-garbage-disposal/.
Alright, the old strainer is out, and the sink is sparkling clean. Now for the fun part: installing the new hardware. This is where all that prep work really shines, setting you up for a professional, leak-free finish. The process itself isn’t complicated, but getting the small details right is what separates a quick fix from a lasting one.
Your first step involves the unsung hero of plumbing: plumber’s putty. This stuff creates the primary seal, so don’t be shy with it. Scoop out a chunk about the size of a large marble.
Work the putty in your hands for a minute to warm it up, then roll it into a uniform “snake” about 1/4 inch thick—think the diameter of a standard pencil.
Setting the Strainer with Plumber’s Putty
Take that rope of putty and carefully lay it around the underside of the new strainer’s flange (the metal lip that sits inside the sink). You’re aiming for a complete, unbroken circle. A little extra putty is always better than not enough; the excess will just squeeze out later, which is exactly what you want to see.
Now, press the strainer body firmly down into the drain opening in your sink. Give it a good, even push to seat it and create an initial bond. From this point on, all the action happens underneath the sink.
This infographic breaks down the essential moves: aligning the parts, tightening everything down, and running a final test.
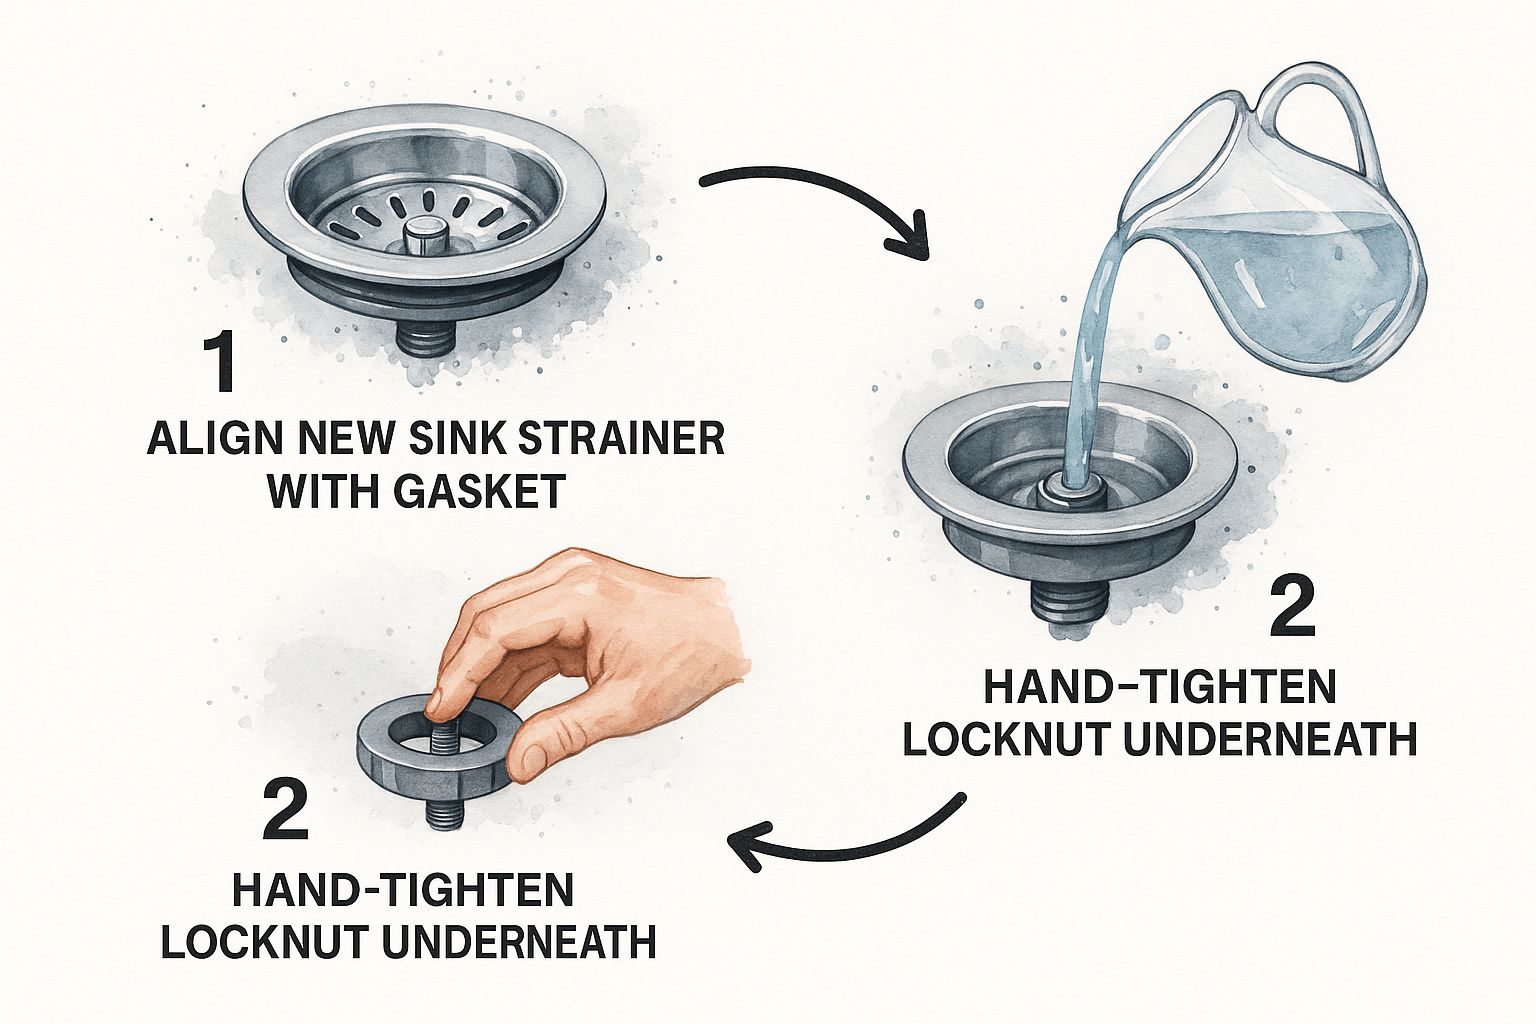
As you can see, a solid seal depends entirely on getting the assembly order right before you check your work with a water test.
Securing the Strainer from Underneath
Getting the components underneath the sink installed in the right order is absolutely crucial for a watertight connection that will last for years.
- First, slide the rubber gasket up the threaded body of the strainer until it’s pressed firmly against the bottom of the sink.
- Next up is the friction washer. This is usually a thin piece of cardboard or plastic. Its only job is to let the locknut glide smoothly without catching and twisting the rubber gasket.
- Finally, thread on the locknut. Spin it up until it’s just hand-tight for now.
Here’s a pro tip that makes all the difference: you have to stop the strainer from spinning in the sink while you tighten the locknut from below. The easiest way is to ask a helper to hold the strainer basket still from above. Flying solo? No problem. Just stick the handles of your channel-lock pliers down into the strainer’s crossbars to brace it.
Crucial Tip: Use your strainer wrench or large pliers to tighten the locknut. You’re going for snug and secure, not cranking on it with all your might. Over-tightening is a classic rookie mistake that can crack the brand-new locknut or, even worse, damage your sink. Think firm compression, not brute force.
As you tighten, you’ll see a beautiful, satisfying ring of excess putty squeeze out around the flange inside the sink bowl. That’s your visual confirmation of a perfect, 360-degree seal. Leave that excess putty there for now. We’ll clean it up in the final step after you’ve reconnected the pipes.
And just like that, your new hardware is officially in place.
Reconnecting the Drain and Checking for Leaks
You’re on the home stretch, but this is where a little patience makes all the difference. Before you start wrestling with the pipes again, take a moment to clean up. You’ll probably see some plumber’s putty that has squeezed out around the new strainer inside the sink bowl. Just wipe that excess away with your finger or a soft cloth. It’s a small step that leaves a clean, professional finish.
Now, let’s get that plumbing hooked back up. Grab the P-trap assembly you set aside earlier.
Putting the P-Trap Back in Place
Your goal is to line up the P-trap perfectly between the new strainer’s tailpiece and the drainpipe coming out of the wall. The biggest mistake people make here is cross-threading the slip nuts, which is a guaranteed recipe for a leak.
My advice? Always start by hand-tightening. Get those threads to catch smoothly and spin the nut on as far as it will comfortably go with just your fingers.
Once everything is hand-tight, take your channel-lock pliers and give each connection a final quarter-turn. That’s it. Seriously, don’t crank on it with all your might. Hand-tight plus a gentle nudge is the golden rule. If you over-tighten, you risk cracking the plastic nuts or deforming the washers, which will cause the very leak you’re trying to prevent.
Understanding how this simple-looking pipe works can make plumbing less intimidating. You can learn more about its purpose in our guide that explains what a P-trap does.
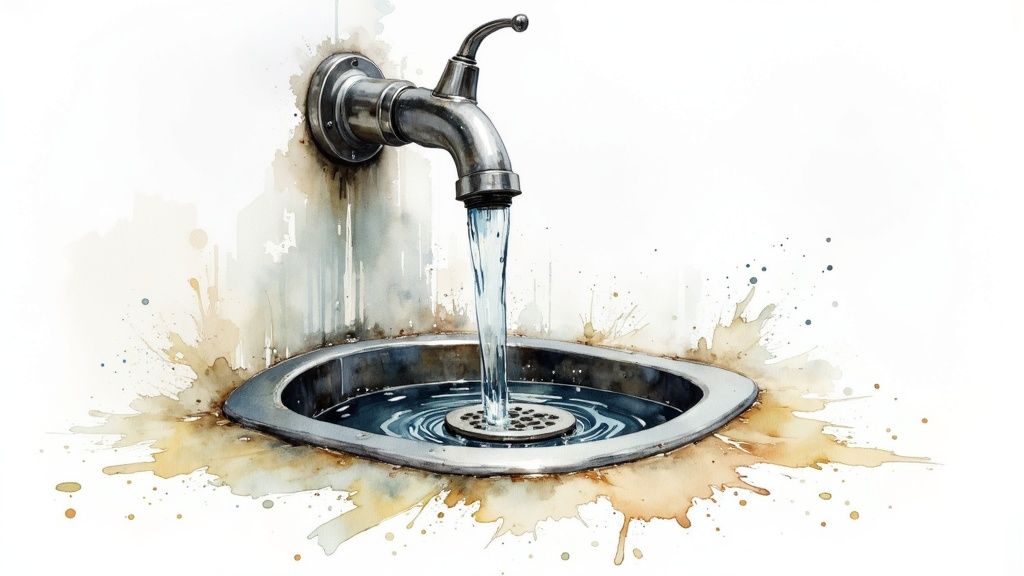
The All-Important Leak Test
This is the moment of truth. Don’t skip this part—it’s what separates a finished job from a future headache.
- First, plug the drain. Use the new stopper to seal the sink.
- Next, fill ‘er up. Run a few inches of cold water into the basin and just let it sit there for at least five to ten minutes. This gives the water time to work its way through any tiny gaps you might have missed.
- Now, do a dry check. While the water is sitting, grab a completely dry paper towel. Run it all around the locknut, gaskets, and both of the P-trap connections underneath. If that paper towel comes away bone dry, you’re in great shape.
The Final Flush: For total peace of mind, pull the stopper and let all the water drain out at once. This sudden rush of water puts the most pressure on your new connections. As it drains, keep a hand on the pipes to feel for any hint of moisture.
If everything is still dry, then congratulations! You’ve successfully replaced your kitchen sink strainer. Now you can get back to using your sink without worrying about that pesky drip. Job well done.
Got Questions? Let’s Troubleshoot Your Sink Strainer Project
No matter how many times you’ve read the instructions, a few little questions always seem to surface when you’re elbow-deep under a sink. That’s perfectly normal. Let’s tackle some of the most common hangups I see when people are replacing a kitchen sink strainer for the first time.
Can I Just Use Silicone Instead of Plumber’s Putty?
This is the big one—the question I hear all the time. On the surface, it makes sense. Silicone is waterproof, right? But using 100% silicone caulk here is a classic rookie mistake, and one you’ll regret later.
Silicone is an adhesive; it’s designed to glue things together. While it will definitely stop water, it will also permanently bond the strainer to your sink. Imagine trying to chip that out in a few years without scratching or cracking your sink basin. It’s a nightmare.
Plumber’s putty is the professional’s choice for a reason. It’s a non-hardening sealant that creates a perfect, watertight gasket through compression alone. It never cures, so when it’s time for the next repair, the old strainer will pop right out. Trust me on this: stick with putty.
Help! My Brand-New Strainer is Leaking!
Don’t panic. A drip after a fresh install is incredibly common and usually points to one of a few simple fixes. Before you start tearing everything apart, check these three things:
- The Locknut Isn’t Tight Enough: This is the cause 9 times out of 10. The locknut needs to be snug enough to create a firm, even seal with the gaskets and putty. Try giving it another quarter-turn with your pliers and test it again.
- A Speck of Debris is Breaking the Seal: Even a tiny bit of old putty or grime left on the sink flange can compromise the seal, creating a microscopic channel for water to sneak through. You might have to take it apart, give the sink opening another thorough cleaning, and reinstall.
- The P-Trap is Cross-Threaded: If the leak is coming from the pipe connections below, you’ve probably cross-threaded the slip nuts. It’s easy to do with plastic threads. Loosen them completely, make sure the pipes are perfectly aligned, and tighten them by hand first before using a wrench for the final turn.
Here’s a pro tip for spotting a slow, sneaky leak: After filling and draining the sink, lay a dry paper towel on the bottom of the cabinet directly under the drain. Even a single, tiny drop of water will create an obvious dark spot on the paper, confirming your suspicion.
If you’ve gone through these steps and still have a stubborn drip, especially if it’s near the garbage disposal, you might be looking at a more complicated problem. Sometimes what seems like a simple fix can point to bigger issues, and it’s better to get an expert to handle complex residential garbage disposal repairs than to risk making things worse.
When your DIY project turns into a plumbing puzzle you can’t solve, Professional Plumber Denver is here to help. For any plumbing challenge, from stubborn leaks to major installations in the Denver Metro area, our experienced team has you covered. Reach out to us at https://professional-plumbers-denver.com.
