
When you're planning a bathroom remodel or building a new one, getting the behind-the-scenes plumbing right is absolutely critical. These initial measurements, known as the "rough-in," set the stage for every fixture you'll install. Think of them as the blueprint for your pipes before any drywall or tile goes up.
Getting these dimensions spot-on from the beginning is the difference between a smooth project and a nightmare of costly corrections. It ensures your toilet, sink, and shower will fit exactly where they're supposed to, without any last-minute surprises.
Understanding Key Bathroom Dimensions
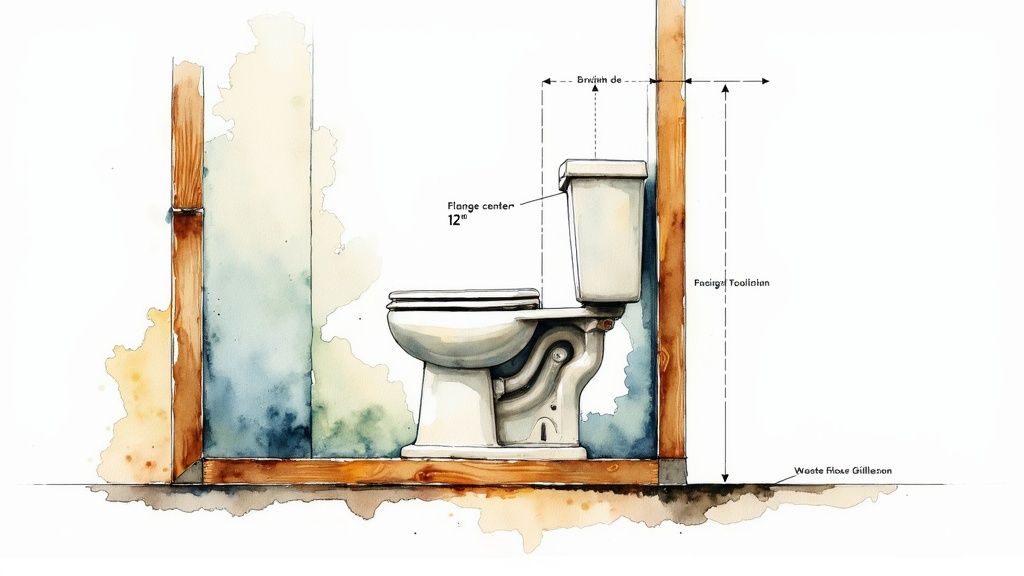
Rough-in dimensions dictate the precise placement of drain pipes and water supply lines in the floors and walls. For example, the toilet rough-in is a classic case of why this matters so much. The modern standard is a 12-inch rough-in, measured from the finished back wall to the center of the floor drain.
However, if you're working in an older home, you might find a 10-inch or even a 14-inch rough-in, which drastically changes the type of toilet you can buy. Understanding your existing layout is the first step toward choosing quality bathroom fittings that will actually work in your space. Always measure twice before you buy anything.
To help you get started, here's a quick rundown of the most common measurements you'll need.
Quick Reference Bathroom Rough In Dimensions
This table gives you the standard rough-in measurements for the most common fixtures you'll find in any bathroom. A crucial tip from the pros: always measure from the finished surface—that means the face of the drywall or tile, not the bare stud behind it. This small detail makes a huge difference.
| Fixture | Component | Standard Dimension (from Finished Floor/Wall) |
|---|---|---|
| Toilet | Drain Center | 12" from back wall |
| Water Supply | 6" to the left of center, 7" high | |
| Sink | Drain Center | 18" – 20" high |
| Water Lines | 2" – 3" above drain, 4" on each side of center | |
| Shower | Valve Height | 48" high |
| Showerhead | 80" high | |
| Bathtub | Drain/Overflow | Per manufacturer's specifications |
| Valve Height | 28" high |
While these numbers represent the industry standard, it's always a good idea to double-check the specific requirements for the fixtures you've chosen. Manufacturer specs can sometimes vary, especially for custom or high-end models.
Why Accurate Rough-In Planning is Non-Negotiable
Before we jump into the specific numbers, let's talk about why bathroom rough-in dimensions are the absolute bedrock of any successful plumbing project. Think of these measurements not as suggestions, but as the critical blueprint for your entire space. Getting them right ensures every fixture fits, works as it should, and complies with building codes.
Get it wrong, and you’re looking at a cascade of expensive, frustrating problems. Imagine realizing your beautiful new vanity won't let the bathroom door open all the way, or discovering the toilet is crammed too close to the wall for a proper installation. These aren't just hypotheticals; they're common headaches that stem from poor planning.
Getting the rough-in right from the very beginning saves you from the nightmare of tearing open freshly finished walls just to shift a drain a few inches. You can learn more about the financial side of things in our breakdown of https://professional-plumbers-denver.com/blogs/rough-in-plumbing-cost/.
Defining The Essential Terms
To get the most out of this guide, you need to know the lingo. Two terms are especially important:
- Centerline: This is an imaginary vertical line drawn straight through the middle of a fixture like a sink or toilet. Drain and water supply lines are measured from this line to ensure they're perfectly centered.
- Finished Wall: When we talk about measurements, we're almost always referring to the final wall surface—the face of the drywall or tile—not the bare 2×4 studs behind it. This is a critical distinction.
When you're starting from scratch, a comprehensive guide to planning a bathroom renovation can be an incredible resource. Ultimately, careful planning is what guarantees proper drainage, prevents leaks, and gets you that passing grade on your plumbing inspection.
Getting Toilet Rough-In Dimensions Right
When you're planning a bathroom, the toilet's placement is one of the first and most critical decisions you'll make. Its location hinges on a single, make-or-break measurement: the toilet rough-in.
This is simply the distance from the finished wall behind the toilet to the very center of the floor drain (also called the toilet flange). Getting this number right isn't just a good idea—it's absolutely essential for ensuring your new toilet fits and functions correctly.
The standard in most homes built today is a 12-inch rough-in. To check what you have, just run a tape measure from the finished wall (that's drywall, not the bare studs) to the center of one of the closet bolts that will secure the toilet to the floor. If you land on 12 inches, you're in luck; a standard toilet is what you need.
Of course, not every bathroom plays by the modern rulebook. This is especially true in older homes or oddly shaped spaces where you might find different dimensions.
- 10-Inch Rough-In: You'll often see this in older, more compact bathrooms where every inch was precious.
- 14-Inch Rough-In: This pops up in larger, sometimes custom-built bathrooms where the goal was to add a bit more space behind the toilet.
Clearance Codes and Spacing
Beyond the drain itself, building codes have a say in how much elbow room your toilet needs. For basic comfort and accessibility, a toilet requires at least 15 inches of clear space on either side, measured from its centerline to the nearest wall or fixture (like a sink or shower). That means you need a dedicated space at least 30 inches wide.
You also need to plan for the space in front. Codes mandate at least 21 inches of clear floor space in front of the toilet bowl to ensure it's usable and safe.
Pro Tip: I can't stress this enough: always measure your existing rough-in before you even think about buying a new toilet. Grabbing a standard 12-inch model when you actually have a 10-inch rough-in will lead to a toilet that flat-out won't fit, leaving you with the headache of moving plumbing.
The image below gives a great visual of how to position a shower drain, and the same principles of precision apply here.
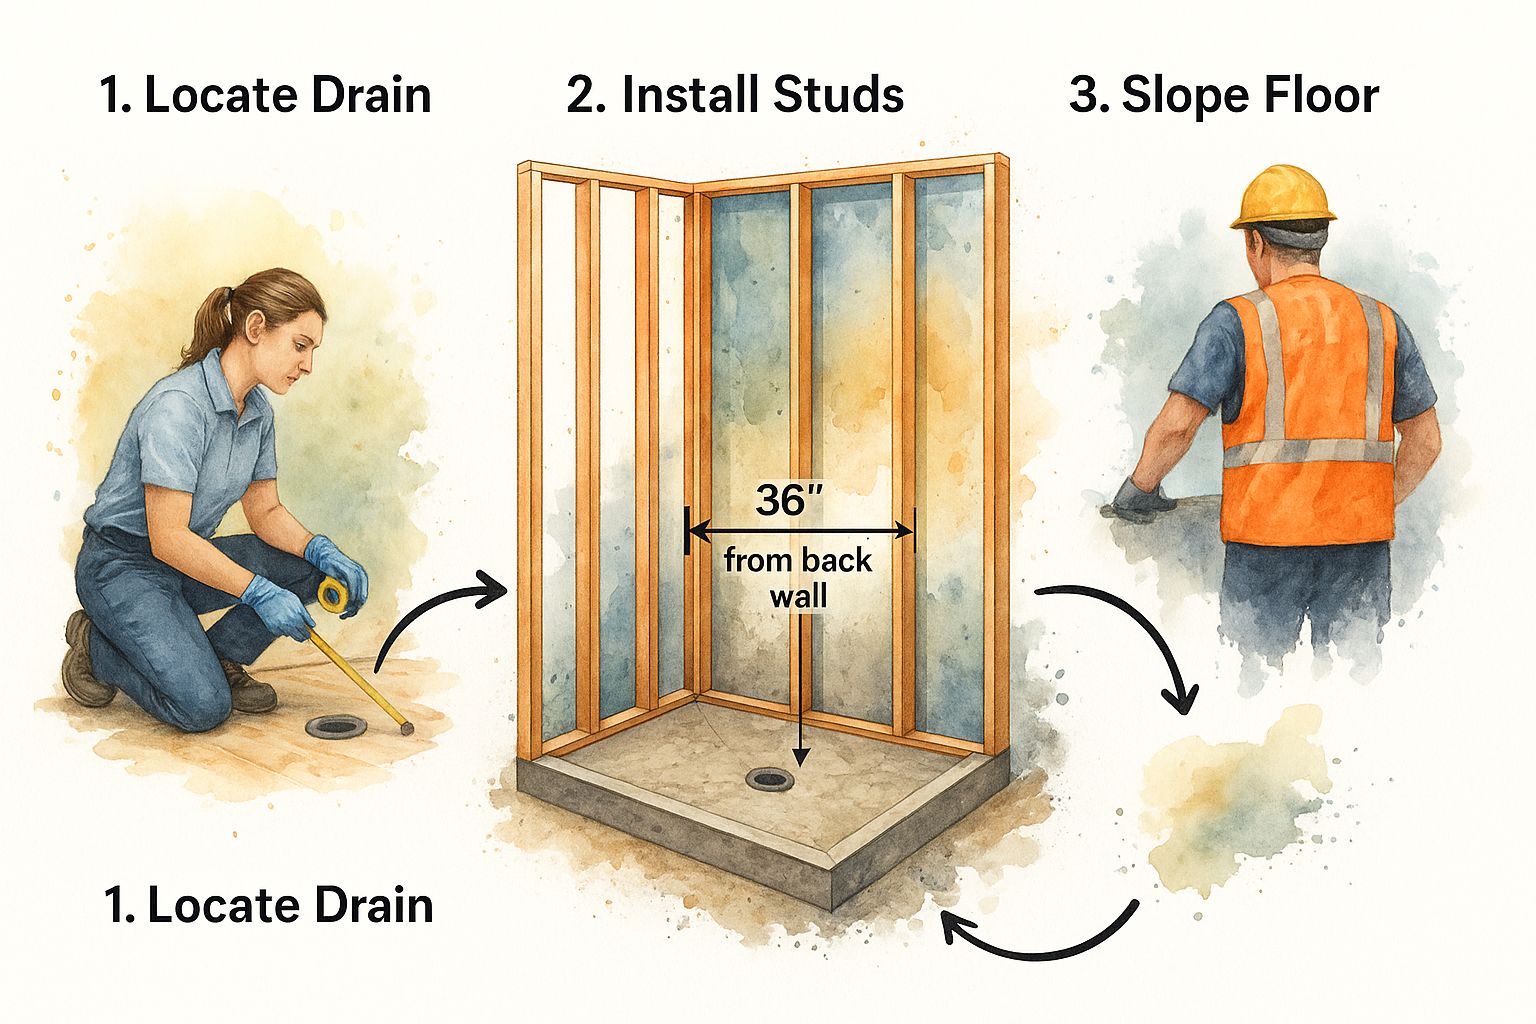
This kind of diagram really drives home the importance of measuring from finished surfaces and locating fixture centers, a core concept that holds true for every single fixture in the bathroom.
Getting Your Sink and Vanity Rough-In Dimensions Right
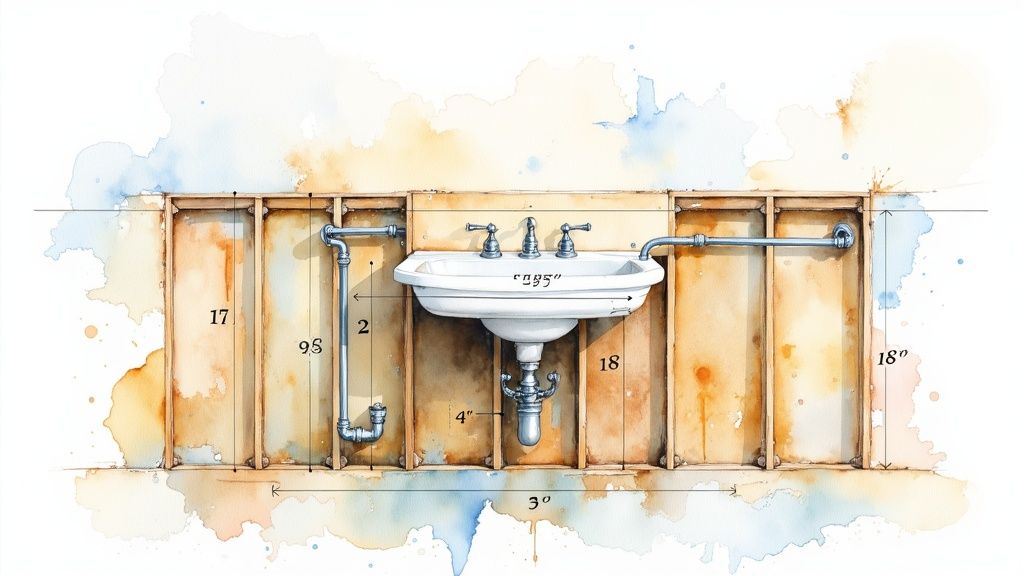
When it comes to plumbing a sink or vanity, precision is everything. This isn't like a toilet rough-in with one main drain to worry about; a sink involves a central drain line and two separate water supply lines. Nailing these bathroom rough in dimensions from the start is the only way to guarantee a leak-free, professional-looking installation.
Most bathroom sinks are housed in a vanity cabinet, which helps establish some standard measurements. The hot and cold water supply lines are typically stubbed out 18 to 20 inches above the finished floor. The drain line, which sits between them, is usually placed a bit lower, around 14 to 18 inches high. These heights work perfectly for standard vanities, which generally stand 33 to 35.5 inches (850 mm to 900 mm) tall.
Sink and Vanity Rough-In Heights
Here’s a quick-reference table breaking down the standard vertical measurements for sink and vanity plumbing, all measured from the finished floor.
| Plumbing Component | Standard Height Above Finished Floor | Notes |
|---|---|---|
| Water Supply Lines | 18" – 20" | This height keeps the shutoff valves accessible but hidden within most vanity cabinets. |
| Drain Stub-Out | 14" – 18" | The drain must be lower than the sink's P-trap arm to ensure proper gravity-fed drainage. |
| Standard Vanity Top | 33" – 35.5" | This is the typical counter height, and your plumbing must be installed relative to it. |
Remember, these are standard guidelines. Always consult the manufacturer's specifications for your specific vanity and sink fixture, as custom or non-traditional designs may have different requirements.
How Different Sink Types Change the Game
The type of sink you're installing will absolutely dictate your rough-in strategy. While the basic plumbing principles are similar to those you'd use for a kitchen fixture, bathroom sinks have their own unique considerations. For a different perspective, you can see how to install a kitchen sink in our other guide.
Here's what to watch out for with common bathroom sink styles:
- Vanity Sinks: The primary objective here is to keep all the pipes neatly concealed within the cabinet. A common mistake is centering the plumbing on the vanity itself; instead, you must center the drain and water lines directly on the sink basin's drain hole.
- Pedestal Sinks: With a pedestal sink, there's nowhere to hide. All your plumbing will be exposed, so your measurements have to be dead-on. The drain must be perfectly centered behind the pedestal column, with the water lines spaced evenly and symmetrically on either side.
- Wall-Mounted Sinks: These are similar to pedestal sinks in that the pipes are visible and demand accuracy. However, they add another critical step: you absolutely must install solid wood blocking inside the wall framing to anchor the sink securely. Drywall alone will not support the weight.
Crucial Tip: Always have the exact fixture specifications on hand before you start drilling holes. A modern vessel sink, which sits on top of the counter, adds several inches of height. This often means you'll need to lower your rough-in for the drain and water lines to connect properly without looking awkward or creating drainage issues.
Shower and Bathtub Plumbing Dimensions
When it comes to plumbing, showers and bathtubs have a different set of rules than sinks or toilets. Getting these dimensions right from the start is absolutely critical for a successful installation and proper function.
For a typical shower stall, the drain is king. You’ll want it dead center in the shower base to make sure water flows correctly from every angle. In a standard 36-inch wide stall, this usually means placing the center of the drain pipe 18 inches from the side framing.
The height of your controls is just as important for the overall bathroom rough in dimensions. A standard shower valve usually gets installed 48 inches up from the finished floor. Further up, the showerhead outlet—the spot where the shower arm will eventually screw in—sits at about 80 inches high. This height works well for most people, but always remember to check the depth of the valve body itself. You have to get it just right so it sits perfectly flush with your finished tile, not recessed or sticking out.
Bathtub and Freeststanding Tub Specifics
With a standard alcove tub, your main focus is on the drain and overflow rough-in. These have to line up perfectly with the holes on the tub you've chosen, and these measurements can differ between models. As a general rule, the tub spout is usually roughed in 4 inches above the tub's rim, with the valve assembly sitting somewhere around 28 inches above the finished floor.
Freestanding tubs are a whole different ballgame. Here, the supply lines and drain often come right up through the floor instead of out of the wall. This requires pinpoint accuracy before you even think about putting down your finished flooring, because once that tile or wood is in, there's absolutely no wiggle room.
Expert Insight: I can't stress this enough: always, always double-check the manufacturer's spec sheet for your specific tub and shower fixtures before you close up a wall. That gorgeous freestanding tub you've been dreaming of will turn into your biggest nightmare if the floor-mounted faucet is off by even an inch. If you're facing a complex layout or just want peace of mind, our team of bathroom plumbers in Denver can make sure every single measurement is spot-on.
Thinking through how your fixture choices will connect to the larger system is a smart way to head off potential issues with sewer or water pipelines down the road.
Common Bathroom Rough-In Mistakes to Avoid
Even when you have all the right bathroom rough in dimensions laid out, it's surprisingly easy for a project to go sideways. From my experience, the costliest mistakes aren't usually from complex miscalculations but from simple oversights that snowball into a huge headache.
One of the most common blunders I see is measuring from the wrong surface. Remember, every rough-in measurement is based on the finished wall and floor—not the bare studs and subfloor. If you forget to factor in the thickness of your drywall (usually ½ inch) plus any tile and backer board, you'll find your toilet or vanity is off-center, creating a nightmare to fix later.
Another critical error is skipping the local codebook. The dimensions in this guide are industry standards, but your specific town or city might have its own rules you're legally required to follow. Always check first.
A Pre-Drywall Verification Checklist
Before a single sheet of drywall goes up, take a moment to run through this checklist. This is your last, best chance to make adjustments easily and cheaply.
- Measure from the Centerline: Walk the room and confirm that every drain and water supply line is perfectly aligned with the centerline of its intended fixture.
- Verify Clearances: Get your tape measure out again. Do you have at least 15 inches from the toilet's centerline to a wall or vanity? Is there a clear 21 inches of space in front of the bowl?
- Check Fixture Specs: Don't just rely on standard measurements. Pull out the spec sheets for the actual toilet, vanity, and shower valve you bought. Have you double-checked your rough-in against the manufacturer's specific requirements?
- Account for Flooring: Look at your vertical heights, like for a vanity drain. Did you add the combined thickness of your underlayment and finished flooring material?
A Critical Reminder: A classic mistake is forgetting to add blocking for anything that hangs on the wall. If you're installing a wall-mounted sink or planning for grab bars, you must install solid wood blocking between the studs before the drywall is installed. Drywall anchors alone are simply not safe enough to handle the weight.
Here are some of the most common questions that come up when people are planning a bathroom remodel. Getting these details right is the key to a smooth project, so let's clear up a few points of confusion and tackle some of the trickier situations you might run into.
What's the Difference Between "Rough-In" and "Finished" Dimensions?
This is probably the single most important concept to get straight. Rough-in dimensions are the measurements you take to locate plumbing and electrical lines inside the open walls and floor. Think of it as mapping everything out from the bare wood studs and subfloor, before any drywall, backer board, or tile goes up.
Finished dimensions, on the other hand, are the final measurements taken after all the surfaces are in place. This is a critical distinction. For example, that standard 12-inch toilet rough-in is measured from the finished wall. So, if you're setting the drain, you have to remember to add the thickness of your drywall (usually ½ inch) to get the placement right on the subfloor.
Can I Change My Toilet's Rough-In Without Moving the Drain?
It depends. While the only "correct" way to change a rough-in is to move the drain pipe and flange, you do have an option for small adjustments. If you've got a 10-inch or 14-inch rough-in but want to use a standard 12-inch toilet, an offset toilet flange can be a lifesaver. This clever fitting can shift the toilet's position by an inch or two in any direction.
Just keep in mind, it's a workaround, not a perfect fix. An offset flange can sometimes restrict waste flow a tiny bit compared to a straight pipe. It’s a great solution when you're in a bind, but it’s always better to get the initial plumbing right from the start.
How Do I Find the Official Plumbing Code for My Area?
The numbers in this guide are based on industry-wide standards like the International Residential Code (IRC), but your local town or county almost certainly has its own set of rules. The best place to start is your local building department's website; they usually have their codes available online.
For peace of mind, just call the building department and ask to speak with a plumbing inspector. They are the final word on what's required, and getting the information straight from the source is the surest way to pass your inspection.
Are Rough-In Dimensions Different for an ADA-Compliant Bathroom?
Yes, they are completely different. The Americans with Disabilities Act (ADA) has its own strict guidelines designed for safety and accessibility, and these requirements will always take precedence over standard dimensions.
- Toilet Height & Clearance: An ADA toilet needs a taller seat height of 17 to 19 inches from the floor. It also requires a lot more space, with the toilet's centerline needing to be exactly 18 inches from the nearest side wall.
- Sink & Faucet Access: Sinks must be installed to leave clear knee space underneath for wheelchair users. The hot and cold water pipes under the sink must also be insulated or shielded to protect a user's legs from burns or bumps.
If your project needs to be ADA-compliant, you absolutely must refer to the official ADA Standards for Accessible Design or hire a professional who specializes in accessible construction.
Figuring out all the details of bathroom rough in dimensions can feel a bit overwhelming, but it’s the bedrock of a well-built bathroom. If you're in the Denver area and want the job done right the first time, give the team at Professional Plumbers Denver a call. We handle everything from minor repairs to complete plumbing rough-ins for remodels and new construction. Contact us 24/7 for all your plumbing needs.

Recent Comments