
Knowing how to install a kitchen faucet really starts before you ever pick up a wrench. Honestly, getting everything ready beforehand is 90% of the battle. This isn’t just about unboxing the new fixture; it’s about making sure you have the right faucet for your sink, gathering all your tools, and prepping the under-sink area so you don’t end up with a huge mess.
Gearing Up for the Job
Nothing torpedoes a DIY project faster than realizing you’re missing a crucial tool halfway through. A smooth faucet swap depends on having everything you need right there with you. Let’s walk through what you need to get this done right the first time, avoiding those extra trips to the hardware store.
First, Match the Faucet to Your Sink
Before you even think about buying a new faucet, take a good look at your sink or countertop. The number of holes already drilled is the single most important detail.
- One-Hole: This is the standard for most modern faucets, especially those with a single handle and a built-in pull-down sprayer.
- Three-Hole: You’ll see this setup for faucets with separate hot and cold handles. The good news is many single-handle faucets include an optional base plate (also called an escutcheon) to neatly cover up the extra holes.
- Four-Hole: This configuration adds an extra spot for accessories like a separate side sprayer, a soap dispenser, or even an instant hot water tap.
Getting this right from the start is critical. It might seem basic, but it saves you the headache of drilling into your countertop or having to return the faucet. While over 83% of residential faucets sold are manual, the variety in how they mount is huge. Making sure your new hardware lines up with your sink’s existing holes is a non-negotiable first step.
Your Faucet Installation Toolkit
Having the right gear turns what could be a frustrating chore into a pretty straightforward task. Here’s a quick checklist of what you’ll want to have on hand before you start.
| Item | What It’s For | Insider Tip |
|---|---|---|
| Basin Wrench | Reaching and turning the hard-to-reach nuts holding the old faucet in place. | This is the MVP. Don’t try this job without one. Its long shaft and pivoting head are a lifesaver. |
| Adjustable Wrenches | Disconnecting the old supply lines and tightening the new ones. | Have a couple of different sizes handy. A smaller one is great for tight spots. |
| Bucket & Old Towels | Catching water that will drain from the old faucet and supply lines. | Always assume there’s more water in the lines than you think. Have them ready before you disconnect anything. |
| Flashlight or Headlamp | Seeing what you’re doing in that dark, cramped cabinet. | A headlamp is best because it keeps your hands free. Trust me, you’ll need them. |
| Plumber’s Putty or Silicone | Creating a watertight seal between the faucet base and the sink. | Your new faucet’s instructions will tell you which to use. Don’t skip this—it prevents leaks down the road. |
This toolkit will cover just about any faucet replacement you’ll run into.
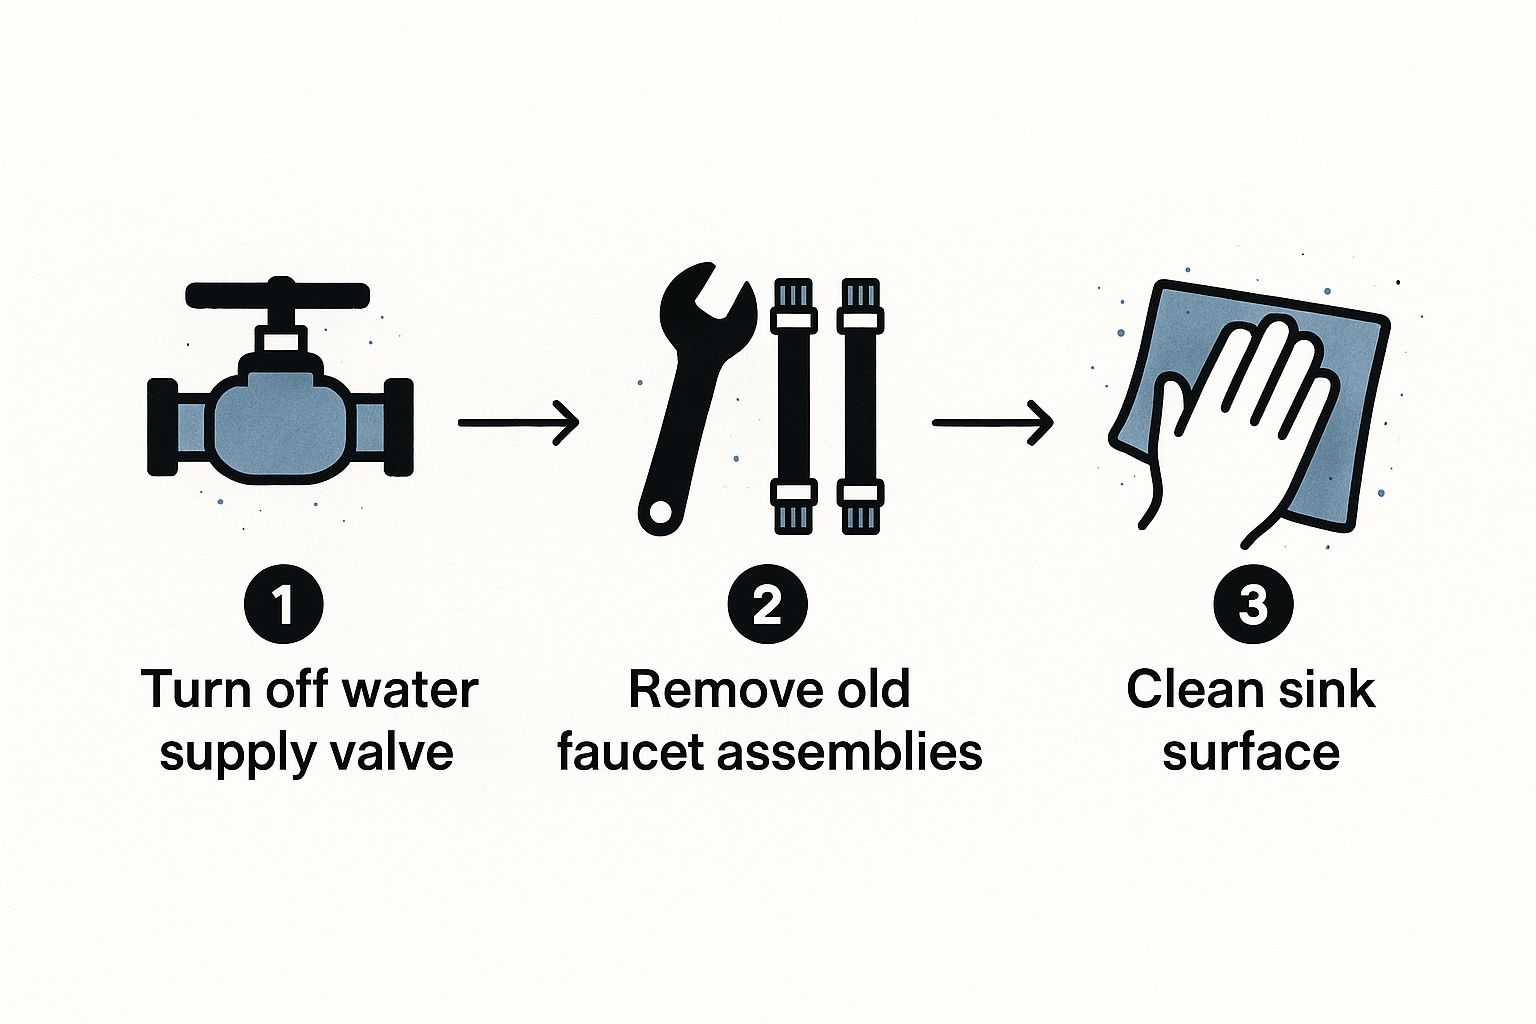
Prepping the Under-Sink “Battlefield”
Okay, first thing’s first: shut off the water. Look for the two shut-off valves under the sink—one for hot water, one for cold—and turn the handles clockwise until they’re fully closed.
If those valves are ancient and won’t budge, you may have to shut off the main water supply to your house for a bit. This is actually a great opportunity to check their condition. If they look corroded or feel stiff, consider replacing them. Learning how to install a shut-off valve is another great DIY skill to have.
With the water off, go ahead and turn the old faucet on to let any trapped water and pressure out of the lines. Then, clear everything—and I mean everything—out from under the sink. Give yourself as much space to work as you possibly can. If you’re also upgrading your counters, this comprehensive guide to choosing and installing kitchen countertops has some excellent tips that tie in well with this project.
Getting the Old Faucet Out Without a Fight

Let’s be honest: sometimes the hardest part of installing a new kitchen faucet is wrestling the old one out. After years, or even decades, of mineral deposits and corrosion, those nuts and bolts can feel like they’re welded in place. But with a little patience and the right tools, you can get it done without wrecking your sink or your sanity.
First things first, you have to disconnect the water supply lines. These are the flexible hoses connecting the shut-off valves under the sink to the faucet. Get your bucket and a few old towels ready right underneath them—no matter how well you drain them, there’s always a bit of water left. Grab an adjustable wrench and turn the coupling nuts counter-clockwise to free them from the valves and the faucet tails.
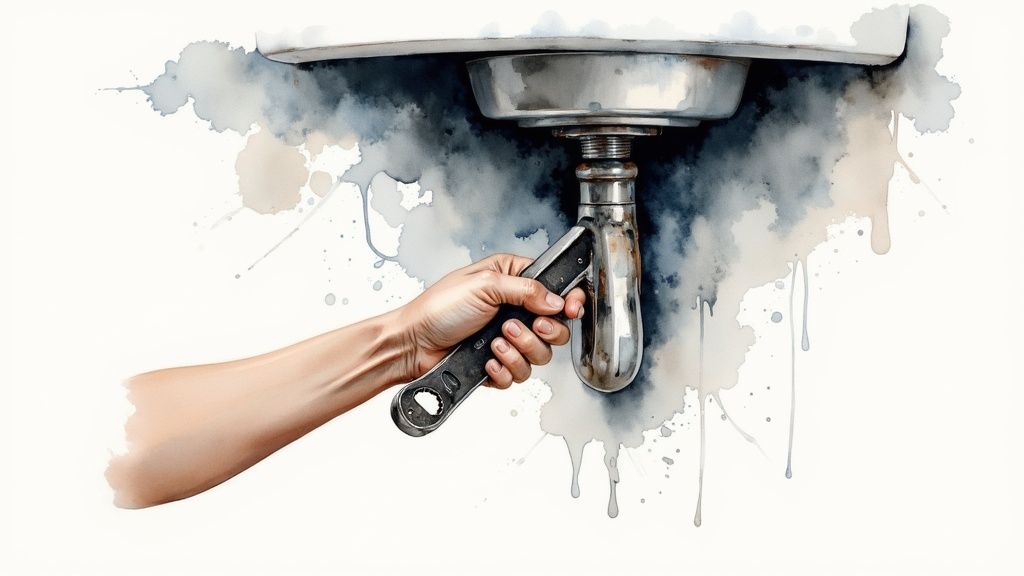
With the water lines detached, it’s time to go after the mounting hardware that’s clamping the faucet to the sink. This is where you’ll be very glad you have a basin wrench.
Making Friends with the Basin Wrench
A basin wrench is a lifesaver for this exact job. Its long handle lets you reach up into that cramped space behind the sink, and the pivoting head is designed to grab onto those hard-to-reach mounting nuts. It might feel awkward at first, but the trick is to make sure you have a firm grip on the nut before you really start cranking on it.
Clamp the wrench’s jaws onto one of the nuts and turn the handle counter-clockwise. If it refuses to budge, resist the urge to just force it. You could end up stripping the nut or, even worse, cracking your sink.
Pro Tip: When a nut won’t move, penetrating oil is your best friend. A quick spray of a product like WD-40 directly on the threads can work miracles. Let it soak for 15-20 minutes to give it time to break down the corrosion, and you’ll often find the nut comes off with surprising ease.
If your setup includes a separate side sprayer, you’ll need to deal with its hose too. Just trace it from the sprayer down to the main faucet body. You’ll probably see a small, heavy counterweight clipped to the hose—just slide that off and set it aside. Then you can unscrew the hose connection.
The Last, and Most Critical, Step
Once all the lines and nuts are disconnected, you should be able to lift the old faucet straight up and out. It’s a great feeling, but hold off on dropping the new one in. This next part is absolutely essential for a leak-free future.
Take a look at the sink surface. You’ll almost certainly see a nasty ring of old plumber’s putty, hard water stains, and general grime where the old faucet sat. Every last bit of that gunk must be removed.
- Start by scraping off the bigger chunks with a plastic putty knife or an old gift card. Steer clear of metal scrapers that can easily scratch the finish of your sink.
- For the stubborn film left behind, a good mineral deposit cleaner or even just a rag soaked in white vinegar can dissolve it.
- Give the whole area a final wipe-down with a clean cloth and some rubbing alcohol. You want the surface to be perfectly clean and dry.
Spending an extra five minutes on this cleanup is one of the smartest things you can do. It guarantees the gasket on your new faucet can create a perfect, watertight seal. Skipping this is the number one reason for those slow, sneaky leaks that can cause serious water damage under your sink before you even know they’re there.
Installing Your New Faucet Like a Pro
Alright, with the old faucet out of the way and the sink deck clean, it’s time for the fun part. This is where you get to see your new fixture in place and the whole project starts coming together. Let’s walk through turning that box of parts into a working, beautiful faucet.
Setting the Faucet and Creating a Seal
First things first, you’ll want to carefully feed the new faucet’s flexible supply lines down through the mounting hole (or holes) on your sink or countertop. It’s a pretty simple move, especially with an undermount sink. If you happen to be tackling a full sink and faucet replacement at the same time, our guide on how to install an undermount sink has some great tips for that bigger job.
Before you drop the faucet all the way down, you need to make sure you get a watertight seal. Most new faucets today come with a handy rubber or plastic gasket designed for this. If yours has one, that’s what you’ll use. If it doesn’t, or if the instructions specifically call for it, you’ll be using a classic tool of the trade: plumber’s putty.
- Grab a small amount of putty and roll it between your palms to form a thin rope, about the thickness of a pencil.
- Gently press this putty rope around the entire underside of the faucet’s base.
- As you set the faucet into place on the sink, the putty will compress and squeeze out a little. That’s good—it means you have a solid seal.
Don’t skip this step. It’s the only thing stopping water from sneaking under the faucet base and dripping into your cabinet below.
Securing the Faucet From Underneath
Time to crawl back under the sink. This is where you’ll anchor the faucet using the mounting hardware that came in the box—typically a friction washer and a large mounting nut.
From below, slide the washer up over the faucet’s threaded shank, followed by the mounting nut. Get it as tight as you can with just your hands. Now, before you reach for a wrench, pop back up and take a look from above. Is the faucet straight? Is it centered exactly where you want it? Adjust it now, while you still can.
Crucial Tip: When you tighten that mounting nut with your basin wrench, you’re aiming for snug, not strained. You want it tight enough that the faucet won’t budge or wobble during use. But if you go overboard and overtighten, you risk cracking the granite, quartz, or even the sink itself. That’s a very expensive mistake to make.
Making the Water Connections
We’re in the home stretch now. The last big step is hooking up the water lines. Your new faucet has two supply lines hanging down—one for hot, one for cold. You’ll connect these directly to the shutoff valves under your sink.
The golden rule for these connections is hand-tighten plus a quarter-turn with a wrench. That’s all it takes. This provides just enough pressure to compress the small rubber seal inside the fitting for a leak-proof connection without damaging the threads.
Does your new faucet have a pull-down or pull-out sprayer? If so, there’s one last connection. You’ll need to attach the sprayer hose to its port on the main faucet body. These are often quick-connect fittings that just click satisfyingly into place.
Once it’s connected, clip the counterweight that came with the faucet onto the sprayer hose. You’ll want to place it at the lowest point of the hose’s loop. This little weight is what gives the sprayer head the pull it needs to retract smoothly back into the spout after you’re done using it. Without it, the sprayer will just hang limp.
Final Connections and The All-Important Leak Test
Alright, the faucet is in place and the supply lines are hooked up. You’re on the home stretch, but don’t get ahead of yourself. This is arguably the most critical part of the whole installation—making sure everything is watertight. A few extra minutes here can save you from a major water damage headache down the road.
The trick is to reintroduce water to the system slowly. Head back to your shutoff valves and give them a gentle, quarter-turn counter-clockwise. Just a little. This gradual approach lets the lines pressurize without a sudden jolt.
As soon as you do, listen. A hissing sound is your first red flag. Grab your flashlight and immediately start scanning every single connection point for even the smallest drop of water.
Performing a Thorough Leak Inspection
If everything looks and sounds good after that initial test, go ahead and open the valves the rest of the way. Now the real inspection begins, and you need to be meticulous.
My favorite trick is to run a dry paper towel over every single connection. Your fingers work too. This simple method will reveal tiny, slow seeps that are almost impossible to spot with your eyes alone.
Make sure your inspection route hits every potential weak spot:
- The connections where the supply lines meet the hot and cold shutoff valves.
- The points where those same lines attach to the new faucet’s inlets.
- If you have a pull-down sprayer, check where its hose connects to the faucet body.
If you spot a drip, don’t sweat it. Just turn the water off again and give the leaky fitting a small, firm quarter-turn with your wrench. Nine times out of ten, that little extra tightening does the trick. If you’re still dealing with a persistent drip, it might be worth understanding the common causes behind a leaky faucet repair.
The Final Functionality Checklist
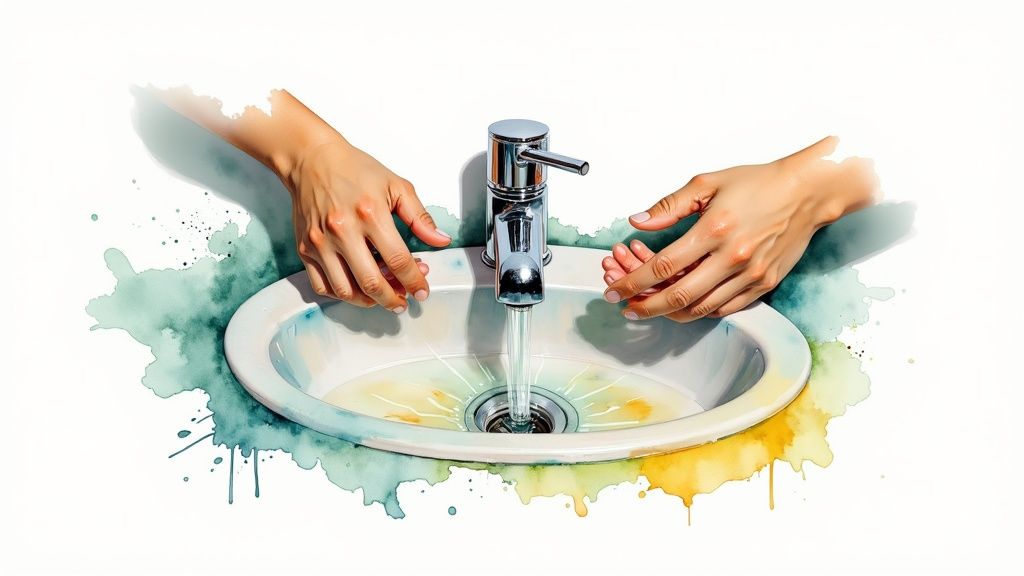
Once you’re 100% confident that all your connections are bone-dry, it’s time to put your new faucet through its paces. This quick final check ensures everything works as designed.
First, before you turn the water on full blast, unscrew the aerator from the tip of the spout. Any little bit of debris or sediment that got knocked loose during the installation can get flushed out now instead of clogging it up right away.
Next, turn the faucet on and let both the hot and cold water run for at least a minute. This clears out the lines completely.
Finally, screw the aerator back on and test every feature. Swing the handle from full hot to full cold. If you have a pull-down or pull-out sprayer, test its functions. Make sure the faucet body swivels smoothly.
This final check is your victory lap. A fully functional, leak-free faucet isn’t just a convenience; it’s a testament to a DIY job done right. You’re part of a massive trend, too. The global kitchen faucets market was valued at around USD 8 billion, and it’s projected to nearly double by 2034, thanks in no small part to homeowners tackling these rewarding projects themselves. You can find more details on this growing market at gminsights.com.
Common Installation Mistakes You Can Easily Avoid
Learning how to install a kitchen faucet often means learning what not to do. I’ve seen it time and again—even experienced DIYers can fall into a few common traps. Sidestepping these simple errors is the key to a project that not only looks great but also functions perfectly for years to come.
The Problem With Over-Tightening
One of the most frequent missteps is cranking down on the connections too hard. It’s a natural impulse to want everything sealed up securely, but going too far can be disastrous. Applying excessive force with a wrench can easily strip the soft brass threads on your fittings or, even worse, crack the plastic mounting nuts.
The “Goldilocks” Rule of Tightening
Your goal is “just right”—snug enough to prevent leaks but not so tight that you stress the components. For water supply lines, the best practice is always hand-tighten first, then use a wrench for a final quarter-turn. That’s it.
Don’t Skip Flushing the Lines
Another critical oversight is failing to flush the water lines before the final connection. When you shut off the water and work on the pipes, it’s inevitable that tiny bits of sediment, rust, or debris get knocked loose inside.
If you connect your shiny new faucet and immediately turn the water on full blast, all that grit shoots directly into the faucet’s delicate internal mechanisms. This can clog the aerator instantly, leading to frustratingly low water pressure right from the start.
Always let the water run into a bucket for a minute from the open supply lines before hooking them up to the faucet. It’s a simple step that saves a lot of headaches.
Picking the Right Sealant Matters
The small detail of using the right sealant can make a huge difference. Many homeowners mistakenly grab silicone for sealing the base of the faucet to the sink. While silicone creates a strong, waterproof bond, it’s also a powerful adhesive that can make future repairs or replacements an absolute nightmare.
Here’s what you should know:
- Plumber’s Putty: This is almost always the right choice for setting a faucet base. It remains pliable, creates a perfect watertight seal, and is easy to clean up.
- Silicone: Reserve this for areas that need a permanent, adhesive bond. Using it on a faucet base can even violate the manufacturer’s warranty.
Knowing these pitfalls is half the battle. To ensure your project goes smoothly, it’s always wise to learn from various experiences; you might find broader insights by looking into common renovation mistakes and misconceptions.
Getting your installation right is a solid investment, especially since the faucet market is projected to expand from USD 21.1 billion to USD 46.9 billion by 2035.
Even with the best preparation, things can go sideways. Here’s a quick guide to troubleshoot some of the most common issues you might run into.
Quick Fixes for Common Installation Headaches
| Problem | Likely Cause | The Solution |
|---|---|---|
| A small drip from a supply line connection. | The connection is either too loose or too tight. | Turn off the water, then slightly loosen the connection. Re-tighten it hand-tight plus a quarter-turn with a wrench. Check for drips again. |
| The faucet base wobbles on the sink. | The mounting nuts underneath are not evenly tightened. | Get back under the sink and tighten the mounting nuts. Alternate between them to ensure even pressure until the base is firm. |
| Very low water pressure on first use. | Debris from the pipes has clogged the aerator. | Unscrew the aerator from the tip of the faucet spout. Clean out any sediment from the screen, then screw it back on. |
Remember, patience is your best tool. Taking an extra minute to do things correctly will save you hours of frustration down the road.
Your Top Faucet Installation Questions Answered
Even with a solid game plan, you’re bound to have questions pop up when you’re contorted under the sink. Getting a new faucet installed is about more than just turning a wrench; it’s about knowing why you’re doing what you’re doing. Let’s tackle the most common questions I hear from folks to make sure you’re feeling confident.
Do I Really Need a Plumber to Install a Faucet?
Honestly, for a simple, one-for-one swap, most homeowners can absolutely handle this themselves. If you’re just replacing an old faucet with a new one in the same spot, the process is pretty direct. As long as you’re okay with working in a tight space and have the right basic tools, you’ve got this.
But, you’ve got to know when to call in a pro. If your project starts getting more complicated—like if you need to reroute plumbing lines, move the shutoff valves, or you’re wrestling with a tricky wall-mounted faucet—that’s the time to pick up the phone. A plumber can keep a small challenge from spiraling into a very expensive, very wet mistake.
How Much Time Should This Project Take?
If you’ve done a bit of DIY work before, you can probably get the whole job done in about one to two hours. The biggest time sink, without fail, is getting the old faucet out. Those nuts can be corroded and really stubborn.
For anyone new to plumbing tasks, I’d block off about three hours. The worst thing you can do is rush. That’s when you overtighten something or cross-thread a connection.
For a DIYer, patience is just as important as a basin wrench. Budgeting extra time removes the pressure and makes the entire experience much more enjoyable and successful.
What’s the Deal with Plumber’s Putty vs. Silicone?
This is a great question, and getting it wrong can cause some real headaches down the road.
Plumber’s putty is your go-to here. It’s a soft, clay-like material that creates a fantastic watertight seal but never fully hardens. This means it stays flexible, is easy to clean up, and makes removing the faucet later a breeze. Most faucet instructions will call for it specifically to set the base.
Silicone, on the other hand, is an adhesive. It creates a permanent, glue-like bond that’s a nightmare to break. If you use silicone to mount your faucet, you risk damaging your countertop or sink when you eventually try to replace it. Unless the manufacturer’s instructions explicitly tell you to use silicone, stick with the putty.
My New Faucet Has Low Water Pressure. What Happened?
This is, by far, the most common issue people face right after they finish, and luckily, the fix is almost always incredibly simple. The problem is usually a bit of sediment or debris that broke loose inside your old pipes during the install. Now, it’s stuck in the aerator.
The aerator is just that little screen on the tip of the faucet spout. All you need to do is unscrew it (you can usually do it by hand), take out the screen and any other small parts, and rinse them clean. Put it back together, and you’re done. This one little trick solves the low-pressure problem more than 90% of the time.
Even the best guides can’t cover every weird situation you might find under an old sink. If you’ve hit a roadblock or just want the confidence that comes with a professional job, Professional Plumber Denver is ready to help. Our experienced techs can handle any faucet installation, guaranteeing a perfect, leak-free finish every single time.

Recent Comments