
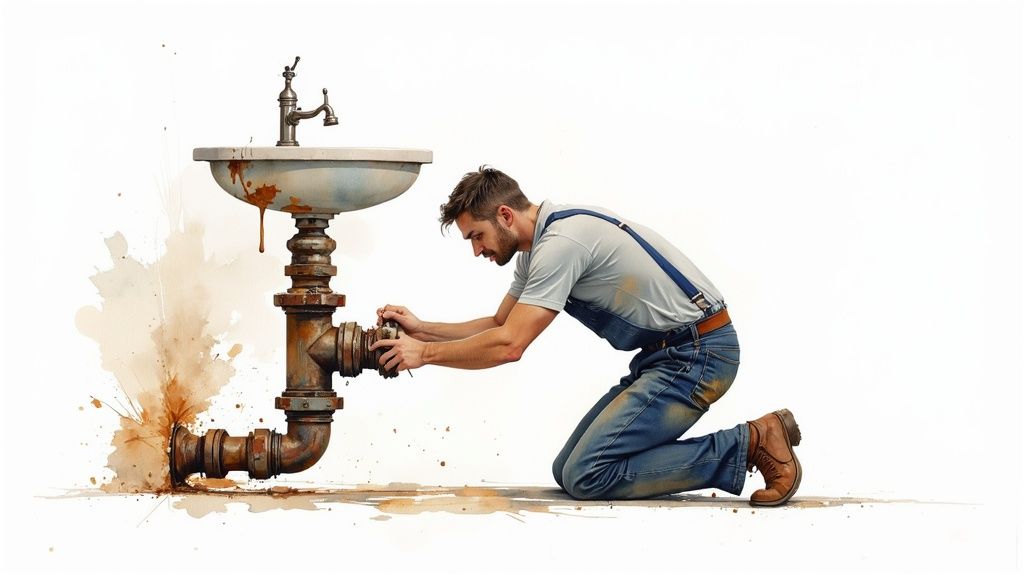
Before you even think about picking up a wrench, you need to get a handle on why your cast iron pipes are giving you trouble in the first place. Knowing what to look for can be the difference between a quick fix and a full-blown disaster. This isn’t just about patching a leak; it’s about understanding the health of your home’s plumbing.
Knowing When to Repair Your Cast Iron Pipes
Cast iron was the gold standard for a reason—it’s tough. These pipes were installed with an expected lifespan of 80 to 100 years. But let’s be realistic, nothing lasts forever. Decades of water flow, shifting soil, and stubborn tree roots all take their toll, eventually leading to cracks, corrosion, and leaks. The biggest headache is that most of this is happening out of sight, underground or behind walls.
The reality is, our country’s infrastructure is getting old. A staggering 82% of all cast iron pipes in North America are over 50 years old, which means they’re right in that prime failure window. It’s no surprise that between 2012 and 2018, the break rate for these pipes shot up by 43%.
Spotting the Early Warning Signs
You don’t need to be a master plumber to spot the red flags. Your house will usually give you some pretty clear hints that something is wrong. Here’s what I tell homeowners to watch out for:
- Persistent Slow Drains: I’m not talking about a single clogged sink. If you’ve got slow drains in multiple rooms, the problem is likely deeper in your main line.
- Foul Sewage Odors: That rotten egg smell? It’s a dead giveaway. If you’re smelling it in your yard or, even worse, inside your home, a sewer pipe has likely cracked.
- Mysterious Damp Spots: See a wet patch on the basement floor that never dries? Or maybe a patch of grass in your yard that’s suspiciously green and lush? That’s often a sign of a slow, steady leak underground.
- Water Discoloration: If your water is coming out rusty or brownish, that’s a clear sign of corrosion happening on the inside of your pipes.
One of these signs on its own might not be a huge deal. But when you start seeing two or three of them together, that’s your cue to act fast. Putting it off just invites more expensive and destructive problems later.
So, when do you tackle it yourself versus when do you call in a pro? That’s the big question. A small, easy-to-reach crack might be a manageable DIY project. But if you’re looking at widespread rust, deep corrosion, or multiple problem spots, you’re probably in over your head. For a deeper dive, check out this guide on deciding when to repair or replace: https://professional-plumbers-denver.com/sewer-line-replacement/how-to-know-if-you-need-to-repair-or-replace-your-sewer/
When in doubt, don’t risk it. Your best bet is always finding a qualified plumber who has the tools and experience to do the job right.
Gathering the Right Tools for the Job
Trust me, walking into a cast iron pipe repair without the right gear is a one-way ticket to frustration. You’ll turn a straightforward fix into a weekend-long nightmare. Before you even think about making that first cut, you need to have everything laid out and ready to go. This isn’t just about working faster; it’s about doing the job right—and safely—the first time.
The biggest decision you’ll face right out of the gate is choosing how to cut that old, stubborn pipe. Cast iron is tough stuff—dense and brittle—so a regular hacksaw won’t even make a dent. Your real choices come down to a dedicated cast iron snap cutter or a heavy-duty angle grinder. Each tool has its pros and cons, and the best one for you really depends on where and how you’re working.
Choosing Your Cutting Tool
I’ve seen plenty of DIYers try to muscle through this part, and it never ends well. Selecting the right cutting tool is a crucial step that sets the tone for the entire repair.
Choosing Your Cutting Tool for Cast Iron Pipe
Picking the right cutter is half the battle. This table breaks down your main options to help you decide which tool fits your specific repair scenario.
| Tool Type | Best For | Pros | Cons |
|---|---|---|---|
| Cast Iron Snap Cutter | Tight spaces, clean cuts, and professional results. | Creates a very clean, straight break with no sparks. Safer in confined areas. | Expensive to buy, often a rental item. Can be awkward on pipes against a wall. |
| Angle Grinder | Open, well-ventilated areas where you have room to work. | Versatile tool many people already own. Cuts quickly. | Extremely messy and loud. Throws sparks and metal fragments everywhere. Creates a rougher cut. |
| Reciprocating Saw | Difficult-to-reach spots, but only as a last resort. | Can get into very awkward angles. | Requires a special diamond grit or carbide blade. Cuts are slow and often uneven. |
While a reciprocating saw can work in a pinch, I almost always recommend a snap cutter. The clean edge it creates makes seating the new coupling far easier and more reliable.
My Two Cents: If you can, just go rent a snap cutter. Seriously. The perfectly clean, straight cut it delivers is worth the small rental fee. It makes fitting the new couplings a breeze and dramatically lowers the chance of a leak down the road. It’s a small price for a lot of peace of mind.
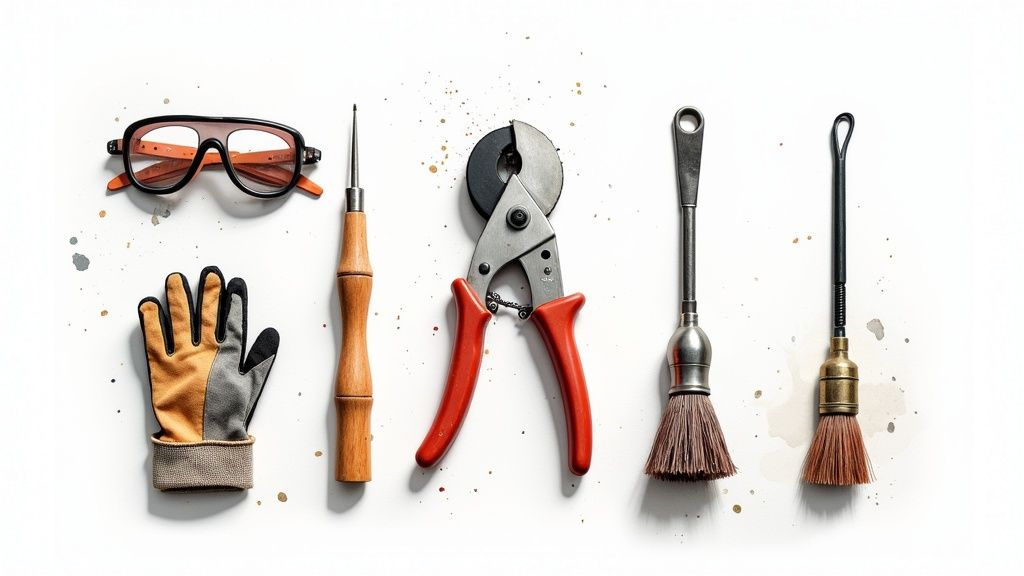
Your Essential Repair Kit
Once you’ve figured out your cutting strategy, it’s time to assemble the rest of your toolkit. The goal is one trip to the hardware store, not three.
Here’s a checklist of what you absolutely need to have on hand:
- No-Hub Couplings: These are the modern standard for joining cast iron to PVC or ABS. Make sure you get the exact diameter to match your pipe. Don’t eyeball it!
- Torque Wrench: This is non-negotiable. The bands on no-hub couplings must be tightened to a specific torque—usually 60 inch-pounds—to seal properly. Over-tighten and you risk cracking the old cast iron; under-tighten and you’re guaranteed a leak.
- Wire Brush: You’ll need to scrub the ends of the existing pipe until they’re free of rust and gunk. A clean surface is essential for a watertight seal.
- Replacement Pipe: For most residential repairs, Schedule 40 PVC or ABS pipe is what you’ll use for the new section.
And please, don’t forget about safety. You’re dealing with heavy materials and powerful tools. Make sure you’ve got the necessary personal protective equipment requirements covered, which at a minimum means heavy-duty work gloves and high-impact safety goggles.
Getting a handle on the right gear can make any plumbing job go more smoothly. For a more complete look at what every homeowner should have, check out our guide on essential plumbing tools.
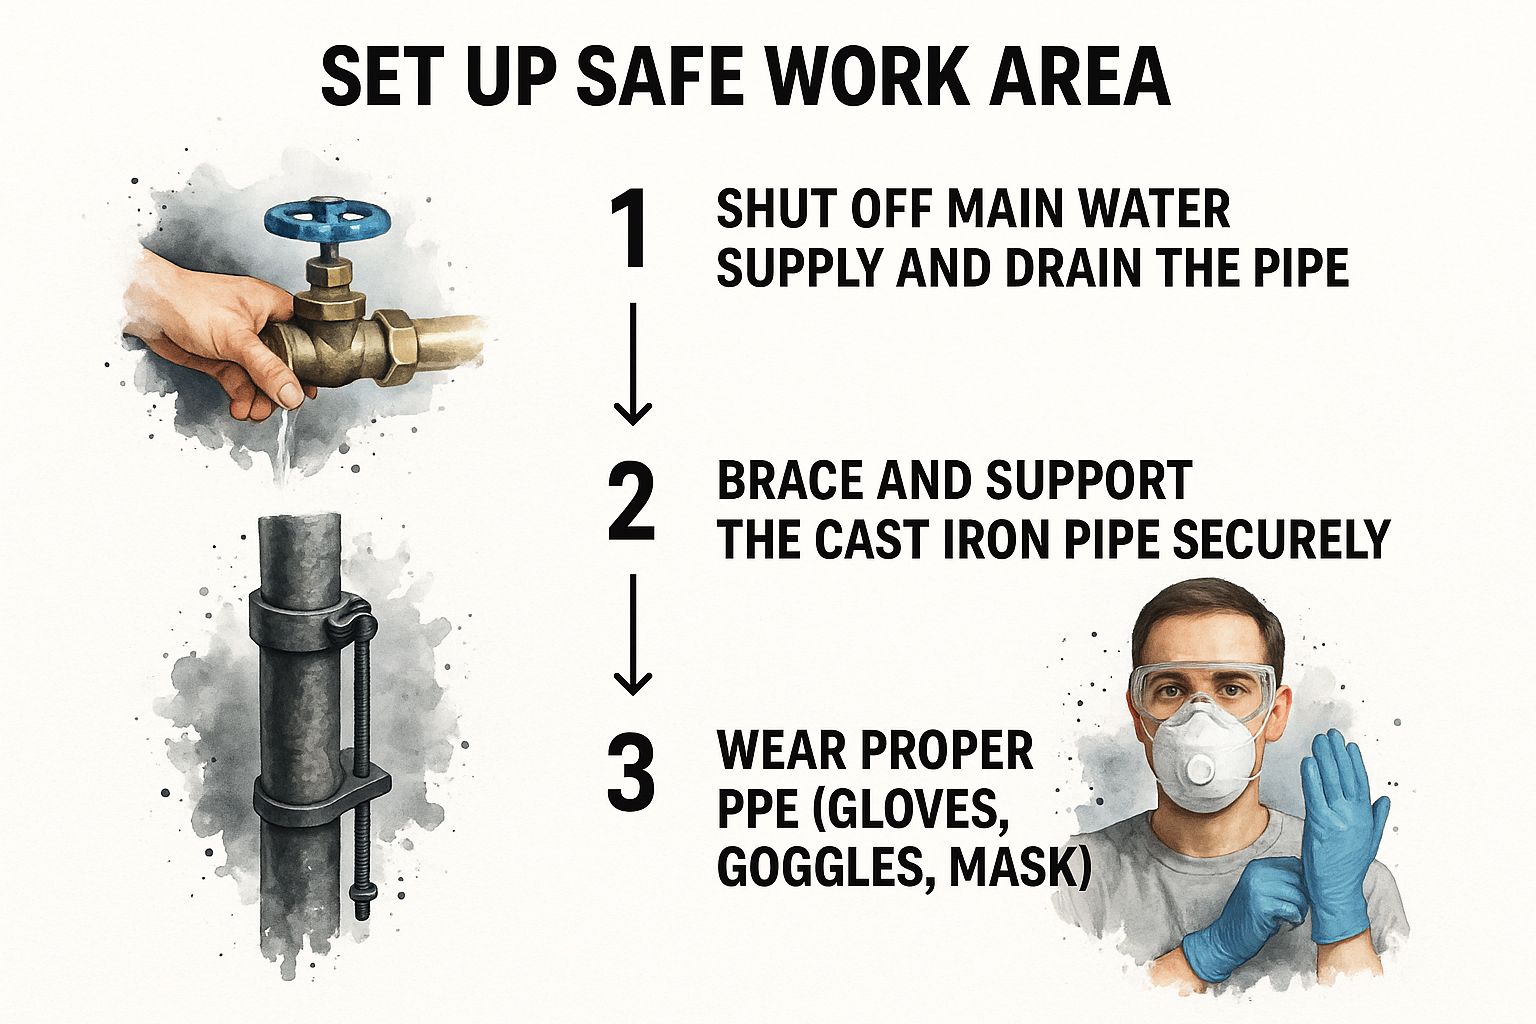
Setting Up a Safe and Clean Work Area
Alright, before you even think about cutting into that old cast iron, we need to talk about prep work. This is the part everyone wants to skip, and it’s where most DIY plumbing jobs go wrong. A little time spent here will save you a world of hurt—and a massive mess—later on.
First things first: shut off the water. Find your home’s main water shutoff valve and crank it closed. Once it’s off, head to the lowest point in your house, like a basement sink or an outdoor spigot, and open the tap. This lets gravity do its job and drain any water still lurking in the pipes, so you don’t get a face full of nasty water the second you make your cut.
Now, let’s talk about the pipe itself. Cast iron is deceptively heavy. A 10-foot section can easily top 100 pounds, and if that comes crashing down, you’re in for a very bad day. You absolutely have to support the pipe you’re working on.
Bracing and Personal Protection
Your goal is to brace the pipe on both sides of where you intend to cut. This is non-negotiable. I’ve seen people use everything from proper pipe stands to sturdy stacks of wood blocks. You can even use heavy-duty plumber’s strap anchored securely to the ceiling joists above. Whatever you use, make sure it’s solid. The last thing you want is for the pipe to sag or drop when it’s cut.
With the pipe secured, it’s time to protect yourself. Cutting old metal is messy business, and you don’t want any of it in your eyes or lungs.
Here’s the minimum gear you should have on:
- Heavy-Duty Gloves: You’ll be dealing with razor-sharp metal edges.
- Safety Goggles: Not glasses, but sealed goggles. Metal shards can fly anywhere.
- Dust Mask or Respirator: Old cast iron and rust can kick up some nasty dust that you do not want to breathe.
If you think this is overkill, consider the stakes. In 2011, a cast iron gas main from 1928 failed in Allentown, PA, causing a fatal explosion. While your drain line isn’t a gas main, it’s a stark reminder of what can happen when old infrastructure gives way. You can dig into historical data on this from the U.S. Department of Transportation.
Getting these three things right—water control, pipe support, and personal gear—is the bedrock of a successful repair.
Key Takeaway: A successful repair is built on a foundation of safety. Taking 30 minutes to prepare your work area can save you from hours of cleanup, thousands in damages, or a trip to the emergency room. Don’t rush this part.
Cutting and Coupling Your New Pipe Section
Alright, your workspace is prepped and your safety gear is on. This is the main event. What you do here requires precision and patience, because the goal isn’t just to hack out the bad section—it’s to prepare the old pipe for a perfect, leak-free union with the new material.
First things first, you need to mark your cuts. Find the damaged area—the crack, corrosion, or hole—and plan to remove a section that goes a few inches into solid, healthy pipe on both sides. A silver marker or even some chalk works great for drawing clear, straight lines where you intend to cut.
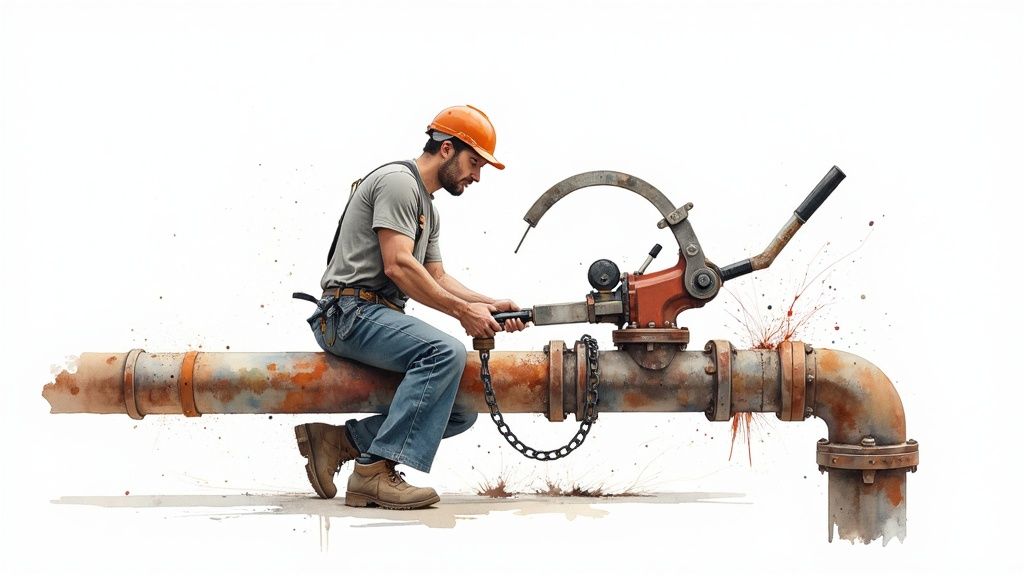
Making a Clean Cut
Now it’s time to get to work. If you’ve got a cast iron snap cutter, you’re in for a treat. Just wrap the chain around your first mark, tighten it down handle by handle, and listen for that distinct snap. That’s the sound of a clean, even break that requires very little cleanup. It’s truly the best way to handle this job.
If you’re going with an angle grinder, the process is louder and a lot messier, but it gets the job done. Just carefully follow your marked line and let the tool do the heavy lifting. Don’t forget, you’ll be throwing a lot of sparks, so make sure there’s nothing flammable nearby. Once you’ve cut through both marks, that damaged section is ready to come out.
With the cuts made, carefully lower the damaged piece of pipe. That thing is heavy and will have sharp edges, so handle it with some respect. You’ve now created the gap for your new pipe section.
Fitting the New Pipe
This is where the repair really starts to take shape. You’ll be bridging that gap with modern PVC or ABS pipe, and the magic happens with special fasteners called no-hub couplings. These are the key to creating a lasting seal between the old cast iron and the new plastic.
A no-hub coupling is made of three simple parts:
- A tough neoprene rubber gasket that creates the waterproof seal.
- A stainless steel shield that wraps around the gasket.
- A couple of band clamps that tighten the whole assembly down.
Before you even think about fitting anything, you have to prep the old cast iron. Grab a wire brush and get aggressive, scrubbing the outside of the pipe ends until all the rust, dirt, and grime are gone. You need a perfectly smooth, clean surface for that rubber gasket to grip.
Pro Tip: A flawless seal is 100% dependent on a clean surface. Any little piece of grit or rust left behind can create a tiny channel for water to escape later. Spend an extra five minutes cleaning those pipe ends until they shine. You will not regret it.
Once they’re clean, slide a no-hub coupling onto each end of the existing cast iron. Now, measure the exact distance between the two ends of the pipe. Cut a piece of your new PVC or ABS to this precise length. A very common mistake is cutting the new section just a little too short or too long, which puts stress on the couplings and practically guarantees a leak down the road.
Securing the Couplings for a Leak-Free Seal
With your new pipe cut to the perfect size, you’re on the home stretch. Go ahead and fit the new PVC or ABS section into the gap. Now, slide the rubber gaskets from the couplings over the joints, making sure each gasket evenly covers both the cast iron and the new plastic pipe.
Next, wrap the stainless steel shields over the gaskets. This is where your torque wrench becomes the most important tool you own. The bands on these couplings have to be tightened to the manufacturer’s specification, which is almost always 60 inch-pounds of torque.
Using your torque wrench, tighten each band screw until you hear that satisfying click. That click means you’ve hit the sweet spot—not loose enough to leak, but not so tight you risk cracking the brittle old cast iron. I always alternate between the screws on each band to ensure the pressure is applied evenly. This final step is what separates a temporary patch from a permanent fix.
Testing Your Work for a Leak-Proof Finish
You’ve done the hard part—the old pipe is out, and the new section is securely in place. But hold off on packing up your tools. A repair is only as good as its seal, and this final step is where you prove the job was done right.
Rushing this final check is a rookie mistake. It can mean the difference between a solid, long-lasting fix and a slow, hidden leak that causes rot and mold for weeks before you even notice it.
First things first, let’s get some water back in the system, but do it slowly. Don’t just crank the main shutoff valve all the way open. Give it about a quarter-turn and just listen. You should hear the pipes gurgle a bit as they fill. This slow, controlled start prevents a sudden pressure surge from hammering your new connections.
Inspecting the Couplings
Now that there’s water in the line, it’s time for a close-up. Grab a good flashlight, even if you think the lighting is fine, and get your eyes right on both of those no-hub couplings.
You’re hunting for any sign of moisture, no matter how tiny. Here’s what to look for:
- Tiny beads of water forming right at the edge of the rubber gasket.
- Any dampness on the stainless steel bands themselves.
- A slight drip starting to form on the bottom of the pipe.
I always keep a dry paper towel with me for this part. Wipe down the entire coupling and the pipe right next to it. If that paper towel shows any moisture at all, you’ve got a small leak to deal with. See? This is why we only opened the valve a little bit.
Don’t panic if you see a tiny drip. This is usually an easy fix. More often than not, it just means one of the band clamps needs a final quarter-turn with your torque wrench to get that perfect, snug seal.
Once you’re confident there are no leaks under low pressure, go ahead and slowly open the main valve the rest of the way. Now, let’s put it to a real test. Run a faucet or flush a toilet nearby to get a good flow of water moving through the repair.
Do your inspection all over again, meticulously checking for any hint of moisture around the couplings. If everything stays bone-dry, you can give yourself a pat on the back—you’ve nailed it.
After confirming the repair is leak-free, you can start the cleanup. But your job isn’t quite finished. For the next 24-48 hours, make it a point to pop back and visually check the repair a couple more times. This just ensures the seal holds up as everything settles.
Catching a problem early is always the goal, and knowing the basics of plumbing leak detection can save you a world of headaches down the road.
Got Questions About Your Cast Iron Pipe Repair?
Even after you’ve tightened that last coupling, a few questions might still be rattling around in your head. It’s totally normal. Knowing the ins and outs of a cast iron repair is what gives you peace of mind that your fix will hold up for the long haul. Let’s tackle some of the most common things people wonder about.
One of the biggest questions I hear is whether it’s better to just patch a small problem area or go ahead and replace a larger section.
My rule of thumb is this: if the pipe on either side of the crack is still solid—meaning you don’t see deep, flaky rust or significant pitting—a sectional repair is a great, cost-effective solution. But if that surrounding pipe feels brittle or looks like a rust-pocked moonscape, you’re just putting a band-aid on a bigger problem. Ripping out a longer section is more work now, but it’ll save you from doing this all over again a few feet down the line next year.
Another major concern is about longevity. How long can you really expect that new connection to last?
How Long Will This Repair Really Last?
When you use a no-hub coupling and install it correctly, that seal is designed to last as long as the pipe itself. We’re talking 50 years or more.
The secret is in the installation. The neoprene gasket is tough as nails, built to resist sewer gas and whatever else goes down the drain. The stainless steel shield then protects that gasket from the shifting and shearing forces that happen underground. As long as you cleaned those pipe ends properly and torqued the bands to spec, you can sleep well at night.
This kind of durability is a huge reason the cast iron pipe market is still so strong. It was valued at around USD 11.66 billion in 2024 and is expected to keep growing, largely because there’s a constant need for reliable, long-term repair methods like this. You can dig into the numbers yourself in a recent market analysis on cast iron pipe industry growth on techsciresearch.com.
Is It Okay to Connect Plastic Pipe to Old Cast Iron?
Yep, 100%. Mixing modern PVC or ABS with old-school cast iron is done every single day in plumbing. They’re obviously very different materials, but that’s precisely what no-hub couplings were designed for—to create a watertight, durable seal between two dissimilar pipes.
In fact, the flexibility of that neoprene gasket is a bonus. It can absorb small vibrations and ground shifts that might crack a more rigid, old-fashioned joint.
One last thing people often ask: “What about all the rust inside the old pipe?” You can’t magically stop the corrosion that’s already happening, but you can definitely slow it down. The best way to preserve the rest of your system is to ensure your drains flow freely and to avoid pouring harsh, corrosive chemical cleaners down them.
If you’ve hit a snag or just want the confidence that comes from a pro job, the team at Professional Plumbers Denver has seen it all. We have the right tools and deep experience to solve any cast iron pipe problem in the Denver Metro area. Contact us 24/7 for a consultation or emergency service.

Recent Comments