
Ready to upgrade your shower? It's one of the easiest and most satisfying home improvements you can tackle, often taking less than 15 minutes from start to finish. You really don't need to call in a plumber for this one.
With just a couple of basic tools, you can swap out that old, sputtering fixture for something that feels like a spa-level upgrade. The whole process is straightforward: unscrew the old head, give the threads a quick clean, wrap them with new tape, and then screw on the new one. It's a simple skill that pays off every single day.
Your Quick Guide to a Better Shower Experience
This isn't just about replacing a part; it's about transforming a daily routine. And you're not alone in wanting a better shower. This small project is part of a massive global trend toward better performance and water efficiency.
The market for shower heads was valued at a staggering $13.3 billion in 2024 and is expected to climb to over $20.4 billion by 2030. That growth shows just how many people are looking for simple ways to enhance their homes. If you're curious about the trends, you can dive into the full market research on GrandViewResearch.com.
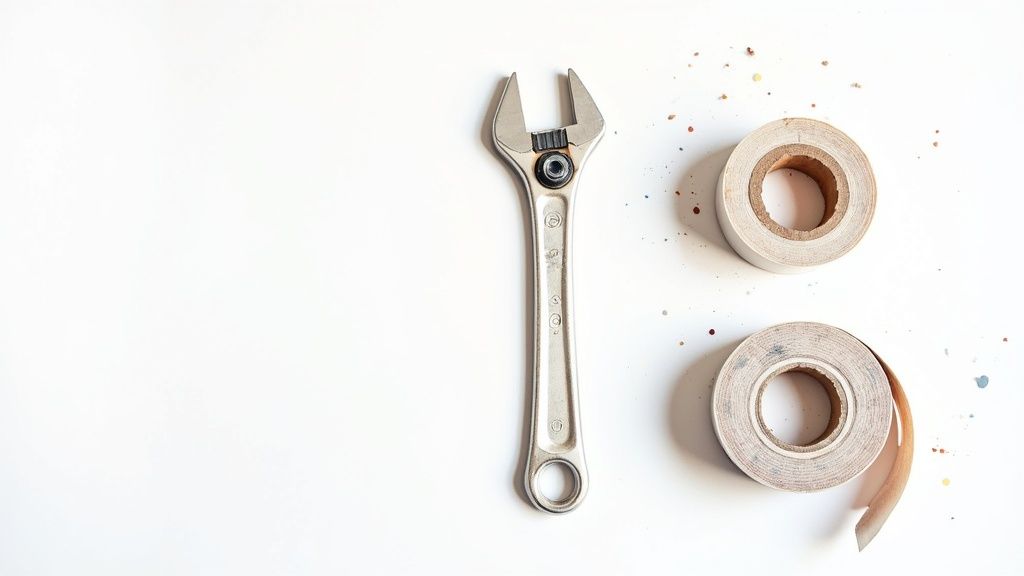
Your Essential Toolkit for Shower Head Replacement
Before you start unscrewing anything, let's get your tools lined up. Gathering everything you need first is my number one tip for a smooth, frustration-free installation. It prevents that awkward mid-project scramble.
Here's a quick look at the essentials.
| Item | Purpose | Pro Tip |
|---|---|---|
| New Shower Head | The centerpiece of your upgrade. | Make sure it matches your style, but also check that it’s compatible with your home's water pressure. |
| Plumber's Tape | Creates a watertight seal on the threads. | This stuff is your best friend for preventing leaks. Don't skip it! Wrap it clockwise 3-4 times. |
| Adjustable Wrench | Provides leverage for loosening and tightening. | Essential for getting a grip on old fixtures that might be stuck on with mineral buildup. |
| Old Rag/Towel | Protects the fixture’s finish and catches drips. | Wrap this around the fixture before using your wrench to avoid scratching that brand-new finish. |
Having these items ready to go means you can get the job done right the first time, without any hiccups.
Choosing the Right Shower Head for Your Home
Before we get into the nuts and bolts of how to replace a shower head, the first step is actually the most fun: picking a new one. The market is flooded with options, and what you choose will literally shape your daily shower from here on out. Getting this right makes the whole project feel like a genuine upgrade.
You’ll generally find three main styles on the shelves: fixed, handheld, and dual-head models. Each has its own distinct personality and fits different needs and bathroom setups.
-
Fixed Shower Heads: This is your classic, no-fuss option mounted directly to the wall. They’re usually the most affordable and simplest to install, making them a solid, straightforward choice for many homes.
-
Handheld Shower Heads: Connected with a flexible hose, these are the champions of versatility. They make everything easier, from rinsing shampoo out of long hair and washing down the shower walls to bathing the dog or helping little kids.
-
Dual-Head Systems: Why choose? These systems give you a fixed head and a handheld wand. You can run them both at once for a full-drench experience or use them individually when you need to.
While the traditional fixed models still dominate the market at about 57.31%, the tide is turning. Handheld systems are the fastest-growing category out there, which tells me people are craving more flexibility and function from their showers.
Features That Make a Difference
Once you’ve settled on a type, look for features that can solve common frustrations. If you're dealing with frustratingly low water pressure, a pressure-boosting shower head can completely change your morning routine. Many modern heads also come with multiple spray patterns—think a powerful massage jet for sore shoulders or a gentle, wide mist.
If you want to dig deeper into how your home's plumbing affects things like water pressure, we've put together a guide on mastering shower plumbing in Denver.
Finally, let's talk looks. Don't just grab the first one you see. Taking a moment to match the finish—whether it's chrome, brushed nickel, or matte black—to your other bathroom fixtures like the sink faucet and towel rack creates a polished, intentional look. It’s a small detail that makes the whole room feel more put-together.
With the global shower head market valued at $7.46 billion in 2022 and still growing, manufacturers are constantly innovating, giving us homeowners more great options than ever before. You can find more data on shower head market trends on GrandViewResearch.com.
Your Visual Guide to a Quick Shower Head Swap
Alright, let's get our hands dirty. This is the fun part, and you'll be surprised at how quickly this all comes together. We'll walk through removing that old, crusty fixture, getting the shower arm prepped for a perfect seal, and then screwing on your new head. Honestly, it’s a job anyone can knock out in just a few minutes.
Removing the Old Fixture
The first potential snag you might hit is an old shower head that's practically welded in place from years of hard water and mineral buildup. Whatever you do, don't just try to muscle it off—that's a surefire way to damage the pipe hidden in your wall, and nobody wants that headache.
The trick is to use a little finesse. Drape a rag around the base of the old head to protect the finish. Then, get a firm grip with your adjustable wrench or pliers and give it a steady turn counter-clockwise. You're not trying to rip it off; you just need enough consistent pressure to break that old seal.
This image shows you exactly how to apply leverage without wrecking your plumbing.
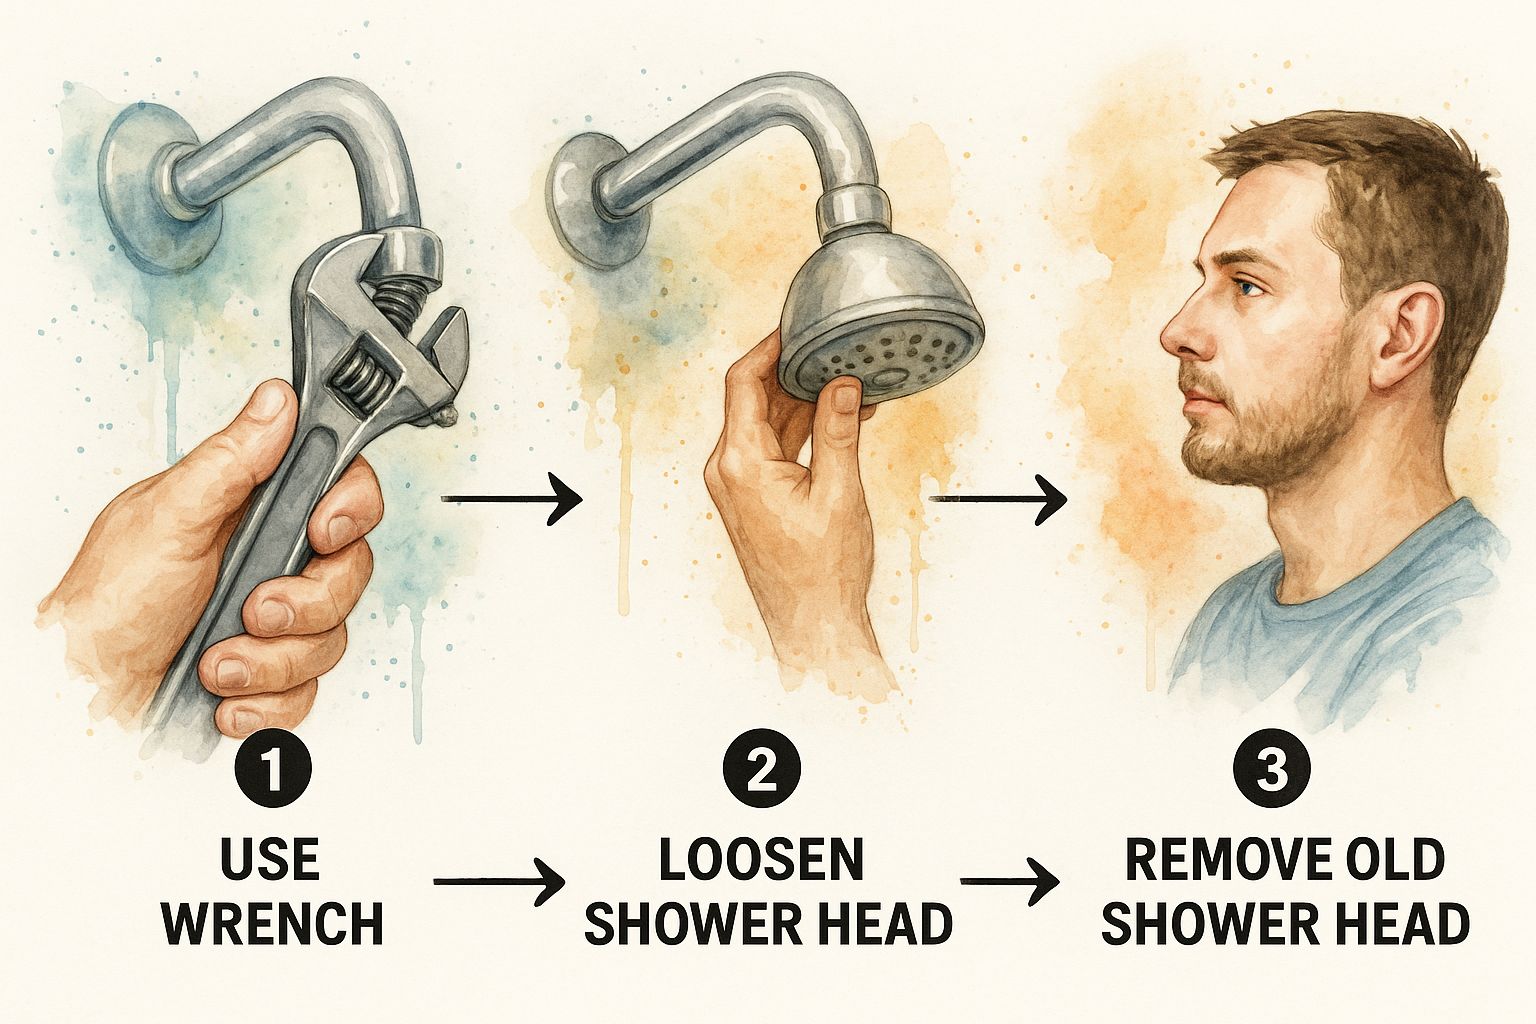
Once it pops loose, the rest is easy. You should be able to spin it off the rest of the way by hand.
Prepping the Shower Arm for a Watertight Seal
With the old head out of the way, you'll see the threaded end of the shower arm pipe. This is where you win or lose the battle against leaks, so a little attention to detail here pays off big time. You’ll probably see some gross, shredded bits of old plumber’s tape and other gunk.
Grab a damp rag or a soft wire brush and clean those threads thoroughly. You need a completely clean surface for the new tape to grip properly.
My Go-To Pro Tip: Before you even think about taping, turn the water on for a second or two. This quick blast will flush out any loose sediment or debris from inside the pipe that could instantly clog your brand-new shower head.
Now, it’s time for the plumber’s tape. The way you wrap this is critical. Get it wrong, and you're guaranteeing a drip.
- Go Clockwise: Always wrap the tape in a clockwise direction as you face the threads.
- Give it 3-4 Wraps: Pull the tape so it's taut and overlap it slightly with each pass. Three to four layers is the sweet spot.
Wrapping clockwise means that as you screw the new head on (also clockwise), you're tightening the tape into the threads, not bunching it up or unraveling it.
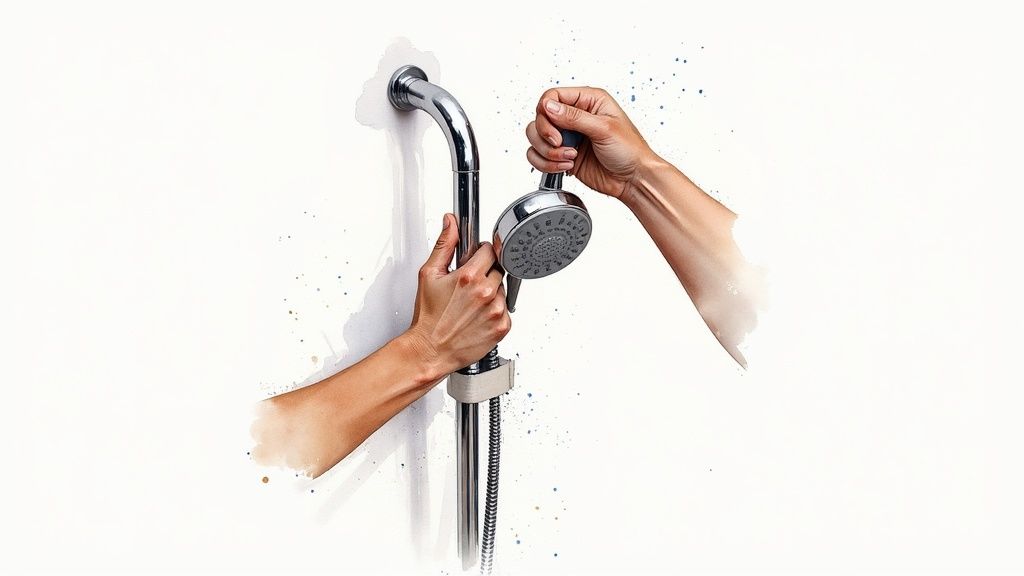
Finishing Up the Installation
You're on the home stretch. Take your shiny new shower head and start threading it onto the prepared arm by hand. It should go on smoothly without much resistance. Keep turning until it's snug and pointing in the right direction.
For most modern fixtures, especially those with plastic fittings, hand-tight is all you need. Seriously.
If the manufacturer's instructions do call for a final nudge with a wrench, be careful. Use your rag to protect the new finish and give it just a tiny one-eighth turn. Overtightening is the number one cause of cracked connectors.
Turn on the water and admire your work. Check for any drips at the connection point. If it’s dry, congratulations—you've officially upgraded your shower. Go enjoy it
Fixing Common Problems Like Leaks and Low Pressure
Even when a job goes smoothly, you can still run into a few little hiccups. Learning how to replace a shower head is one thing, but knowing how to quickly fix the minor issues that pop up is what really makes the project a success. The great news? The fixes are almost always easier than the installation itself.
What to Do About Drips and Leaks
The most frequent issue you'll likely encounter is a small, nagging drip right where the new shower head meets the shower arm. Don't worry, this doesn't mean you bought a faulty fixture. In my experience, it almost always comes down to the plumber's tape.
The number one reason for a leak at this connection is improper tape application. Either there isn't enough tape to create a seal, or it was wrapped in the wrong direction (counter-clockwise), causing it to unravel as you tightened the head.
Fixing it is a breeze. Just unscrew the new head, peel off the old, ineffective tape, and start fresh. Tightly wrap the threads with three to four full wraps of new tape, making sure you go in a clockwise direction. This ensures the tape cinches down and creates a perfect seal as you screw the head back on.
Tackling Weak Water Pressure
What if your new shower head is leak-free, but the water flow is just… sad? Before you get frustrated, there are a couple of quick things to check.
First, every new shower head has a small screen filter right where it connects to the pipe. It's designed to catch sediment, and sometimes, the installation process can knock debris loose from inside the pipes, clogging it up instantly. Simply unscrew the head and give that little screen a good rinse under the faucet.
If the pressure is still low, the culprit is probably the flow restrictor. This is a small plastic disc required by water conservation laws, but it can be a real pain if your home already has low water pressure to begin with. You can usually pry it out gently with a paperclip or a small flathead screwdriver.
Of course, some pressure problems are more widespread. If you've tried these fixes and are still getting a weak stream, the issue might be rooted deeper in your home's plumbing. You can learn more by reading these professional tips for troubleshooting low water pressure throughout your house.
Sometimes a visual guide helps pinpoint the problem faster. Here’s a quick-glance table for solving the most common issues you might face.
Quick Fixes for Common Installation Issues
| Problem | Likely Cause | Solution |
|---|---|---|
| A steady drip at the connection | Improper plumber's tape seal | Unscrew the head. Remove the old tape and re-wrap the threads clockwise with 3-4 layers of new tape. |
| Water spraying from the sides | Cross-threaded connection | Carefully unscrew the head and restart. Make sure it screws on straight and easily without resistance. |
| Disappointingly weak flow | Clogged filter screen or flow restrictor | Unscrew the head. Rinse the screen filter. If needed, carefully remove the plastic flow restrictor. |
| The shower head won't tighten | Stripped plastic threads | The threads on the shower head may be damaged. You might need to exchange it for a new one. |
Using this chart can help you quickly identify what's gone wrong and get your new shower running perfectly in no time.
Pro Tips for a Flawless and Lasting Installation
You’ve got the basics down for swapping out a shower head, but the real secret to a job that lasts is in the small details. These are the tricks of the trade that make the difference between a quick fix and a professional-grade installation you won’t have to think about for years.
Before you even unbox that new fixture, do yourself a favor: turn the shower on for just a moment. This quick blast of water will flush out any loose sediment or gunk hiding in the pipe. It's a simple, two-second step that prevents that debris from immediately clogging up your brand-new shower head.
The Secrets to a Perfect Seal
Getting a watertight, leak-free connection is what this all comes down to. The success of your entire project hinges on creating a perfect seal, which is all about using plumber's tape correctly and tightening the fixture just right.
Pro Tip: Always, always wrap the plumber's tape clockwise around the threads of the shower arm. When you screw the new head on (which also turns clockwise), the tape will tighten and compress into the threads, creating a perfect seal. If you wrap it the wrong way, the tape will bunch up and unravel as you tighten, practically guaranteeing a leak.
Make sure you get a good seal by applying three to four full wraps of tape, pulling it snug as you go.
After you've hand-tightened the new head as far as it will go, you might need a wrench for that final quarter-turn. If you do, grab a soft cloth or rag and wrap it around the base of the fixture first. This simple buffer will protect that shiny new finish from getting scratched by your tool.
While these tips cover the most common scenarios, plumbing can sometimes throw you a curveball. If you run into more stubborn issues, our guide on common plumbing problems and how to fix them can offer more advanced solutions.
Today's market is also shaped by efficiency programs like the EPA's WaterSense, which has changed the fixtures we buy. To get a better sense of the industry, you can learn more about today's shower head market on Market.us.
Your Shower Head Replacement Questions Answered
https://www.youtube.com/embed/I4F4HV4nipk
Even a straightforward project can bring up a few questions. I’ve been there. Getting the answers ahead of time is the key to a quick, successful job and feeling good about doing it yourself. Here’s the rundown on the most common things people ask.
Do I Have to Shut Off the Main Water Valve for This?
Definitely not. That’s a huge relief, right? This is one of the best parts about this particular upgrade. Your shower’s faucet handle is all the shut-off you need.
Just make sure that handle is pushed firmly into the "off" position. As long as it is, no water can flow through the shower arm once you take the old head off. It's a truly beginner-friendly plumbing task with zero risk of turning your bathroom into a splash zone.
What Are the Essential Tools I'll Actually Need?
You can get this done with just a couple of items from the toolbox. The absolute must-haves are:
- Plumber’s tape (you might see it called Teflon tape) to create a perfect seal.
- A pair of adjustable pliers or a wrench for some extra muscle.
I also recommend grabbing an old towel or rag. You’ll want to wrap it around the new shower head's base if you need to use the pliers for that final nudge. This prevents the tool from scratching up your shiny new fixture. While you might be able to hand-tighten the new head, getting the old one off—especially if it's been on there for years—is almost always a job for the pliers.
I can tell you from experience, if you've got a leak where the new head meets the pipe, it's almost always a plumber's tape problem. The two classic mistakes are using too little tape (go for 3-4 wraps) or wrapping it the wrong way.
Help! My New Shower Head Is Leaking at the Connection.
A little drip at the connection point is frustrating, but it's an easy fix. The problem is almost certainly the seal you created with the plumber's tape.
You absolutely must wrap the tape clockwise around the threads on the shower arm. Why? When you screw the new head on (also clockwise), this motion tightens the tape down into the threads, forming that watertight seal. If you wrap it counter-clockwise, the tape will just unravel and bunch up as you tighten, which is a guaranteed recipe for a leak.
Is There a Way to Get More Water Pressure from My New Shower Head?
You often can, yes. Most modern shower heads come with a water restrictor (or flow regulator) already installed inside. It's a small plastic disc put there to meet water conservation standards. While great for the environment, it can make the water flow feel pretty weak, especially if your home’s pressure is low to begin with.
Usually, you can carefully pry this little disc out with a paperclip or a small pair of needle-nose pliers. This can make a huge difference in the flow rate. Just give the manufacturer's instructions a quick look first, as the exact method for removing it can differ from one brand to another.
When you need reliable, expert help with any plumbing challenge, from a simple replacement to a major installation, the team at Professional Plumbers Denver is ready to assist. You can find out more about our services at https://professional-plumbers-denver.com.

Recent Comments