
That humming sound coming from your sink? It’s a classic sign your garbage disposal is jammed. The good news is that most of the time, this is a simple fix you can knock out in under 30 minutes. It usually just takes a few key steps: cutting the power, grabbing a flashlight to see what you’re dealing with, and using a special wrench to free the blades.
What to Do Before You Start
When your garbage disposal starts humming or making a horrible grinding noise, it’s basically screaming for help. Before you grab a single tool or even think about a fix, your first and most important job is to make the situation safe. This isn’t just a suggestion—it’s the golden rule for avoiding a trip to the emergency room.

Prioritize Safety Above All Else
First things first: kill the power to the disposal. And I don’t mean just flipping the wall switch. Head straight to your home’s circuit breaker box and shut off the breaker dedicated to the garbage disposal. This is the only way to be 100% sure the unit can’t accidentally kick on while you’re working on it.
Once you’re certain the power is off, it’s time to play detective and figure out what’s causing the jam in the first place.
Never, ever put your hand or fingers down into the grinding chamber of a garbage disposal. Even with the power completely off, those blades are incredibly sharp and can cause a serious injury.
This checklist walks you through the essential safety and diagnostic steps to take before you try to fix anything. It’s all about making sure you can safely identify the problem.
Safety and Diagnostic Checklist
| Action | Why It Matters | Pro Tip |
|---|---|---|
| Cut Power at the Breaker | Flipping the wall switch isn’t enough. This guarantees zero electrical current can reach the unit, preventing accidental startup. | If your breakers aren’t labeled, flip the disposal switch on and have someone watch it while you test breakers one by one. Label it for next time! |
| Perform a Visual Check | Use a flashlight to look down the drain. Identifying the culprit now can save you a ton of effort later. | Keep a small, bright LED flashlight under the sink. It’s perfect for this and for spotting leaks. |
| Gather Your Tools | Get long-nosed pliers or tongs ready. You’ll need them to safely retrieve any foreign objects. | Kitchen tongs work great in a pinch. They give you the reach and grip you need without getting your hands anywhere near the blades. |
Following these simple but critical steps sets you up for a safe and successful DIY repair.
Perform a Quick Visual Inspection
With the power off and your flashlight in hand, shine a light down the sink drain. Take a good look inside for anything obvious that’s jamming the works. Most of the time, the problem is something that fell in by accident.
Keep an eye out for common culprits like:
- Fallen Utensils: I’ve seen it all—spoons, forks, and even small bottle caps are notorious for finding their way into the disposal.
- Large Food Scraps: Things like avocado pits, chicken bones, or a big chunk of potato can easily wedge the blades in place.
- Fibrous Materials: Stringy foods are the enemy. Celery stalks, corn husks, and artichoke leaves love to wrap themselves around the blades instead of grinding up.
If you can see the offender, grab your pliers or tongs—again, never your fingers—and carefully pull it out. Honestly, this simple visual check and retrieval solves the problem more often than not, without you having to do anything else.
Simple Fixes for Minor Clogs
Alright, with the power safely off, it’s time to deal with the clog itself. You might be surprised to learn that for most everyday jams, you won’t need anything more than what’s already in your kitchen cabinets. These first-line-of-defense methods are perfect for breaking up minor food buildup and grease without reaching for harsh chemicals.

Give It a Good Plunge
Before you start mixing potions, your first move should always be the humble plunger. It’s often the fastest way to clear a simple food blockage. Just grab a standard sink plunger (not the toilet one!), and fill the sink with a few inches of water—just enough to cover the plunger’s bell. This creates the seal you need to build pressure.
Now, get to it. Vigorously pump the plunger up and down about six to eight times. The force you’re creating can often be enough to pop that stubborn blockage right through the pipes. Lift the plunger and see what happens. If the water drains, you’re done! If not, give it another go before trying something else.
The Old-School Baking Soda and Vinegar Trick
If plunging didn’t cut it, it’s time for a classic for a reason. The baking soda and vinegar combo is brilliant for dissolving the greasy, gunky buildup that slows down drains.
Start by pouring about half a cup of baking soda straight down the disposal drain. Follow it up with one cup of plain white vinegar. You’ll hear it fizz and bubble immediately—that’s the sound of science at work, breaking down all that grime.
Let that mixture do its thing for at least 10-15 minutes. While you wait, get a kettle of water boiling. After the time’s up, carefully pour the boiling water down the drain to flush everything clean.
Pro Tip: This isn’t just a great unclogging method; it’s a fantastic deodorizer. That fizzing action helps scrub away the old food particles that cause those funky kitchen sink smells.
Freshen Up with Ice and Citrus
For a final touch that cleans, sharpens, and gets rid of any lingering odors, I swear by the ice cube trick. Fill the disposal chamber with a good handful of ice cubes, toss in some coarse salt, and add a few citrus peels—lemon or orange rinds work great.
Next, turn on the cold water and then fire up the disposal. The ice and salt act like a scrub brush, scouring the inside of the grinding chamber and knocking loose any stubborn bits. The citrus peels? They just leave behind a fresh, clean scent. While this is more of a maintenance tip, it can definitely help break up tiny clogs before they become big problems.
How to Manually Free a Jammed Disposal
So, the simple tricks didn’t work. You can hear that telltale hum from the motor, but the blades themselves are stubbornly refusing to spin. This almost always points to a good old-fashioned mechanical jam.
Time to grab your best friend for this job: an Allen wrench. Most disposals come with one, but if you’ve lost it, don’t worry. This tool is designed specifically to manually crank the motor and break free whatever’s got it stuck.
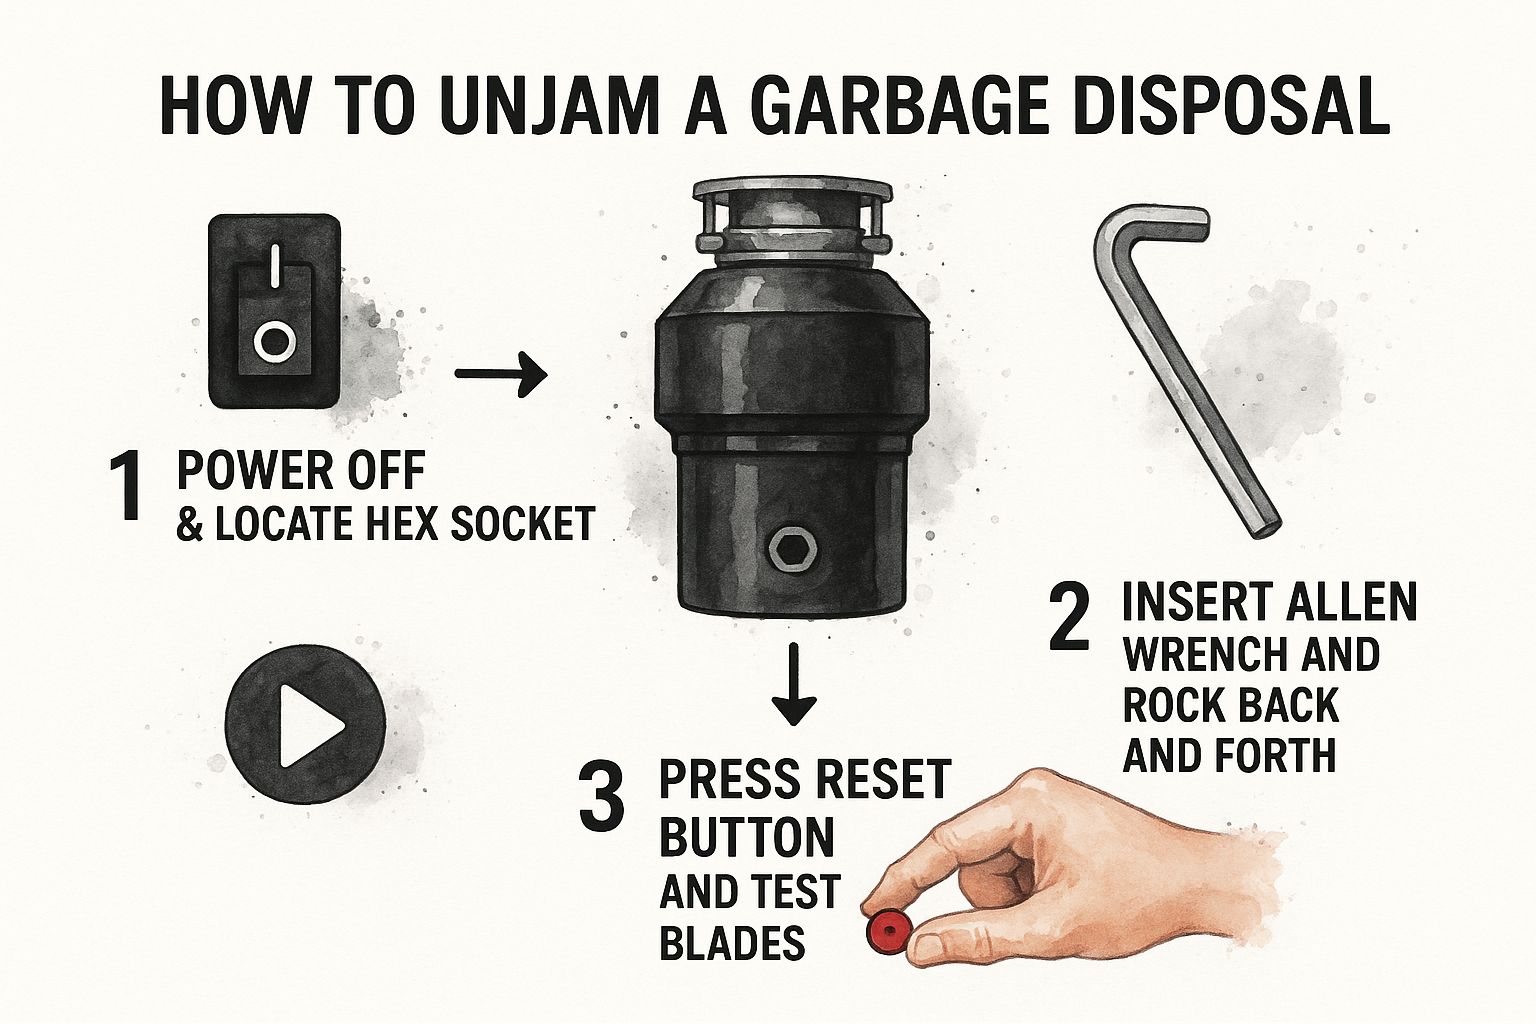
Before you even think about reaching under the sink, there’s one non-negotiable rule. Kill the power at the circuit breaker. Not just the switch on the wall—the breaker. Safety first, always.
Once you’re sure it’s safe, take a look at the very bottom of the disposal canister. You should spot a small, hex-shaped socket right in the center. That’s your target.
Using the Wrench to Break the Jam
Go ahead and fit the Allen wrench into that socket. Now, you’ll need to apply some firm, steady pressure. Think of it less like turning a screw and more like rocking a stubborn lever back and forth. A few degrees clockwise, then a few degrees counter-clockwise.
You’re not aiming for full rotations. The whole idea is to wiggle the grinding plates just enough to dislodge the culprit, whether it’s a stray bottle cap or a clump of potato peels.
Keep working it back and forth. At some point, you’ll likely feel a sudden release of tension, maybe even hear a little “pop.” That’s the sound of victory! It means you’ve broken the jam. Once the wrench can move freely in both directions, you’ve done the hard part.
Don’t be shy about putting some muscle into it. These units are built tough. And if you can’t find the wrench that came with your disposal, a standard 1/4-inch Allen wrench from any hardware store will almost always do the trick.
With the jam cleared, grab a pair of tongs (never your hands!) and fish out any loose debris you can see inside the disposal chamber.
Now you can head back to the breaker box and flip the power back on. Before you test it, find the small red reset button on the bottom of the unit and give it a firm press. Then, turn on the cold water and hit the switch.
Many common disposal issues stem from what goes down the drain. In fact, studies show that 20-30% of malfunctions are caused by improper waste. Mastering this manual technique can often save you from making a service call, which ends up being necessary in about 15% of cases. For a deeper dive into other potential problems, check out our guide on troubleshooting a garbage disposal that’s not working.
Clearing Out a Clogged Drain Pipe
So you’ve tried all the tricks and your sink still won’t drain? Chances are, the problem isn’t even in the garbage disposal itself. The real culprit is often a nasty clog hiding further down the line in the P-trap—that U-shaped pipe under your sink. This is the prime spot for grease, coffee grounds, and all sorts of gunk to build up and create a solid blockage.
Diving into your own plumbing can feel a little daunting, but trust me, clearing out the P-trap is a straightforward job that can fix even the most stubborn backups. All you really need are a bucket, a pair of channel-lock pliers, and about 20 minutes. This is especially the move to make when you notice a garbage disposal backup into your sink, as that almost always points to a blockage right here.
Getting Ready to Work
First thing’s first: clear out that cabinet under your sink. You need room to move around without knocking over old cleaning supplies.
Next, place an empty bucket directly under the U-shaped pipe. This isn’t optional. That pipe is full of stagnant, grimy water, and it’s all coming out. Having a few old towels on hand is also a smart move, because spills are pretty much guaranteed.
A Quick Safety Note: If you’ve recently poured any chemical drain cleaners down the sink, you absolutely need to wear protective gloves and safety glasses. You don’t want that stuff splashing back on your skin or in your eyes.
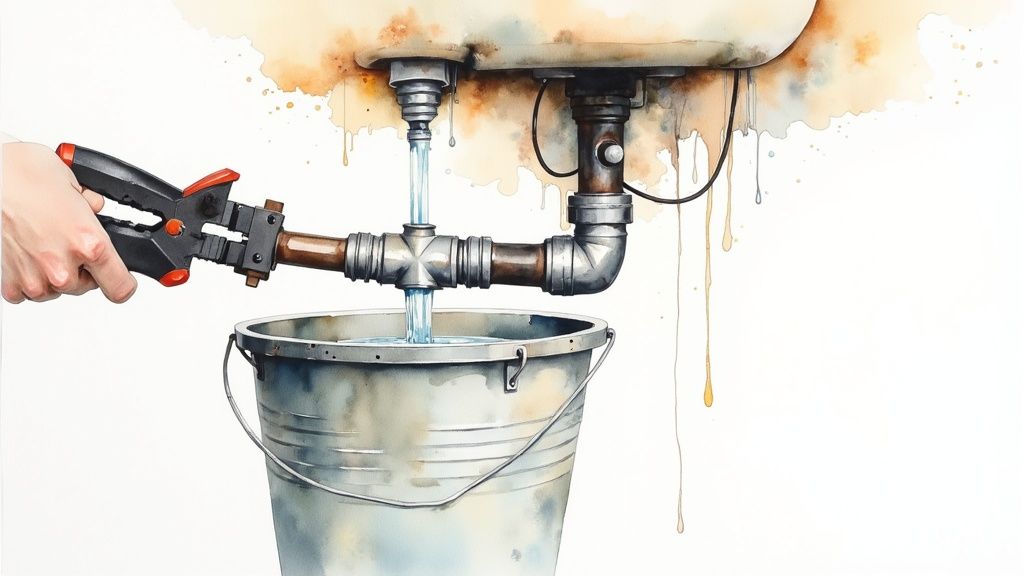
How to Remove and Clean the P-Trap
With your bucket and towels ready, it’s time to get to it.
- Loosen the Nuts: Look at the P-trap. You’ll see two large slip nuts holding it in place—one connects to the pipe coming down from the sink, and the other connects to the pipe going into the wall. Grab your channel-lock pliers, grip the first nut, and turn it counter-clockwise. Once it breaks free, you can usually finish unscrewing it by hand.
- Remove the Trap: Do the same for the second nut. As it comes loose, hold onto the P-trap so it doesn’t just fall. Carefully lower the pipe and dump all that nasty water and sludge into your bucket.
- Clean It Out: Now for the fun part. Take the P-trap to another sink (or even better, outside with a garden hose) and get cleaning. I find a wire brush or even a bent coat hanger works great for scraping out any compacted gunk. Give it a final, thorough rinse with hot water.
Before you put everything back together, give the pipe and its rubber washers a quick inspection. If they look cracked, brittle, or worn out, just replace them. It’s a cheap and easy fix that will prevent leaks down the road.
Reattach the P-trap by hand-tightening the nuts first, then give them a final quarter-turn with your pliers to snug them up. Don’t overtighten them! Finally, run hot water for a minute or two and check carefully for any drips. If it’s dry, you’re back in business.
Smart Habits to Keep Your Disposal Clog-Free
You’ve got your disposal running again—great job! Now, the real trick is making sure it stays that way. A few simple changes to your kitchen routine can save you from having to do this all over again. It’s really just about being a little more mindful about what’s going down the drain.
Think of your disposal as a powerful assistant, not an all-consuming monster. It’s built for small, soft food scraps, not the leftovers from a Thanksgiving feast. A little bit of prevention is worth a pound of cure, especially when it comes to your plumbing.
Don’t Feed It the Wrong Things
The most important rule for disposal care is knowing what it simply can’t handle. Some foods are just asking for trouble and are notorious for creating nasty blockages. To keep your unit happy and your pipes clear, make a point to scrape these into the trash can instead.
- Stringy Veggies: Celery stalks, onion skins, corn husks, and artichokes have tough, fibrous strands that will tangle around the blades like hair in a vacuum cleaner. They just don’t grind up.
- Foods That Swell: Pasta, rice, and even oatmeal will expand when they sit in water. This creates a thick, starchy paste that can easily clog the trap and pipes.
- Gritty Gunk-Makers: Coffee grounds and eggshells might seem innocent, but they behave like sand. They settle in the pipes and mix with any grease present to form a dense sludge that’s tough to break down.
- Grease, Oil, and Fats: This is a big one. Never pour these down any drain. They might be liquid when hot, but they solidify as they cool, coating your pipes and creating the foundation for a major blockage.
The Plumber’s Pro-Tip: Always run a strong stream of cold water before you turn the disposal on, while it’s running, and for at least 20 seconds after you turn it off. This simple habit is the single best thing you can do to flush everything completely through the plumbing lines.
Best Practices for Everyday Use
Beyond just avoiding the problem foods, a few small tweaks to how you use your disposal can make a huge difference. Following these tips consistently will not only prevent clogs but will also extend the life of your appliance.
Keeping the unit itself clean is another crucial part of maintenance. For a full rundown, check out our guide on how to clean your garbage disposal for some easy steps to keep it running fresh.
This kind of proactive thinking matters more than you might think. On a global scale, we generate an astonishing 2.01 billion tonnes of municipal solid waste annually. That number is projected to jump by 70% by 2050, putting a massive strain on every part of our waste infrastructure, right down to the pipes in your home. You can dig into the specifics by exploring the World Bank’s data on solid waste management.
Common Questions About Unclogging a Garbage Disposal
Even when you follow the steps, a stubborn garbage disposal can throw you a curveball. I’ve heard just about every question in the book from homeowners trying to tackle this, so let’s walk through a few of the most common scenarios.
“My Disposal Is Humming, But Nothing’s Happening. What Gives?”
That humming sound is your disposal’s motor telling you it wants to work but something is physically stopping it. Think of it as a cry for help. 99% of the time, this means the blades are jammed.
It could be a stray piece of bone, a dropped bottle cap, or even a stubborn bit of fibrous vegetable waste. Your first move should always be to grab that Allen wrench that came with the unit. Manually cranking the blades back and forth is almost always enough to dislodge whatever’s stuck in there.
“Is It Okay To Pour a Chemical Drain Cleaner Down There?”
Please don’t. While it’s tempting to reach for a bottle of chemical drain cleaner for a quick fix, it’s one of the worst things you can do to your disposal.
These harsh, corrosive chemicals are notorious for eating away at the plastic and metal parts inside the unit. Over time, they can cause serious damage to your disposal and even the pipes themselves. It’s much safer to stick with plunging or the baking soda and vinegar method for routine cleaning and minor clogs.
I see this mistake all the time. People think baking soda and vinegar is a magic bullet for tough clogs. In reality, its power lies in cleaning and fizzing away greasy buildup, not dissolving a solid, physical blockage.
“The Disposal Is Running, But My Sink Is Still Backed Up. Now What?”
Ah, the classic case of mistaken identity. If your disposal’s blades are spinning freely but the water isn’t going anywhere, the clog isn’t in the disposal at all—it’s further down the line.
The most likely culprit is a blocked P-trap, which is that U-shaped pipe right under your sink. This is where grease, coffee grounds, and food particles love to accumulate and form a stubborn dam. Once you’ve ruled out a jam in the disposal unit, your next step is to get a bucket and clean out that P-trap.
Dealing with a clog that just won’t quit can be incredibly frustrating. If you’ve given these DIY fixes your best shot and are still stuck, the experts at Professional Plumbers Denver are ready to help. We handle everything from stubborn disposals to major plumbing emergencies all over the Denver Metro area. Contact us today for fast, reliable service.

Recent Comments