
When you’re dealing with the frustration of low water pressure, the first instinct is often to grab a wrench. But hold on a second. The most effective troubleshooting starts with a bit of detective work, not brute force.
Before you even think about tools, you need to figure out the scope of the problem. Is it just one sink acting up, or is every faucet in the house dribbling? Is it happening with both hot and cold water? Answering these simple questions is the single fastest way to pinpoint the cause, saving you from a wild goose chase.
Your First Steps in Diagnosing Low Water Pressure
Think of yourself as a plumbing detective for a few minutes. A methodical, no-tools-required check can often get you straight to the root of that weak water flow. The entire goal here is to isolate the issue by observing where and when it happens.
It’s all about patterns. For instance, if only your upstairs shower is weak, the problem is almost certainly at that one fixture. But if your kitchen sink, shower, and even the toilet are all sluggish, you’re looking at a bigger, system-wide issue. This could point to anything from your main water supply line to a problem with the city’s service.
Systematically Check Your Fixtures
Let’s walk through your home and test every spot where water comes out. This isn’t complicated, but the clues you gather are invaluable.
- Sinks (Kitchen & Bath): Go to each one and test the hot and cold taps separately. Is one side weaker than the other, or are they both trickling out?
- Showers & Tubs: How’s the pressure here? Showerheads are notorious for getting clogged with mineral deposits, which is a very common and easy-to-fix problem.
- Toilets: Flush it and listen. Does the tank seem to take forever to refill? That’s a subtle but classic sign of low pressure throughout your whole system.
- Outdoor Faucets: Don’t forget the hose spigots outside. Checking these helps you figure out if the pressure is low before the water even gets distributed through your house.
Key Insight: If you only have low pressure with hot water at every faucet, the problem is almost definitely your water heater. If the issue is confined to a single faucet, the culprit is probably a clogged aerator right at the tip of the spout.
Consider External and Global Factors
Sometimes, the problem isn’t inside your four walls at all. It’s easy to get focused on our own pipes, but our water supply is part of a much larger, and sometimes fragile, system.
Globally, just getting enough water is a massive challenge. Believe it or not, around 1.8 billion people live in areas with absolute water scarcity. This has a direct impact on the ability of utilities to maintain consistent pressure for homes. In regions dealing with water stress, aging infrastructure and high demand can cause pressure drops that affect entire neighborhoods at once.
Thinking about these bigger issues reminds us that a sudden dip in your home’s water pressure could easily be a municipal problem. You can explore more data on global water challenges to see how they connect to local supplies.
Finding and Checking Your Main Water Valves
Sometimes, the simplest explanation is the right one. Before you start worrying about major plumbing problems, it’s worth checking the two main control points for your home’s water supply: the main shutoff valve and the water meter valve.
It’s surprisingly common to find one of these isn’t fully open. Maybe a utility crew was working on the street, or a plumber did a repair and didn’t open the valve all the way back up. It happens more than you’d think. This quick, five-minute check could solve your low pressure problem instantly and save you a service call fee.
Locating Your Shutoff Valves
First things first, you have to find them. Where they are depends on your home’s age, style, and your local climate.
- Your Main Shutoff Valve: This valve is almost always inside your house, right where the main water line comes in from the outside. Good places to look are the basement (often along the front wall), a crawl space, a utility closet, or sometimes near your water heater.
- The Water Meter Valve: This one lives outside, usually in a covered box buried in the ground near the curb or sidewalk. The lid will probably say “Water.” Getting the lid off and turning the valve might require a special tool called a water key.
Once you’ve got eyes on them, you need to know what you’re looking at. There are two main types of valves you’ll encounter.
Pro Tip: A ball valve is easy to identify by its single lever handle. If that handle is parallel with the pipe, it’s wide open. If it’s perpendicular (at a 90-degree angle), it’s shut off. In contrast, a gate valve has a round, wheel-like handle that you turn several times, just like a hose spigot.
How to Tell If a Valve Is Fully Open
With a ball valve, it’s a simple visual check—if the handle lines up with the pipe, you’re good to go.
For a gate valve, it’s a bit more hands-on. Turn the round handle counter-clockwise as far as it will go. Don’t crank on it with all your might, but give it firm turns until it stops. If you discover either valve was partially closed, opening it up completely might bring your water pressure right back to normal.
Taking a moment to rule out this simple issue is a crucial first step. If the valves are wide open and you’re still dealing with a weak flow, you can confidently move on to other possibilities. To get a better grasp of what else could be going on, you can learn more about the various low water pressure causes that can affect a home. This will help you build a complete picture of the problem.
How to Test Your Pressure Reducing Valve
So, you’ve checked all the main valves and they’re wide open, but your shower still feels more like a light drizzle than a refreshing spray. If the low pressure is a whole-house problem, my next suspect is almost always the Pressure Reducing Valve, or PRV.
Think of the PRV as your home’s plumbing bodyguard. This bell-shaped device, usually installed right after your main shutoff valve, takes the super-high pressure from the city water supply—which can easily top 100 PSI—and tames it down to a safe and usable 45–60 PSI. Without it, your pipes and appliances would be under constant strain. But like any hard-working part, a PRV can wear out, get gummed up with sediment, and eventually fail. When that happens, it often gets stuck, restricting water flow and causing that frustratingly weak pressure everywhere.
The Right Tool for the Job
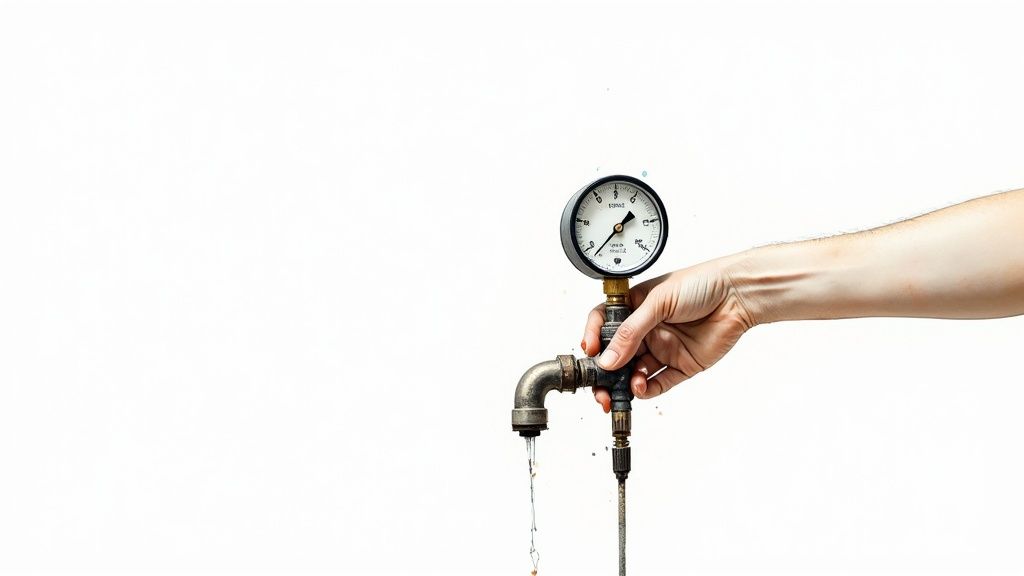
The good news is that you don’t need a truck full of expensive tools to figure this out. All it takes is a simple water pressure gauge. You can grab one at any hardware store for about $10–$15. It’s a small investment that pays off by taking all the guesswork out of the equation.
These gauges come with a standard hose fitting, so you can just screw them right onto an outdoor spigot (what we plumbers often call a hose bib). It gives you a clear, precise reading in Pounds per Square Inch (PSI), so you know exactly what you’re dealing with.
Performing the Pressure Test
Testing the pressure is a piece of cake. This image gives you a quick visual on how to get it done right at your hose spigot.
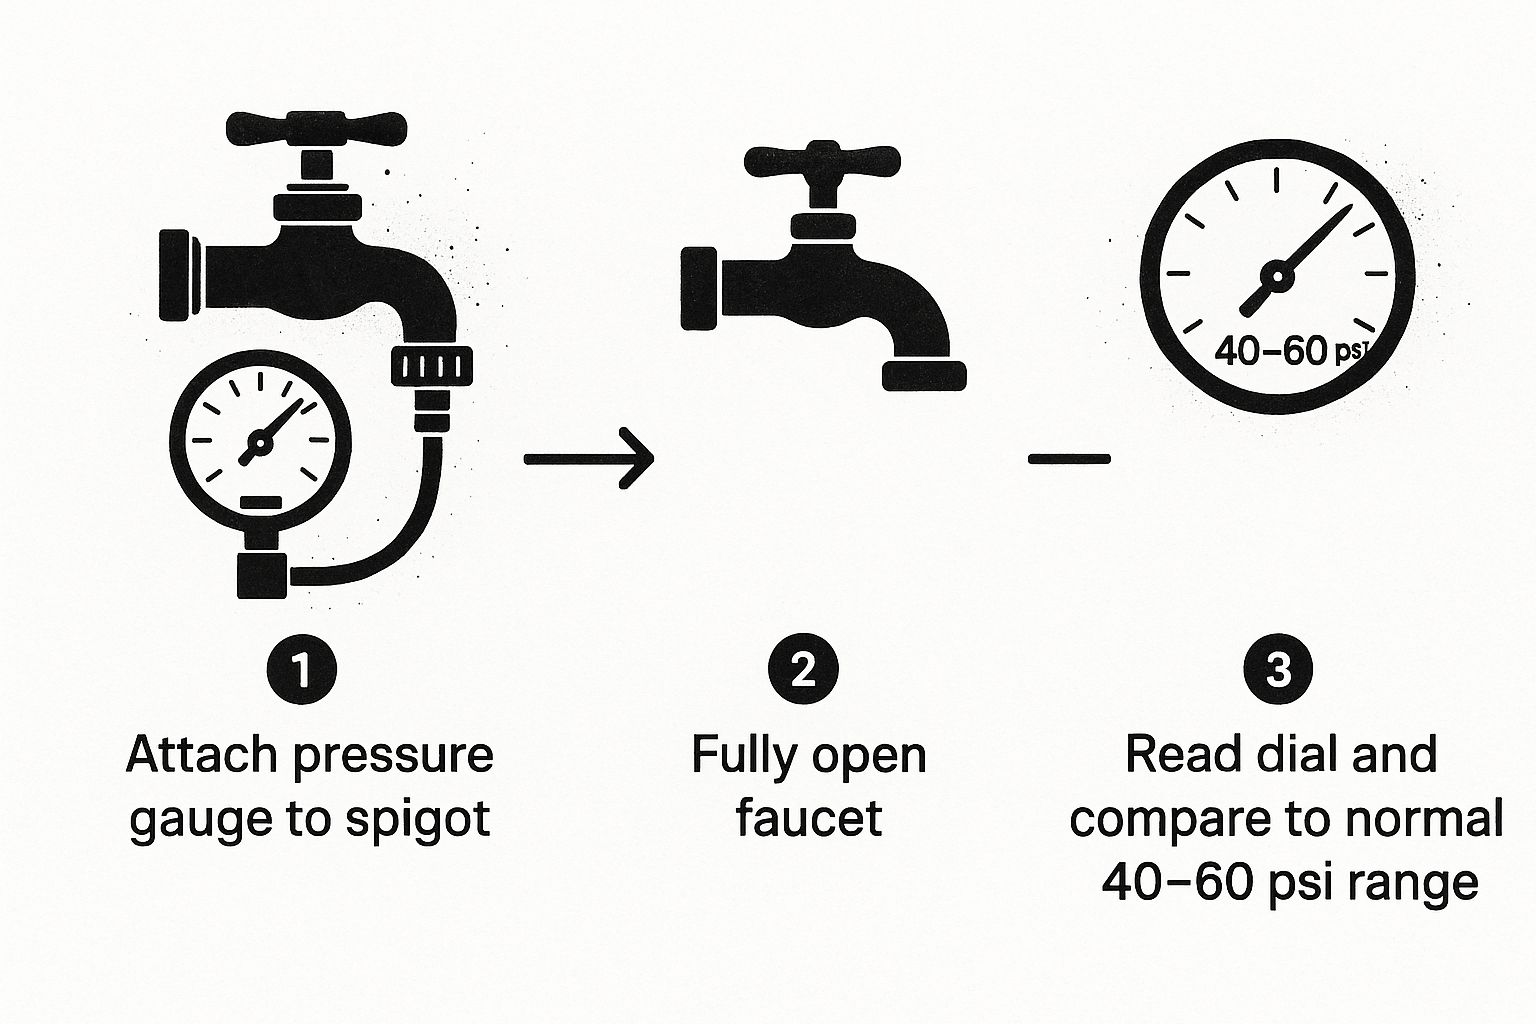
As you can see, you just attach the gauge and turn the faucet all the way on. If that needle is pointing anywhere below 40 PSI, you’ve officially confirmed a low-pressure problem, and the PRV is now your prime suspect.
Pro Tip: Before you start, make sure you’re getting a true “static” pressure reading. That means no other water should be running anywhere. Turn off the washing machine, the dishwasher, the sprinklers, and every single faucet. This ensures you’re measuring the baseline pressure for the whole house.
Adjusting Your Pressure Reducing Valve
If the test shows low pressure, you might be in luck. A quick adjustment could solve the problem. Take a look at the top of your PRV; you should see a threaded bolt held in place by a locknut.
- First, grab a wrench and loosen the locknut by turning it counter-clockwise.
- Next, turn the adjustment bolt clockwise to increase the pressure. Go slow here—a quarter-turn at a time is all you need.
- Once you’ve made a small adjustment, tighten the locknut back up and head outside to re-test the pressure at the hose spigot.
You’ll want to repeat this little dance until your gauge shows a healthy reading somewhere in that sweet spot of 45–60 PSI. Whatever you do, don’t get carried away. Pushing the pressure above 80 PSI can cause serious damage to your plumbing and appliances.
If you’ve turned the screw a few times and the needle on your gauge hasn’t budged, that’s a tell-tale sign. The PRV has likely failed internally and is beyond a simple adjustment. At that point, it’s time to call in a professional to have it replaced.
Clearing Clogged Faucets and Showerheads
If you’ve traced your low water pressure to just one or two fixtures, you can breathe a sigh of relief. That’s actually great news. When a single faucet just sputters or a showerhead delivers a sad, weak spray, the culprit is almost always a simple clog right where the water comes out.
Over time, tiny bits of sediment and mineral scale—especially if you have hard water—can break loose inside your pipes. They travel along with the water until they get caught in the fine mesh screens of your faucet aerators and showerheads. This gunk slowly chokes off the flow. Luckily, the fix is usually quick, easy, and incredibly satisfying.
The Aerator Cleaning Method
Look at the very tip of your sink’s faucet. That small, threaded piece is the aerator. Its job is to mix air into the water, giving you that smooth, splash-free stream. But that fine screen also makes it a perfect trap for debris.
Most of the time, you can just unscrew the aerator by hand. If it’s a bit stubborn from mineral buildup, wrap a cloth or a rubber jar opener around it to get a better grip. This also protects the finish from scratches. For really stuck ones, I’ll use a pair of adjustable pliers, but always with a towel wrapped around the aerator to prevent any damage.
Once it’s off, the process is straightforward:
- Take It Apart: Carefully disassemble the aerator over a small bowl. Keep track of the order of the screen, washer, and housing—it’s easy to get them mixed up.
- Rinse and Scrub: Grab an old toothbrush and gently scrub away any visible grit from each part under some running water.
- Give It a Vinegar Soak: For that chalky, hard-to-remove mineral scale, drop all the components into a small bowl of white vinegar for about 30 minutes. The acid works wonders on calcium and magnesium deposits.
- Final Rinse and Reassembly: After the soak, give everything one last rinse. Put the pieces back together in the correct order, and simply screw the aerator back onto the faucet.
Expert Tip: Before you screw that clean aerator back on, turn the faucet on for a few seconds. This blasts out any debris that was sitting right behind it in the pipe, which keeps it from clogging up again immediately.
Reviving a Weak Showerhead
The exact same idea applies to your showerhead. Most modern showerheads can be unscrewed from the shower arm by hand. If it’s stuck tight, use the same wrapped-pliers trick you used on the faucet aerator.
Once you have it off, look closely at the small holes where the water sprays out. I usually use a paperclip or a pin to poke out any gunk I can see.
For a really deep clean, you’ll want to submerge the entire showerhead in a bowl of white vinegar and just leave it overnight. This will dissolve all the internal scale buildup you can’t even see. In the morning, give it a good scrub with a brush, rinse it out completely, and reinstall it. You will be amazed at the difference. For a single fixture, this is often the only troubleshooting step you’ll need.
Is It Your Water Heater? What to Check When Only the Hot Water Is Low
Have you ever turned on the shower, only to find the hot water trickles out while the cold water blasts? It’s a common frustration, and it almost always points to one culprit: your water heater. When cold water pressure is fine but the hot side is weak, you know the problem is happening somewhere within or right next to that tank.
Sediment: The Enemy of Hot Water Flow
For those with a traditional tank-style water heater, the most likely issue is sediment buildup. Over time, minerals like calcium and magnesium naturally present in the water supply settle out and form a thick layer of sludge at the bottom of the tank. This gunk can eventually get sucked up and clog the hot water outlet pipe, effectively choking off the flow to the rest of your house.
Tankless water heaters aren’t immune, either. They just face a different version of the same problem. Instead of a big tank, they flash-heat water in a small heat exchanger. Mineral scale can build up inside these narrow passages, creating a bottleneck that throttles your hot water pressure.
Quick Water Heater Checks You Can Do Now
Before you jump to conclusions about sediment, there are a couple of simple things to check. Every water heater has its own shut-off valve on the cold water pipe leading into it. It’s possible this valve got partially closed by accident.
- Find the valve on the cold inlet pipe.
- If it has a lever handle, make sure it’s parallel to the pipe (fully open).
- If it has a round, wheel-like handle, turn it all the way counter-clockwise until it stops.
If the valve is wide open and you still suspect a clog, it might be time to flush the tank. This is a standard maintenance task that clears out all that accumulated sediment. It’s a bit of a process, but it can make a world of difference. For a step-by-step walkthrough, check out our guide on essential hot water heater maintenance.
The Sneaky Problem of Hidden Leaks
What if both your hot and cold water pressure have dropped? This often signals a more serious problem—a hidden leak somewhere in your plumbing. Even a tiny, pinhole-sized leak in a pipe tucked away in a wall or buried under your home’s foundation can siphon off enough water to cause a noticeable pressure drop everywhere.
Your water meter is your secret weapon for finding these kinds of leaks. Here’s how to turn it into a leak detector:
First, make absolutely sure every single faucet, shower, and water-using appliance in your house is turned off. No dishwashers running, no toilets filling.
Next, head outside and find your water meter, which is usually in a utility box near the street. Pop the lid and look closely at the dial. You’re searching for a small, often triangular, dial or a digital flow indicator. If that little indicator is moving at all, water is flowing somewhere.
Crucial Takeaway: A moving water meter when everything is turned off is the smoking gun. It’s a clear sign you have a leak, and ignoring it can lead to massive water damage and shockingly high bills.
This kind of pressure loss isn’t just a personal headache; it’s a symptom of larger challenges. By 2022, an estimated 2.4 billion people were living in areas facing extreme water stress, where high demand puts a strain on the entire supply system. You can discover more about how global water stress impacts local supply to see the bigger picture.
When You Should Call a Professional Plumber

Fixing your own low water pressure can be a great feeling, but part of being a smart homeowner is knowing when to hang up the wrench and pick up the phone. Some problems are just too big or too risky for a DIY approach. Recognizing those moments isn’t about giving up; it’s about protecting your home from much bigger headaches.
If you’ve gone through all the usual suspects—your shut-off valves are fully open, the fixture aerators are spotless, and you’ve even tried adjusting the PRV—but your water still just trickles out, it’s probably time for backup. When water pressure stays low no matter what you do, that’s a classic symptom of a deeper problem lurking out of sight.
Red Flags That Demand a Professional
Some plumbing jobs just aren’t worth the risk. The potential for a catastrophic mistake far outweighs any money you might save doing it yourself. If you spot any of these warning signs, your very next move should be to call a licensed plumber.
- You Know There’s a Leak, But Where? Your water meter test screams “leak,” but you can’t see a single drop of water anywhere. This is where the pros shine. They have specialized acoustic listening devices and thermal cameras to find hidden leaks behind walls or under concrete slabs without tearing your house apart.
- You Have Old Galvanized Pipes. If your home was built before the 1960s, there’s a good chance you’re dealing with galvanized steel pipes. Over many decades, these pipes corrode from the inside, slowly choking off the water flow. This isn’t a simple clog to be snaked out; it’s a systemic failure that often means it’s time to repipe part or all of the house.
- The PRV Needs to Be Replaced. Making a slight adjustment to a Pressure Reducing Valve is one thing. But replacing a dead one? That means cutting into your main water supply line. One wrong move, and you’ve got a geyser in your yard or basement. It’s a job that demands expertise and the right tools.
Key Takeaway: A pro doesn’t just show up with a bigger toolbox; they bring years of diagnostic experience. A mystery that could have you scratching your head all weekend can often be solved by an expert in under an hour, saving you a world of frustration and preventing costly water damage.
Thinking About the Bigger Picture
Sometimes, the problem isn’t just inside your home. A good plumber can help you navigate issues with the municipal supply. For instance, climate models predict that by 2050, many areas will face significant water shortages, which can affect the water pressure delivered to your entire neighborhood. You can discover more about the future water crisis and see why having an efficient plumbing system is becoming more critical.
This is where a plumber’s advice becomes invaluable. They can install a water pressure booster system to compensate for low municipal pressure or suggest other upgrades to make your home’s plumbing more resilient. Investing in professional help for the tough stuff and learning about preventative plumbing maintenance is the best way to keep your water flowing strong for years.
Common Questions About Low Water Pressure
Even after you’ve worked through the basics, some low water pressure situations can be real head-scratchers. Let’s dig into some of the questions I hear most often from homeowners who are trying to figure out why their water flow has slowed to a trickle.
“My Water Pressure Just Dropped Out of Nowhere. What’s Going On?”
When your entire house loses pressure all at once, the first thing I always tell people is to look outside your own four walls. Give your next-door neighbor a quick call or text. Are they having the same issue? If so, you can bet it’s a municipal problem—think a water main break down the street or some scheduled maintenance you might have missed a notice about.
If your neighbors’ water is running fine, then the issue is definitely on your property. It could be something simple, like a main shutoff valve that got partially turned by accident. But it could also be something more serious, like a brand-new pipe leak that’s bleeding off all your pressure. Checking with the neighbors first is the fastest way to narrow down your search.
“Could My Water Softener Be the Problem?”
Oh, absolutely. I’ve seen this countless times. A water softener, especially one that’s a bit older or hasn’t been serviced in a while, can act like a dam in your plumbing system. Over the years, the resin bed inside the unit gets gummed up with sediment and minerals, making it harder and harder for water to push through.
The Quick Softener Test
There’s an easy way to check this yourself. Find the bypass valve on your water softener unit. Flip it, and you’ll send water straight past the softener, directly into your home’s pipes. If your water pressure roars back to life, you’ve found your culprit. The unit needs a professional service call or a full replacement.
“How Can I Tell if My Pipes Are Clogged?”
This is a big concern, especially for folks in older homes. If your house was built before the 1960s, there’s a good chance you have galvanized steel pipes. These pipes have a nasty habit of corroding from the inside out over decades. This isn’t your typical hair clog; it’s the actual diameter of the pipe slowly shrinking, which chokes your water pressure over a period of years.
If you’ve noticed your water pressure getting progressively worse over a long time—and it affects the whole house—pipe corrosion is a very likely suspect. This is one of those situations that’s well beyond a DIY fix. You’ll need a plumber to come in, take a look, and probably discuss repiping options.
“So, What’s Considered Good Water Pressure Anyway?”
For most homes, the sweet spot for water pressure is somewhere between 45 and 60 PSI (pounds per square inch). If your pressure gauge is consistently reading below 40 PSI, you’re officially in “low pressure” territory.
On the flip side, be aware that anything over 80 PSI is too high. That kind of force can wreak havoc on your pipes, fixtures, and even your appliances, leading to leaks and premature failure.
When a simple fix isn’t cutting it, it’s time to bring in the pros. Professional Plumbers Denver has the specialized tools and hands-on experience to pinpoint the real cause of your water pressure woes, from hidden leaks to main line clogs. Get your water pressure back to normal by contacting us today.

Recent Comments