
Think of that tankless water heater tucked away in your home as a high-performance engine. It’s not a “set it and forget it” appliance. To keep it running smoothly and efficiently, it needs regular tune-ups, and the most critical part of that tune-up is flushing the system to get rid of mineral buildup.
Doing this consistently is what ensures your unit can deliver that endless hot water you love and actually make it to its expected 20-year lifespan. If you skip it, you’re not just risking a cold shower—you’re looking at higher energy bills and eventually, a total system failure.
Why Regular Maintenance Is Not Optional
The biggest enemy of any tankless water heater is scale. This is just a fancy word for the mineral deposits—mostly calcium and magnesium—that build up inside the unit over time. If you live in an area with hard water, like many parts of Denver, this problem is significantly worse.
These minerals create a stubborn, insulating layer over the heat exchanger. This forces the heater to work much harder and burn more fuel just to get the water to the temperature you’ve set on the thermostat. It’s like trying to run a marathon with weights tied to your ankles; the system is still trying, but it’s wasting a massive amount of energy to do the same job.
The Real Cost of Neglect
Putting off maintenance might feel like you’re saving a little time and money now, but it’s a costly gamble. Studies have shown that significant scale buildup can slash your heater’s efficiency by as much as 8-10%. That’s a direct hit to your monthly utility bills. The good news? An annual system flush can bring that efficiency right back up, protecting your investment and keeping your costs where they should be.
Neglecting your tankless heater doesn’t save you money; it just postpones a much larger expense. A simple annual flush can prevent a premature and costly replacement down the road.
This is why it’s so helpful to understand the importance of preventive maintenance as a general principle. It’s always smarter—and cheaper—to prevent a major breakdown than it is to react to one after it happens.
To give you a clearer picture, here’s a quick breakdown of what’s at stake.
Tankless Maintenance Impact Overview
| Maintenance Task | Benefit of Regular Service | Consequence of Neglect |
|---|---|---|
| System Flushing | Maintains peak energy efficiency and lowers utility bills. | Scale buildup reduces efficiency by 8-10%, leading to higher costs. |
| Heat Exchanger Care | Prevents overheating and ensures a full 20-year lifespan. | Scale causes component stress, leading to premature failure. |
| Filter Cleaning | Ensures consistent water flow and temperature. | Clogged filters cause pressure drops and system errors. |
| Warranty Compliance | Keeps your manufacturer’s warranty valid for repairs. | Voids the warranty, leaving you to pay for expensive repairs. |
Ultimately, a proactive approach to maintenance is a strategic financial decision, not just a chore.
From Chore to Investment
When you start seeing maintenance as an investment, the benefits become crystal clear. It’s not just about avoiding problems; it’s about actively protecting your home and your budget.
- Sustained Energy Efficiency: A clean, scale-free system simply uses less energy. Your utility bills stay low and predictable.
- Extended Lifespan: With proper care, your unit can easily reach or even outlast its projected 20-year service life.
- Reliable Performance: You can count on consistent, uninterrupted hot water without those frustrating temperature fluctuations or sudden shutdowns.
- Warranty Protection: Most manufacturers make regular maintenance a condition of their warranty. Skipping it could mean you’re on the hook for the full cost of a major repair.
Assembling Your Maintenance Toolkit
Before you even think about turning a valve, a successful tankless water heater flush starts with having the right gear. A little prep work now saves you from those frustrating, mid-job runs to the hardware store. Think of this as your pre-flight checklist.
Gathering the right equipment isn’t just about making the job easier—it’s about making it safer and protecting your investment.
Core Flushing Equipment
The most critical part of your toolkit is the flushing setup. These are the non-negotiables for clearing out the gunk and scale that kill your heater’s efficiency.
- Submersible Pump: You’ll want a pump with a flow rate of at least 350 gallons per hour (GPH). Anything less just won’t have the muscle to push the cleaning solution through all the tight passages inside the heat exchanger.
- A 5-Gallon Bucket: This acts as your reservoir, holding the descaling solution while the pump circulates it through the system. Simple, but essential.
- Two High-Quality Hoses: One hose will carry the solution from the pump to the heater’s cold water service port. The other will return the solution from the hot water port back into the bucket, completing the loop. Make sure they have sturdy, reliable fittings.
A quick pro-tip: Don’t skimp on the hoses. I’ve seen cheap ones kink up or have fittings fail mid-flush, and that’s a quick way to make a huge, wet mess. It’s a small detail that makes a world of difference.
The Descaling Solution and Safety Gear
What you use to clean your heater is just as important as the tools you use to do it. For most homes, the best solution is also the simplest and safest.
Your go-to descaler should be food-grade white vinegar. Plan on having about two gallons on hand to mix a 50/50 solution with water. It’s non-toxic, easy to find, and does a fantastic job dissolving mineral deposits without being harsh on the unit’s internal parts.
While you’re working, keep a few old towels and a shallow pan nearby. They’re perfect for catching any drips when you connect and disconnect the hoses. If you flush the unit and still run into problems, it might be a sign of something more serious. It could be worth looking into common tankless water heater issues to see if a bigger problem is at play.
Getting Your Hands Dirty: How to Flush Your System
Alright, let’s roll up our sleeves. Flushing your tankless water heater is hands-down the most important piece of maintenance you can perform. It’s what keeps it running efficiently year after year. Don’t let it intimidate you; the whole process is pretty straightforward once you get the hang of it.
The idea is simple: we’re going to circulate a cleaning solution through the unit’s guts to dissolve all the gunk—mostly mineral scale—that’s built up on the heat exchanger. Think of it as a deep clean for the heart of your water heater.
Prep Work: Safety and a Clean Workspace
Before a single hose gets connected, let’s talk safety. You’re mixing electricity (or gas) and water, so taking a moment to prep the right way isn’t optional.
First things first, kill the power. If you’ve got an electric model, head to your main breaker panel and flip the breaker for the water heater to the “off” position. For gas units, there’s usually an electrical switch nearby that powers the controls—turn that off. A quick glance at the digital display should confirm it’s dark.
Next, you need to cut the water supply to the heater. Find the main shut-off valve on the cold water line feeding the unit and close it completely. This stops any new water from coming in while you’re working.
The image below gives you a great visual of the connections you’ll be making.
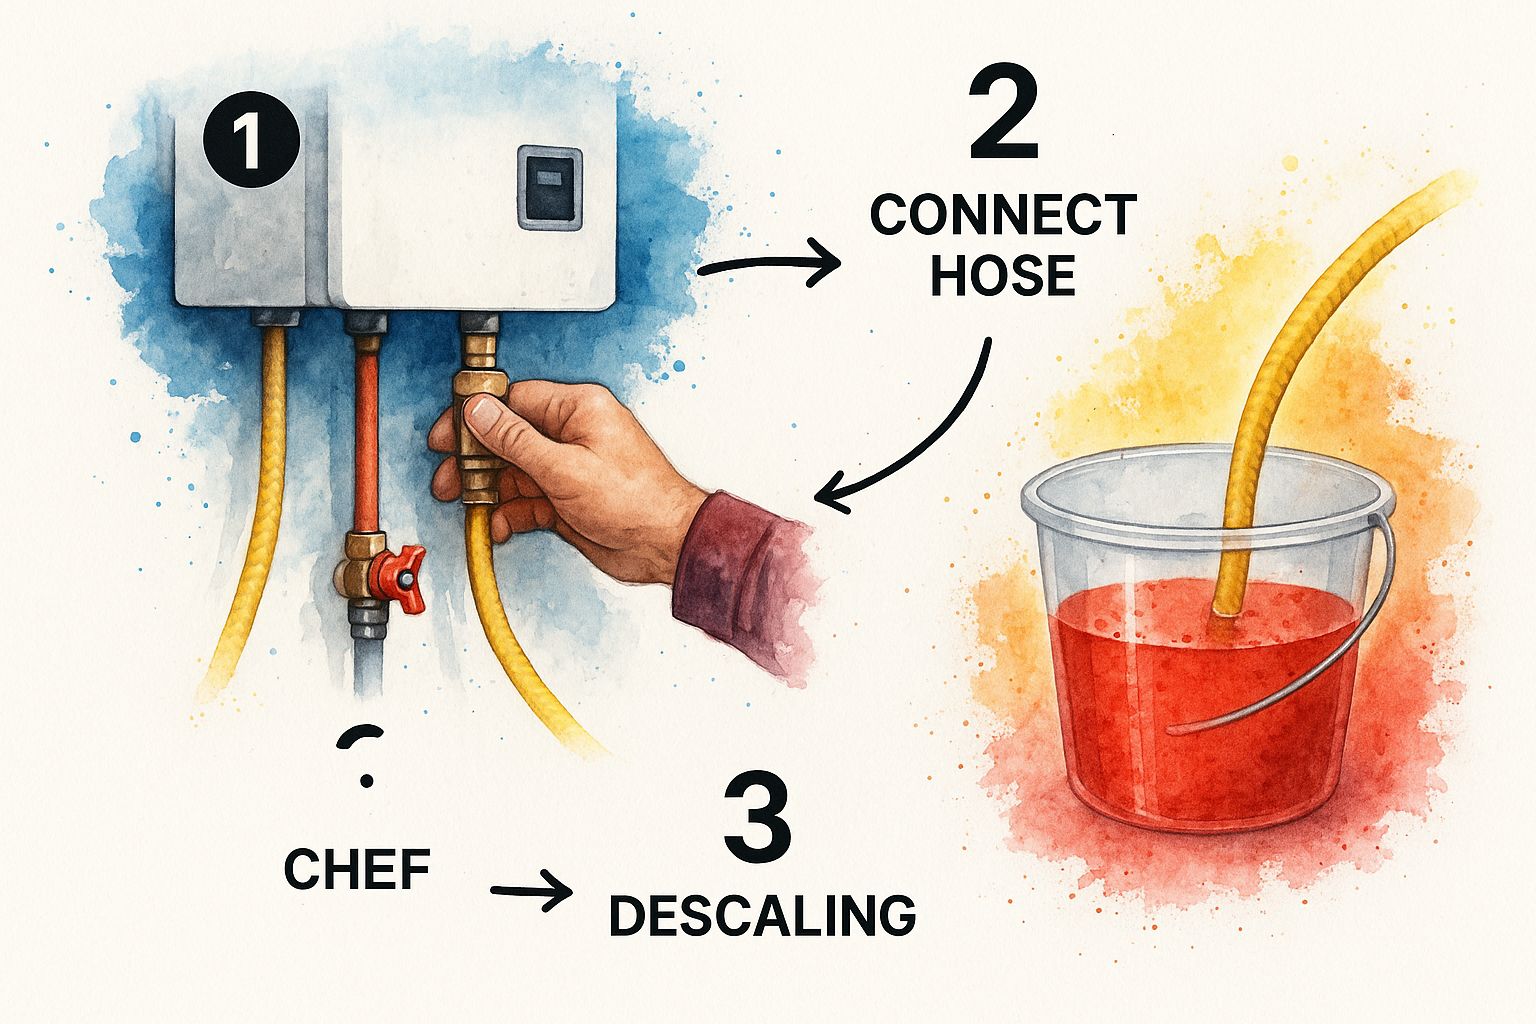
It really clarifies the simple loop you’ll create to get the cleaning solution moving, which helps make sense of the hose connections before you even start.
Making the Connections
With the power off and water isolated, it’s time to hook everything up. Look for two service ports on your isolation valves—one on the cold line, one on the hot. They usually have little T-shaped handles.
Take your first hose and connect it to the cold water service port. The other end goes into your 5-gallon bucket, where it will attach to the outlet on your submersible pump.
Now, grab your second hose and connect it to the hot water service port. Drop the free end of this hose back into the bucket. You’ve just created a closed loop. The pump will push the cleaning solution into the cold side, it’ll travel through the heater, and then exit the hot side right back into your bucket.
For the descaling solution, you don’t need anything fancy. A simple 50/50 mix of plain white vinegar and water works wonders. Pour about a gallon of each into the bucket, making sure your pump is completely submerged.
A Little Pro Tip: When you open the service valve handles, go slow. Open the cold side first, then the hot side. This little trick helps push any trapped air out of the lines and prevents an “airlock,” which can stop the solution from circulating properly.
Let the Descaler Do Its Thing
Once your hoses are tight and the solution is mixed, plug in the pump. You should see the vinegar mix flowing steadily from the hot water hose back into the bucket. Just let it run. You’ll want to give it at least 45 to 60 minutes to work its magic.
So, how long is long enough? It really depends on how hard your water is. If you live in an area with super hard water, letting it circulate for a full 90 minutes might be a good idea to break down stubborn scale deposits. If your water is on the softer side, 45 minutes is usually plenty. Don’t be surprised if you see little white or gray flecks coming out of the return hose—that’s the scale dissolving. It’s a good sign!
It’s interesting to see how this process differs from older tank-style heaters. Those often use a sacrificial part to manage corrosion, and you can learn more about what is an anode rod to understand the contrast in their maintenance needs.
The Final Rinse
After the solution has done its job, unplug the pump. The descaling part is over, but you still need to get all that vinegar and loose sediment out of the heater. This last step is what ensures you get clean water and peak performance when you turn it all back on.
Here’s the sequence to wrap things up:
- Start by closing the hot service port, but leave the cold one open for now.
- Disconnect the hose from the cold port and get the pump out of the bucket.
- Slowly open the main cold water supply valve. This will send fresh water rushing through the heater and out the hot water service hose. Let it run for five to ten minutes to flush everything out. Make sure that hose is pointed into the bucket or a nearby drain.
- Close the cold service port and then shut the main cold water supply valve again.
All that’s left is to disconnect both hoses and screw the caps back on the service ports nice and tight. Fully open both the main cold and hot water valves, then restore power at the breaker. That’s it—you’re done! Your tankless heater has been serviced and is ready to run like new again.
Beyond the Flush: Checking Filters, Vents, and Drains
Flushing your tankless water heater is a big deal, but it’s not the whole story. To keep your system running safely and efficiently, you need to look at a few other key spots. It’s easy to overlook the filters, vents, and drains, but neglecting them can lead to problems that look a lot like a scaled-up unit.
Think of it like car maintenance. You wouldn’t just change the oil and ignore a clogged air filter or a blocked exhaust pipe. A complete check-up ensures every part is doing its job.
Unclogging the Inlet Water Filter
Tucked away on the cold water inlet line is a small screen filter. You might not even know it’s there, but its job is crucial: it’s the first line of defense, catching sediment and debris before they can get inside your heater and cause real damage.
Over time, this little filter gets clogged. When that happens, water flow gets choked off, and you’ll notice a frustrating drop in hot water pressure.
Cleaning it is simple. Just shut off the power and water to the heater. Find the filter—it’s usually a small, thimble-shaped screen right at the cold water connection. Carefully remove it and give it a good rinse under the tap. A soft brush can help with any stubborn bits of gunk.
Keeping Vents Clear for Safety
This is a big one, especially if you have a gas model. Your tankless heater needs to breathe. The intake vent pulls in fresh air for combustion, and the exhaust vent gets rid of dangerous fumes, like carbon monoxide. Blockages are a serious safety hazard.
All this requires is a quick visual inspection. Walk outside and take a look at where your vents terminate. You’re looking for anything that could block airflow:
- Leaves, grass clippings, and twigs
- Bird or rodent nests
- Heavy snow and ice buildup in the winter
A blocked vent can cause your heater to shut down. In a worst-case scenario, it could lead to carbon monoxide leaking into your home.
A quick walk-around to check your vents every couple of months is the easiest and most important safety check you can perform. It takes two minutes, costs nothing, and prevents a major hazard.
Checking the Condensate Drain
If you’ve got a high-efficiency condensing unit, you have one more quick task. These heaters are so efficient they actually create condensation—which is slightly acidic—as a byproduct. A small drain line carries this liquid away safely.
Every now and then, this line can get clogged. Just find the condensate trap, which is usually a small, clear plastic piece at the bottom of the heater. Make sure it looks clean and that the drain line isn’t blocked. This simple check prevents water from backing up, which could shut your heater down or cause a leak.
Setting Up Your Annual Maintenance Plan
The secret to keeping your tankless water heater running smoothly for years isn’t some complicated industry secret—it’s just creating a routine you can actually stick to. A generic “check it once a year” recommendation doesn’t cut it, because the biggest factor by far is the hardness of your local water. That’s what determines how fast a layer of damaging scale builds up inside your unit.
Luckily, finding this out is usually pretty straightforward. A quick online search for your city or county’s “annual water quality report” should give you what you need. Look for a number measured in grains per gallon (GPG). This single number is your North Star for building a smart, personalized maintenance plan.
Tailoring Your Schedule to Water Hardness
Once you have your GPG number, you can stop guessing and start planning. As you’d expect, very hard water means you’ll need to be more diligent, while softer water gives you a bit more breathing room.
Here’s a good rule of thumb I’ve developed over years of servicing these units:
- Soft Water (0-3 GPG): You can often get away with descaling every two, maybe even three years.
- Moderately Hard Water (4-7 GPG): This is the sweet spot for a strict annual descaling schedule. Many suburban areas fall into this category.
- Hard to Very Hard Water (8+ GPG): In this case, you really need to be proactive. Plan on descaling every six to nine months to prevent any serious buildup.
This isn’t just about busywork. I’ve seen firsthand how quickly scale can cripple a system. Utility studies back this up, showing that poorly maintained heaters can lose up to 10% efficiency each year from scale, especially in areas with water hardness over 7 GPG. That efficiency loss shows up directly on your energy bills, wiping out the very savings that make tankless units so appealing.
My Pro Tip: The moment you finish descaling your unit, pull out your phone and set a calendar reminder for the next one. It’s the single best way to turn a good intention into a completed task.
Recommended Maintenance Frequency by Water Hardness
To make it even easier, here’s a quick-reference table. It helps you see at a glance how often you should be flushing your system and performing other key checks based on your local water quality.
| Water Hardness Level (Grains Per Gallon) | Recommended Descaling Frequency | Other Checks (Filter/Vents) |
|---|---|---|
| 0 – 3 (Soft) | Every 2-3 years | Annually |
| 4 – 7 (Moderate) | Annually | Every 6 months |
| 8 – 10 (Hard) | Every 9-12 months | Every 3-4 months |
| 11+ (Very Hard) | Every 6 months | Every 3 months |
Using this as your guide ensures you’re giving your heater the right amount of attention—not too much, not too little—which is the key to maximizing its lifespan and efficiency.
Bundle Your Checks for Efficiency
Your tankless water heater maintenance schedule should be more than just the annual descaling project. The most efficient way to stay on top of things is to bundle a few quick checks into a simple quarterly routine.
Set a reminder on your calendar for the first weekend of every season. When it pops up, just take five minutes to do a quick visual inspection. Check that the air intake and exhaust vents are clear of any debris like leaves, cobwebs, or even birds’ nests. At the same time, give the small inlet water filter a quick clean.
This simple, consistent habit transforms maintenance from a big, dreaded chore into a manageable process that will keep your heater running like new for its entire lifespan.
Common Questions About Tankless Maintenance
Even after going through all the steps, it’s totally normal to have a few questions pop up. Let’s tackle some of the practical concerns that people run into when they’re getting ready to maintain their tankless water heater for the first time.
Can I Use Descaling Solutions Other Than Vinegar?
Absolutely. While plain white vinegar is a great, non-toxic, and easy-to-find option for most DIY jobs, it’s not your only choice. You’ll find several commercial descaling solutions out there that are designed specifically for potable water systems like your heater.
These dedicated products can often get the job done faster, especially if you’re dealing with really heavy scale buildup. But here’s the most important rule: always check your user manual first. Make sure any product you use is approved for your specific model. The last thing you want to do is damage a sensitive component and accidentally void your warranty.
How Do I Know When My Heater Needs Service?
Your tankless heater is actually pretty good at giving you hints when it needs some attention. You just have to know what you’re looking for. The signs are usually subtle at first but get more obvious over time.
It’s probably time for maintenance if you start noticing:
- Hot water pressure at the faucet just isn’t what it used to be.
- The water is taking a lot longer to heat up.
- The temperature fluctuates while you’re in the shower, going from hot to lukewarm and back.
- You hear weird noises coming from the unit, like rumbling, whining, or that high-pitched “kettle” sound.
On top of that, most modern heaters will just tell you directly. They often have built-in diagnostics that will flash an error code or a “maintenance required” light right on the display.
A huge mistake I see homeowners make is ignoring these early warning signs. Trust me, a quick flush when you first notice a problem is way easier and cheaper than dealing with a total system failure caused by months of mineral buildup.
Should I Hire a Professional Instead?
For plenty of homeowners, DIY tankless maintenance is a totally doable and budget-friendly task. But calling in a pro is always a smart move if you’re not comfortable with the process, don’t have the right tools, or just want the peace of mind that comes with an expert set of eyes.
A qualified plumber will do a lot more than just descale the unit. They’ll also inspect the electrical connections, check gas pressures (for gas models), and spot potential issues that are easy to miss. Think of it as a worthwhile investment in your home’s safety and the long-term health of your heater.
Will Skipping Maintenance Void My Warranty?
In many cases, the answer is a hard yes. Most manufacturers require proof of regular maintenance as a condition of their warranty, especially if you live in an area with hard water. If a major part like the heat exchanger fails because of scale, your claim could easily be denied if you can’t show that you followed the recommended service schedule.
There’s a good reason for this—regular care really works. Warranty providers have found that consistent flushing and inspection can cut down on major failure rates by up to 50%. It’s a simple habit that protects the significant investment you made in a tankless unit and ensures you get all the energy-saving benefits it offers. You can learn more about the tankless heater market and its trends to see just how valuable these systems are.
At Professional Plumber Denver, we have the expertise to handle all your tankless water heater maintenance and repair needs. If you want to ensure your system runs perfectly, visit us at https://professional-plumbers-denver.com to schedule a service with our expert Denver plumbers today.

Recent Comments