
That constant hissing or trickling sound is more than just an annoyance; it’s the sound of your money and a critical resource—water—literally going down the drain. A toilet that won’t stop running is one of the most common plumbing headaches homeowners face. But the good news is, you can almost always fix it yourself.
Before you even think about calling a plumber, take the lid off the tank and take a peek inside. More often than not, the problem is a simple, inexpensive part that’s either worn out or just needs a quick adjustment.
What to Check When Your Toilet Won’t Stop Running
Most of the time, the trouble boils down to one of three key components inside the tank. Getting a handle on what each one does is the first step to a quick, successful repair.
- The Flapper: This is the rubber or vinyl seal at the bottom of your tank. When you flush, it lifts up; when it settles back down, it’s supposed to create a watertight seal. Over time, these can warp, crack, or get covered in mineral deposits, allowing water to constantly trickle into the bowl.
- The Float: This part tells the fill valve when the tank is full and it’s time to stop the water. It’s usually either a large ball on an arm or a cup that slides up the fill valve tube. If the float is set too high, the water level will rise above the overflow tube and just keep running.
- The Fill Valve: This is the tall assembly that refills the tank after you flush. Like any mechanical part with seals and moving pieces, it can simply wear out and fail to shut off completely, causing a constant, slow refill cycle.
To make things even easier, here’s a quick way to diagnose the issue based on what you’re seeing and hearing.
Quick Diagnosis for a Running Toilet
Use this table to quickly identify the potential cause of your running toilet based on the symptoms you’re observing.
| Symptom | Likely Cause | Difficulty to Fix | Tools Needed |
|---|---|---|---|
| Constant, quiet trickling sound; water “ripples” in the bowl. | Leaky Flapper | Easy | None (maybe a sponge) |
| Water level is too high, visibly flowing into the overflow tube. | Float is set too high. | Easy | Screwdriver or your hands |
| Toilet refills intermittently on its own (“ghost flushing”). | Slow leak from a worn-out Flapper or Fill Valve seal. | Easy to Moderate | Varies; none to basic hand tools |
| Fill valve won’t shut off, hissing sound even after the tank is full. | Worn-out or faulty Fill Valve. | Moderate | Adjustable wrench, sponge, bucket |
This table should help you narrow down the culprit, but when in doubt, start with the most common offender.
Pinpointing the Problem Quickly
Nine times out of ten, the problem is the flapper. It’s the most common point of failure and, luckily, the easiest to fix. A single leaky toilet can waste an unbelievable 200 gallons of water every single day. That adds up to over 70,000 gallons a year, a staggering amount of waste that has a real impact on your utility bills and the environment. You can learn more about the global importance of water conservation from the World Health Organization’s sanitation fact sheets.
Pro Tip: Not sure if your flapper is the culprit? Add a few drops of food coloring to the tank water. Don’t flush! Just wait 15-20 minutes. If you see any of that color seeping into the toilet bowl, you’ve got a classic leaky flapper on your hands.
This simple test takes just a few minutes and can save you the hassle and expense of replacing parts that are still working just fine.
How to Check and Replace a Toilet Flapper
If your toilet just won’t quit running, the flapper is almost always the first place to look. Think of it as the drain plug for your toilet tank. Over time, this little rubber seal can get old, stiff, or caked with mineral buildup, which stops it from creating a tight seal.
The easiest way to be sure it’s the flapper? The old-school food coloring trick. Just add a few drops into the tank (the back part) and walk away. Don’t flush. If you come back in 15-20 minutes and see colorful water seeping into the bowl, you’ve found your culprit. This quick test can save you from guessing and replacing parts that are perfectly fine.
Swapping Out the Old Flapper
Once you know the flapper is the problem, you’re in for one of the easiest and most satisfying home repairs. Seriously, this is a quick one.
First things first, shut off the water. You’ll find a small valve on the wall or floor behind the toilet—give it a gentle turn clockwise until it stops. Now, flush the toilet to empty the tank. You can use a sponge or an old towel to soak up that last little bit of water at the bottom. The old flapper simply unhooks from two little pegs on the overflow tube and unclips from the chain that connects to the flush handle. Easy peasy.
Take that old flapper with you to the hardware store. It’s tempting to just grab a “universal” one, but toilets come in more shapes and sizes than you’d think. Getting an exact match is your best bet for a leak-free fit.
I can’t tell you how many times people replace a flapper only to have the toilet keep running. The most common mistake is getting one that’s the wrong size for the flush valve opening. It might look right, but if it doesn’t seal perfectly, you’re right back where you started.
The image below gives you a great step-by-step diagnostic to run through before you even pick up a tool.
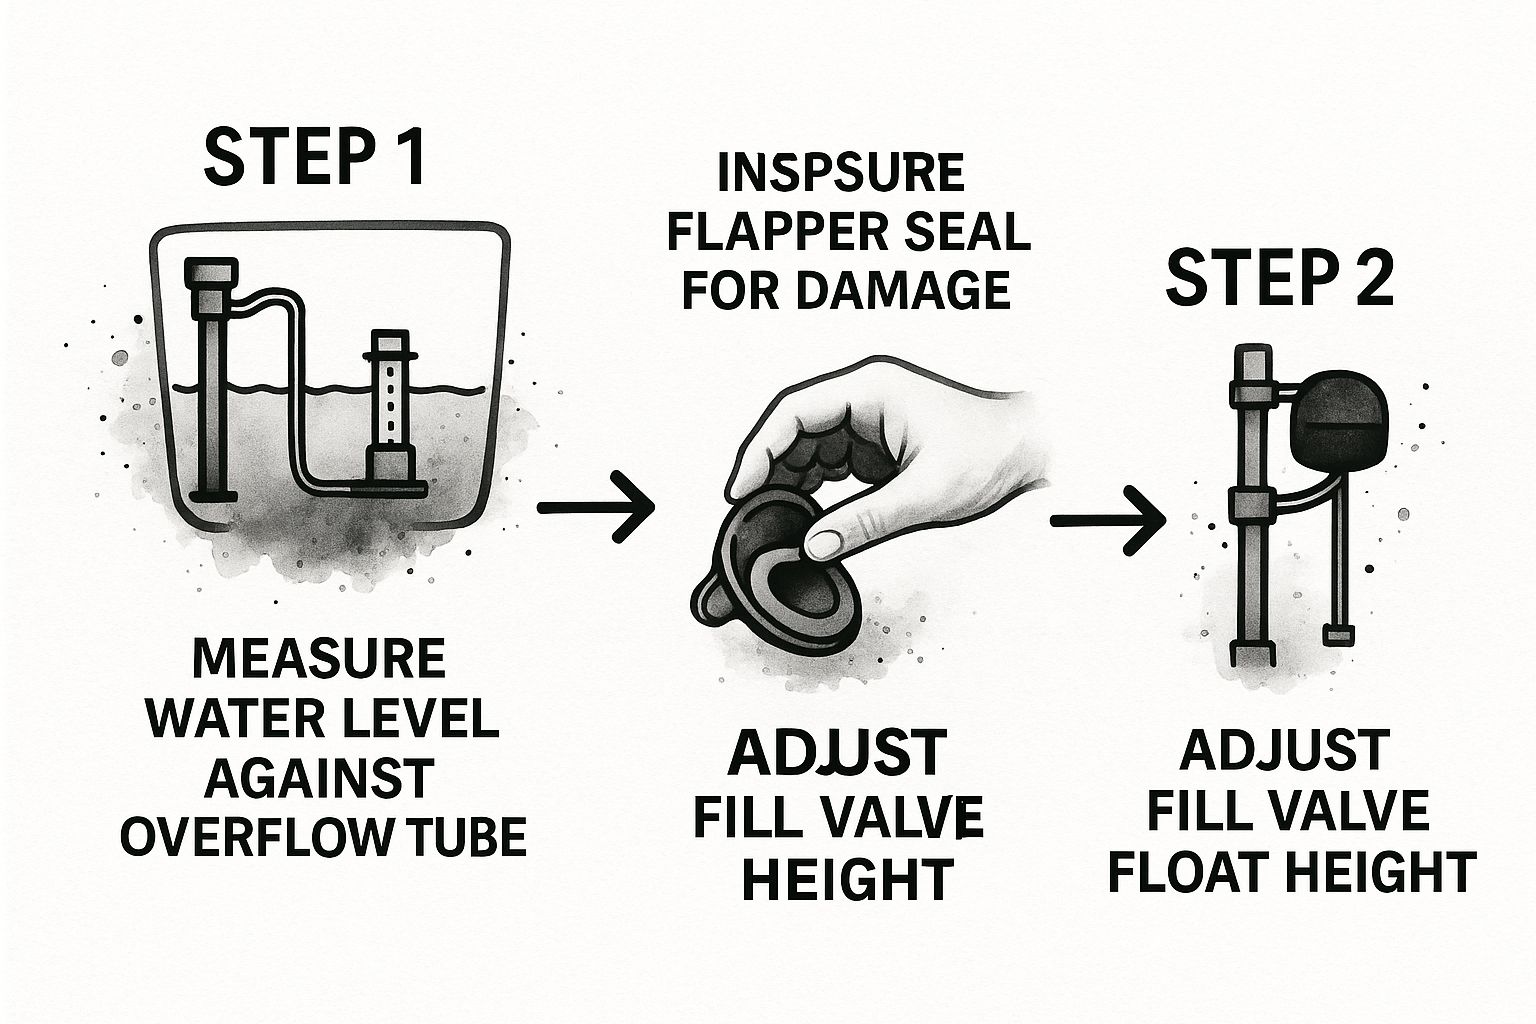
Following a simple checklist like this helps you narrow down the issue without any guesswork.
Installing the new one is just as simple as taking the old one out. Hook the new flapper onto the same pegs on the overflow tube and connect the chain to the flush handle’s arm. If you need a more in-depth look at this or other common toilet troubles, you can find more tips in our guide to fixing a constantly running toilet.
With everything reconnected, turn the water supply back on. Let the tank fill up, give it a test flush, and listen for that beautiful sound of silence once it’s done.
If that dye test didn’t reveal a flapper leak, your next stop is inside the tank to look at the float and the fill valve. These two parts work together to tell your toilet when to stop filling up. When they’re out of whack, you get a toilet that never knows when to quit.
The most common culprit here is a float that’s set too high. If the water level in the tank creeps above the overflow tube, it’ll just keep spilling down that tube forever. This constant overflow tricks the fill valve into thinking the tank is never full, so it just keeps running.
Thankfully, this is usually a quick fix.
Getting the Float Height Just Right
Open up the tank lid and you’ll spot one of two types of floats. The adjustment process is a little different for each.
- Ball Floats: These are the old-school ones—a big, buoyant ball on a long metal arm. To lower the water level, you just need to gently bend that arm downward. Don’t go crazy here; a small bend can make a huge difference. Bend it a bit, let the tank fill, and see where the water stops.
- Cup Floats: Newer toilets typically have a plastic cup or cylinder that moves up and down the fill valve shaft. To adjust it, look for either a long screw or a small clip. Turning the screw or pinching and sliding the clip will raise or lower the float, changing the shut-off point for the water.

The sweet spot is a water level about one inch below the top of the overflow tube. This gives you enough water for a solid flush without any spillage.
What If It’s the Fill Valve?
So, you’ve adjusted the float perfectly, but the toilet is still running. Now it’s time to suspect the fill valve itself. Over time, these valves wear out. You might hear a constant hissing, notice the tank filling up incredibly slowly, or find it just refuses to shut off no matter what the float is doing.
A tell-tale sign of a dying fill valve is “phantom flushing”—when the toilet randomly refills for a few seconds, long after it was last flushed. This happens because the valve’s internal seals are shot, allowing water to slowly seep back into the tank.
Replacing a fill valve is a job most homeowners can tackle with a few basic tools. But if things seem more complicated, like a major leak starts or you’re worried a clog is causing other problems, it’s smart to play it safe. If you think a blockage might be part of the issue, our guide on how to snake a toilet can offer some helpful perspective.
2. Check the Overflow and Refill Tubes
Sometimes, the culprit behind a constantly running toilet isn’t a faulty part at all. The problem can be as simple as a component inside the tank being slightly out of place. More often than not, the issue lies with the relationship between the refill tube and the overflow tube.
First, let’s get our bearings. The overflow tube is that large, rigid pipe usually found in the middle of the tank. Its whole purpose is to act as a safety drain, preventing a messy overflow by sending any excess water down into the bowl. Connected to it, you’ll see a much smaller, flexible hose—that’s the refill tube.
That little tube has a surprisingly important job. After you flush, it sends a stream of water down the overflow tube to refill the bowl to its proper level. If it’s not positioned correctly, you get a toilet that never shuts up.
Is the Refill Tube Siphoning Water?
Here’s a classic mistake I see all the time: the refill tube gets shoved inside the overflow tube instead of being clipped to the top of it.
When the end of that little hose sits below the tank’s water level, it creates a siphoning effect. It constantly sucks water out of the tank and funnels it straight down into the bowl. This, in turn, makes the fill valve run nonstop trying to replace the water that’s being siphoned away.
- The Right Way: The refill tube should always be positioned above the tank’s water line. It needs to be clipped to the top of the overflow tube, aiming water down into it.
- The Easy Fix: If you see the tube stuck down in the pipe, just pull it out. Most modern fill valves come with a small plastic clip designed to attach the hose securely to the rim of the overflow tube.
This is one of those simple fixes that can make you feel like a pro. Just making sure that little tube is clipped to the top of the overflow pipe, not dangling inside it, can solve the problem instantly.
While you’re in there, take a quick glance at the overflow tube itself. It’s not common, but I’ve seen them develop hairline cracks over time. A crack will create a very slow, almost silent leak from the tank into the bowl. If you find any damage on the pipe, the whole flush valve assembly will need to be replaced.
Knowing When to Call a Professional Plumber
Look, most running toilets are a pretty straightforward DIY fix. But every once in a while, you’ll run into a problem that just won’t quit. If you’ve tinkered with the flapper, adjusted the float, and checked the chain—and the toilet still runs—it’s probably time to bring in a pro. A stubborn running toilet often hints at something more complex than a simple part swap.
For instance, that “phantom flush” that wakes you up in the middle of the night? That can be a sign of a worn-out flush valve seat, and fixing that right requires special tools and know-how. And if you ever spot water pooling around the base of your toilet or see even tiny hairline cracks in the porcelain tank, stop immediately. Those are red flags for much bigger problems that can lead to serious water damage if ignored.
The Financial Tipping Point
There also comes a point where it just doesn’t make sense to keep throwing money at an old, inefficient toilet. A constant cycle of repairs can turn into a real money pit. It’s worth remembering that the toilet market is a massive industry, with the United States market alone valued at an estimated USD 3.23 billion per year. A big driver for that growth is the demand for water-saving models that prevent the very leaks you’re battling. You can dig into more details about the toilet market on cognitivemarketresearch.com.
Deciding to replace an old toilet isn’t giving up; it’s a strategic upgrade. The long-term savings on your water bill from a modern, efficient model can often justify the upfront investment, especially if you’re facing another repair bill.
Knowing when to roll up your sleeves and when to pick up the phone is the key. While fixing minor issues yourself is great, it’s just as important to recognize when you’re out of your depth. Being prepared for various common plumbing emergencies is a smart move for any homeowner.
If you’ve hit a wall with your repair attempts or you suspect there’s a bigger issue at play, don’t hesitate. You can learn more about why hiring a professional plumber in Denver is important right here on our blog. A professional can diagnose the root cause quickly and correctly, preventing a small annoyance from turning into a full-blown disaster.
Common Questions About Fixing a Running Toilet
Even after a seemingly successful repair, you might still be scratching your head over a few things. Let’s tackle some of the most common questions that pop up when you’re dealing with a toilet that just won’t quit.
How Much Does It Cost to Fix a Running Toilet?
The good news? Most of the time, this is a really cheap fix. If you just need to swap out a bad flapper or tweak the float, you can get the job done yourself for less than $20. You can grab a new flapper or even a full fill valve kit at any home improvement store without breaking the bank.
But what if you’ve tried the basics and the water is still running? That’s when you might need to call in a pro. A plumber’s visit can run anywhere from $75 to $250, depending on what they find and where you live. This usually happens when you’re dealing with a trickier problem, like a corroded flush valve seat or a cracked flush valve that needs a full replacement.
What’s the Difference Between a Fill Valve and a Flush Valve?
It’s really easy to mix these two up, but they do completely different jobs. They’re the two main players inside your toilet tank.
- The Fill Valve: This is that tall tower, usually on the left side of the tank. Its whole purpose is to refill the tank with fresh water after you flush. The float arm or cup is attached to it, telling it when to stop filling.
- The Flush Valve: This is the big assembly right in the middle. It includes the overflow tube (that tall pipe) and the flapper, which sits on the valve seat at the bottom. This is what lets all the water rush into the bowl when you hit the handle.
Here’s a simple way I remember it: The fill valve fills the tank, and the flush valve lets you flush the toilet. Getting them straight makes buying parts a lot easier and helps you sound like you know what you’re talking about if you have to call for backup.
What if the Toilet Still Runs After Replacing Parts?
This is the moment that makes you want to pull your hair out, but don’t give up. If you’ve put in a new flapper and a new fill valve and you’re still hearing that phantom running water, it’s time to dig a little deeper.
First, take another look at that small refill tube. It should be clipped neatly onto the side of the overflow tube, not just stuffed down inside it. If it’s too far down, it can create a siphon that constantly drains water from the tank.
Next, run your finger around the flush valve seat—that’s the plastic or brass ring the flapper seals against. Feel for any rough spots, nicks, or mineral buildup. Even a tiny imperfection can be enough to break the seal and cause a slow, silent leak.
If you’ve gone through all the steps and that toilet is still running, don’t let it keep adding to your water bill. The team at Professional Plumbers Denver has seen it all and can pinpoint the problem in no time. We offer expert diagnostic and repair services across the Denver Metro area. Contact us 24/7 for a fast, reliable solution.

Recent Comments